I recently spent a week teaching and selling silk at Gulf Wars, a weeklong SCA event, and ended up talking with a nice young lady about the inkle loom she’d bought; she was trying to figure out how to warp it and how to measure the heddles. Coincidentally that’s when I was reminded that a lot of inkle loom makers are not inkle loom weavers. So what follows is a discussion of what I look for in an inkle loom, design wise. (I’m also looking for good construction: pegs and base that aren’t too thin so that it doesn’t bend under tension, construction that’s solid and can withstand occasional drops, etc.)
And yes; I use coloured strings to keep track of what I’m measuring; always check the heddle loop lengths; it’s tempting to assume that it is always the length between the top and heddle pegs, but depending on the loom design this can be quite wrong.
The Four Peg Weaving Area
The four pegs that control the weaving area are the front, top, back, and heddle pegs. Other pegs will be arranged around them, because a pegged inkle loom is warped in a circular warp fashion. These four pegs should not be mobile in any way.
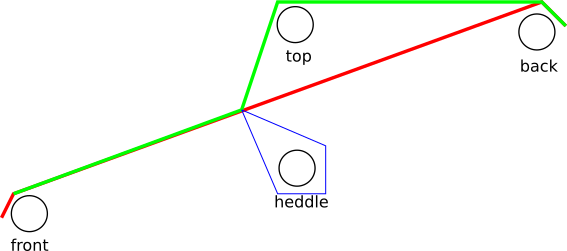
An inkle loom is usually warped with threads following alternating paths – the red path is the “Open” path, which is not controlled by a heddle, and the green path is the “Heddled” path, which has a sharp corner created by the blue heddle. The size of the shed is controlled by the red path, which is moved up or down to create the two possible sheds.
When I start using a new inkle loom, the first thing I do is warp the loom with two loops, one following the open path, the other the heddled path, so that I can measure the length of the heddles, and so that I can check the position of the pegs for weaving. (Sometimes after this check, I decide to use a different peg as the heddle peg.)
Things to look for in the Four Peg Weaving Area
The (red) open path is the one that shifts up and down to create the shed; ideally the green heddled threads stay immobile. As such, I need enough room for the red threads to lift above, and press down below, the green thread. The sheds are created by lifting up/pressing down the red area not covered by the green thread. If the shed is very small, I will need to compensate for that in the weaving, by using a slimmer shuttle or – if possible – choosing a different peg as the heddle peg.
Be careful when checking warping paths, by the way; the warp cannot go around the heddle peg; you wouldn’t be able to advance the band once the woven area reached the heddles.
How to Measure the Length of the Heddles
I like to use double-length heddles; these are loops that sit on the heddledle peg, fold around the warp string, and then back on the heddle peg. That allows you to add heddles easily while warping. When I’m measuring I also tend to colour code my string, so in this case I want to measure a blue (heddle) string long enough to fold the green string down to match the red string, as per the figure above.
Once you’ve got an open and a heddled warp string on the loom, to measure the length of the heddle, start with the blue string above the green. Go down on one side of the green string, around the heddle peg and back up, then do the same on the other side of the green string. Cut, leaving yourself a generous tail, and then carefully tie a square knot so that the green warp string follows the correct path. (For a singled heddle, just go down to the heddle peg once, but now you have to make sure the loop goes around the warp string.)
Once you’ve got a heddle loop cut and knotted to size, you can experiment with the various pegs on the loom to see which two pegs can be used to create a loop of the same size. Use those two pegs to create your heddle loops for the weaving project.
The Tension Bar
The tension bar should not be one of the four pegs that control the weaving area; the tension bar is the movable peg that allows you to shift the band around the loom by releasing the tension, and then tighten everything back into place. If the tension peg is also the front peg, the weaving area will change as you weave, which means the shed created by the heddle loops will change over time.
Having a tension peg near the front usually makes weaving easier since you can adjust it while weaving without having to shift the loom around; it just shouldn’t be the front peg.
Enjoy your weaving …
Now that you have the heddle loops knotted, you can go ahead and warp, alternating open and heddled strings as per the usual inkle weaving.