There’s something about John Masefield’s “Sea Fever” that is very … adaptable. I’ve been inspired by his poem before to write about weaving in the Fever post. But today I realized I hadn’t made a sprang pouch in 2 days, and was feeling the pangs of withdrawal … and this happened.
Sprang Fever

I must go back to the sprang again, to the lonely warp and the frame,
And all I ask is a pattern and a safety rope to tame,
And the yarns' twist, as the colours' travel, all interlinking,
And the twining slides on the fabric's face, and the small dots blinking.

I must go back to the sprang again for the call of the intertwined
Is a wild call and a clear that cannot be left behind.
And all I ask is a clear warp with the colours alternating,
And the twined slide and the sudden turn and the midpoint waiting ...

I must go back to the sprang again, to the stretchy warp of yore
To the pouch sewn and the hair net that was worn in the far before.
And all I ask is a merry yarn dyed the cheerful colours adored,
And a pile of pouches stacking high to form a loving hoard.
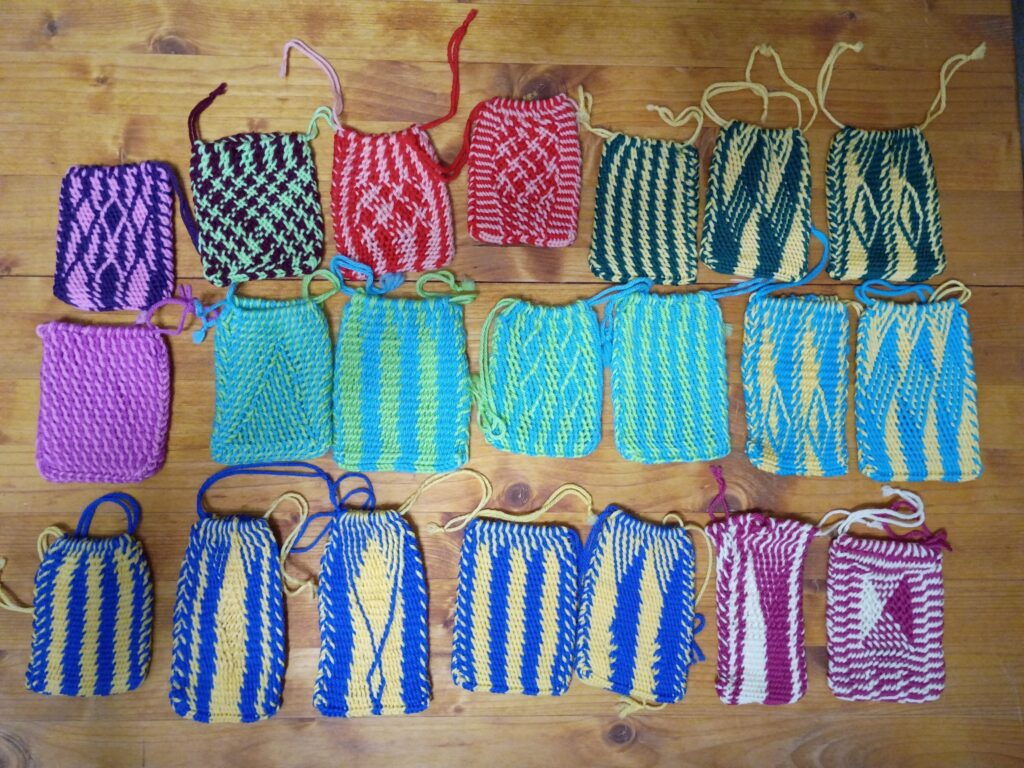
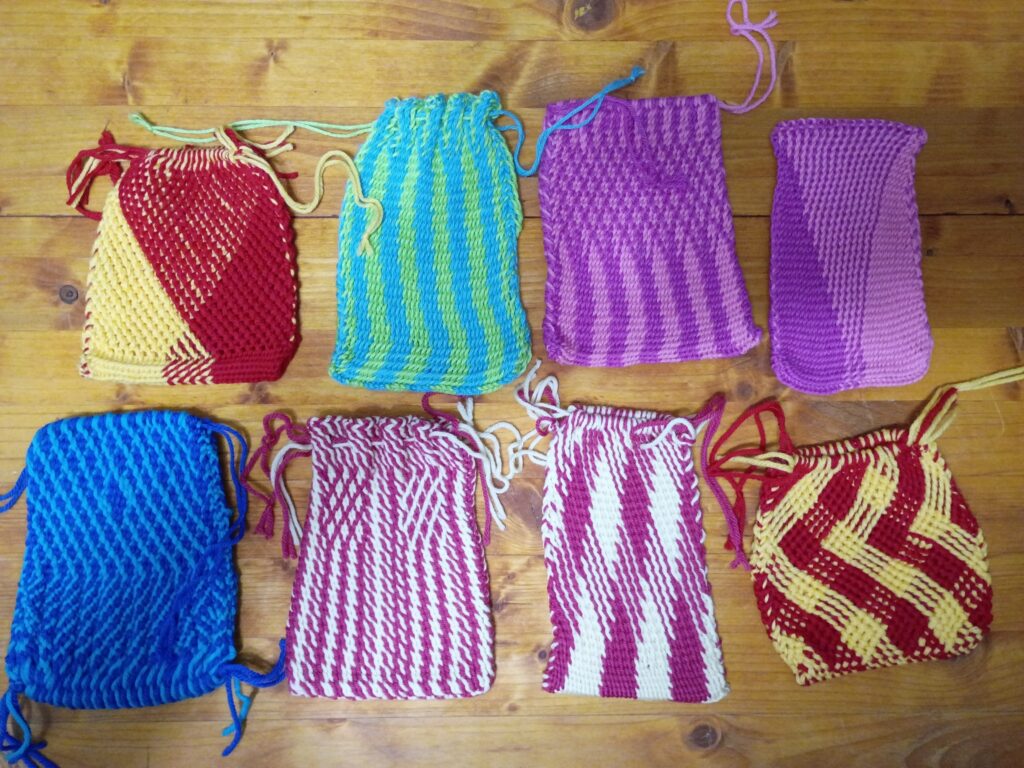
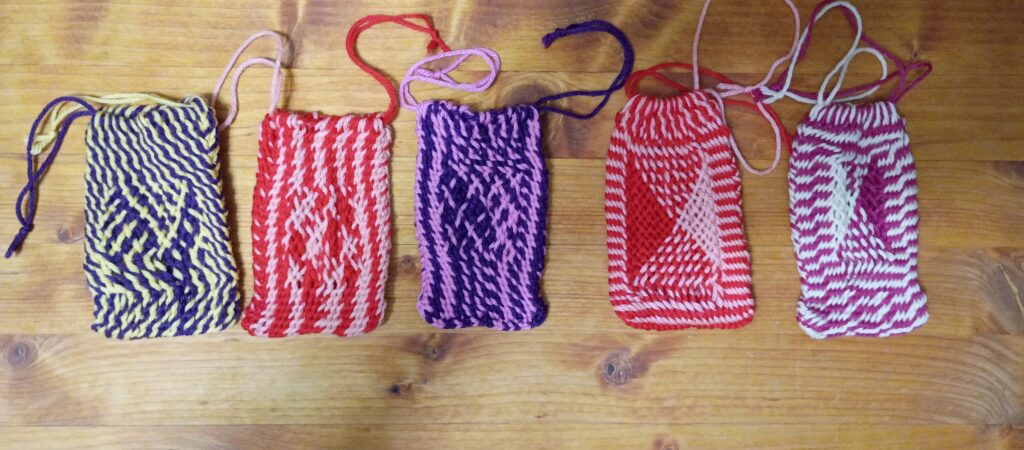
I had a little hoard of pouches; they’ve traveled to White Wolf and Phoenix in search of new homes. I have, of course, immediately started the new collection, but these are the ones on the road.
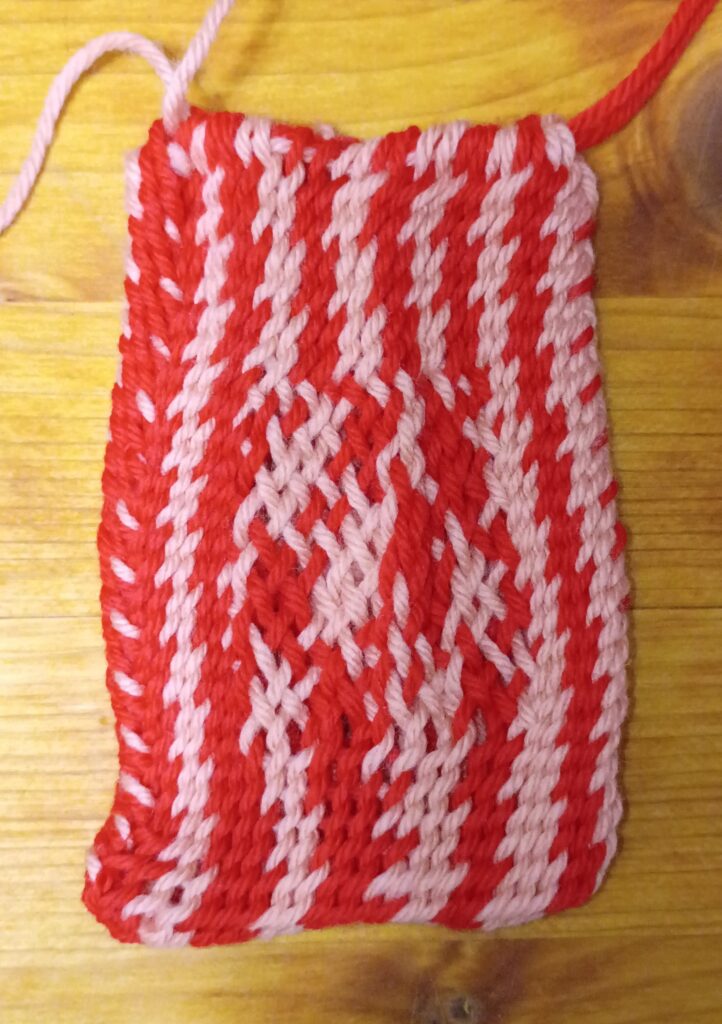
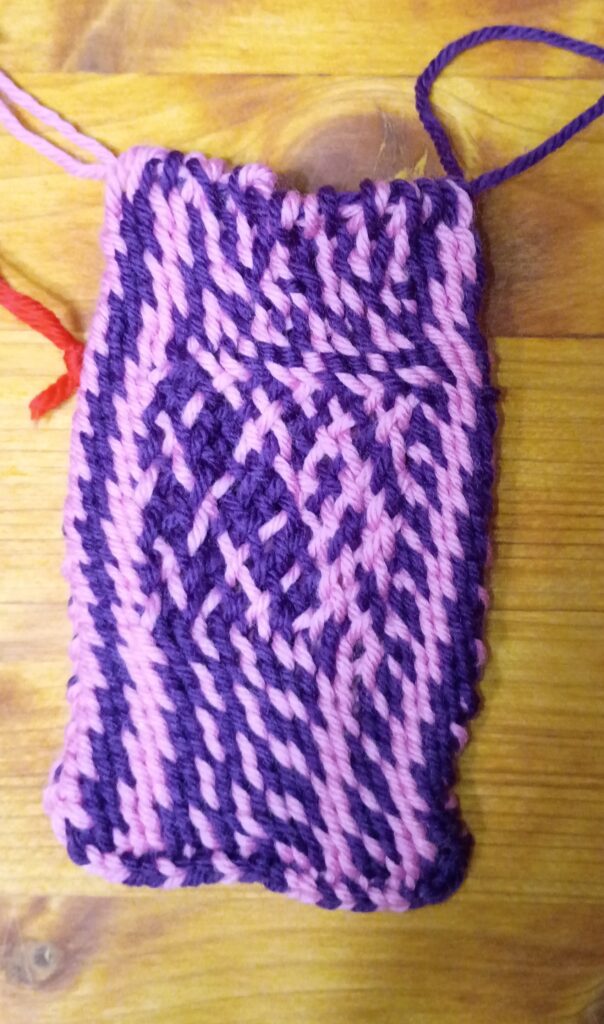
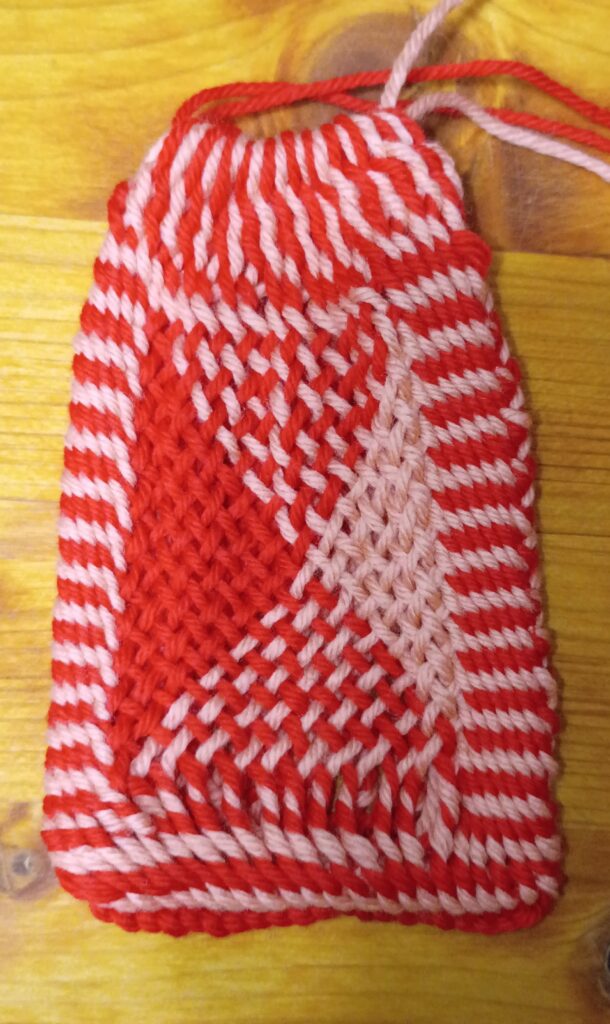
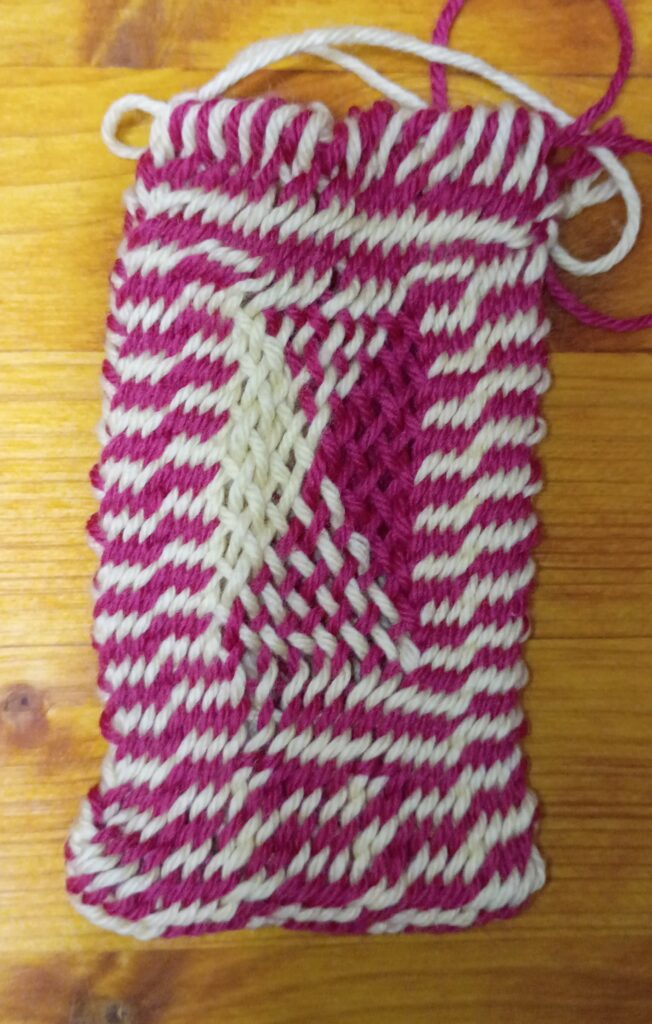
So as I described in the previous post, I’ve been working on blending regular interlinked and interlaced sprang. The first picture below shows the progress I made in chronological order, left to right, and then below that I’m going to discuss each pouch in greater detail. All five pouches were warped with 24 loops, alternating between two colours.
The first pouch where I tried to follow the pattern described in the previous post, where the interlinking started out as z-twist. After years of spranging in s-twist, this was more complicated than expected. The sprang is very loose, and for the bottom few rows I switched back to s-twist. Also, looked nothing like what I expected.
So I changed the startup position for the interlacing from AABB to AAAABBBB. This looked less busy, but there were still tension issues, and moreover, the diagonal stripes were 4 threads wide.
Which led to the next design, where the interlacing was arranged with repeated AAABBB; so that one colour had two adjacent threads on the front, and the other on the back. And the interlacing panel looked nothing like what I’d expected. It was at this point that I finally (belatedly?) realized that the threads that started on the back would slide to the left, an the ones starting on front would slide to the right, so that AAABBB did not produce thinner diagonals, but instead unbalanced diagonals. Back to the drawing board.
For a complete change in setup, when warping the loops were still alternating colour, but after the first two rows to set the sprang, extra twists were added so that all the front threads were one colour, and the back threads the other colour. This finally created the look I was trying for, inspired by Collingwood. I also beat the individual rows a lot harder, switching from a safety string to 4 skewers; two high and two low, left inserted in the previous two rows. After every row, the oldest skewer was extracted, then placed in the new shed, and a lot of pressure was applied because interlacing is naturally much looser than interlinking. Everything went swimmingly until I switched back to interlinking, where I accidentally repeated one row instead of switching between braid and overplait. A mistake I didn’t catch until I’d sewn the pouch together. Oops.
For the last pouch, I changed the width of the interlaced panel so that it was only 8 loops wide, instead of 12, which also meant the interlaced pattern didn’t run as many rows, leaving me with some extra space to place with colour changes near the bottom of the pouch.
The nice thing about churning out a set of five small pouches with variations is that it makes it easier both to understand what I’m doing, and to modify and improve, without necessarily undoing and starting over many times. And now we go on experimenting with other patterns, more colour combos, etc.
So lately I’ve been futzing with sprang. Mostly, just doing the simple designs that I use when teaching; warp is two colour, warped alternating colour, and intertwining can move coloured yarn from side to side to make vertical stripes or diamonds or what have you.
But then I started dreaming about more complex patterns.
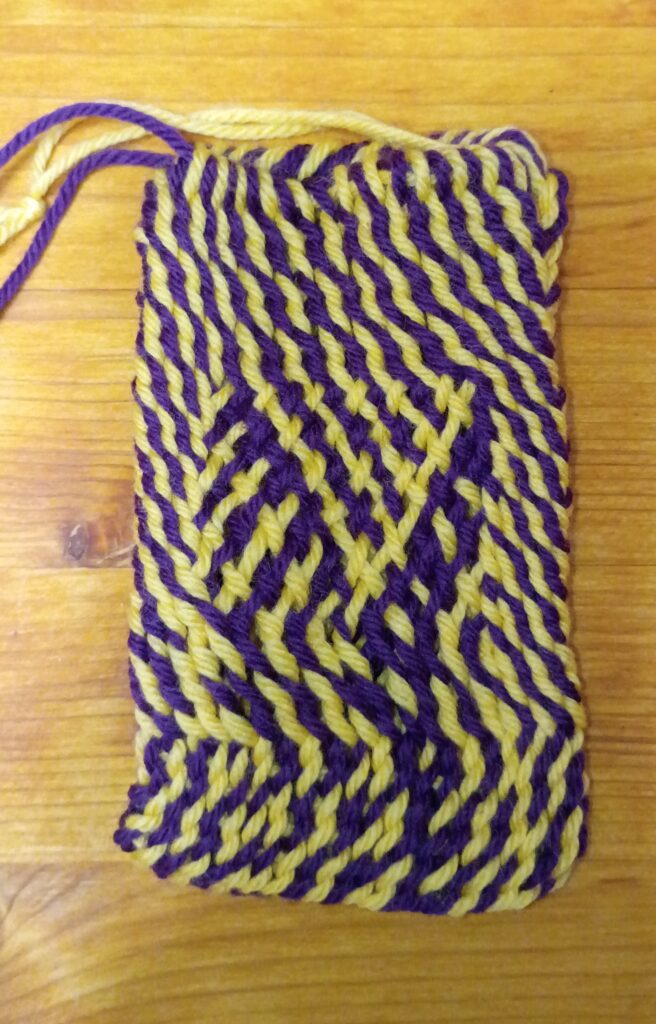
And then I dug out a copy of Collingwood’s 1974 “Techniques of Sprang”. Collingwood’s writing is very dense, and moreover, what he’s written is a compendium of techniques. There are no “projects” included to try out, and the information density of each page is high. So there are two things I want to try eventually: one is doublecloth, where the bicoloured sprang separates into two layers, and by switching threads between layers you can switch colours, and the other is to combine interlacing and regular 1/1 interlinking.
And today’s dream is all about a piece of sprang where the borders are all 1/1 interlinking, but in the center there are 1 or more rectangles of 1/1 interlacing. The first attempts will be small, so will be turned into little pouches, and we will see where it goes from there. The notes I’m writing here are primarily to help myself remember what Collingwood is talking about as I combine information from Chapter 5 (basic 1/1 interlinking, p 68-73) and Chapter 7 (Interlacing p 184-187, 197).
Notation (and translations into what I do)
When I teach, we start with the simple s-twist version where threads start on the left hand, and we always push the next one thread (or two threads on the right edge) to the back before picking up the back. In Collingwood’s notation this is written as “B\F“. The alternate is z-twist, where the back thread is picked up first and then the front thread is pushed to the back. This is written as “B/F“. The key point is the direction of the diagonal: the thread that moves first is the one closest to the bottom of the diagonal.
Notation (spaces added for easier readability)
Translation
B / F
pull back up, push front down
B \ F
push front down, pull back up
B / 2F <- (B / F) <- 2B / F
plait row (z-twist)
<- (B / F) <-
overplait row (z-twist)
B \ B <- (F \ B) <- F \ F
overplait row (s-twist, interlacing)
Translation Table for Notation
Row instructions are typically read from right to left, as the threads all start on the left hand, are manipulated by the right hand, and end up on the right hand. Combinations in brackets are repeated multiple times across the project.
The plait and overplait row are alternated; it’s just that when I teach the two rows I use the S-twist variant. I’ve leaving the Z-twist version in the translation table because that’s what Collingwood uses.
1/1 Interlacing
1/1 interlacing alternates the usual z-twisted plait row followed by a row of S-twist interlinking, with special moves at the selvages. The F \ F and B \ B are special moves. For F \ F work with two front threads, rather than a front and a back thread, and the left front thread is pulled over the right front thread and pushed to the back. Similarly for B \ B, work with two back threads; again the left thread is pulled across the right back thread and pushed to the back, while the back thread that’s been crossed over (originally the right back thread) s pulled to the front. In Collingwood’s notation he uses (F \ B) for the repeated step in the middle, but that’s primarily because a normal plait row would begin with a B \ 2F, and so that back thread still has to be deal with, throwing off the tempo, as it were. So the over plait row could also be written as B \ B <- (B / F) <- F \ F, but that looks as though you’re dealing with 3 front threads in the beginning, when you’re not.
Combining interlinking and interlacing
Here’s where the magic begins … or here’s where I have been rereading this section since last night, and now I’m writing stuff down just so it will hopefully stick. The project will consist of two types of areas: interlinking all the way across, created by alternating standard plait and overplait rows, and rectangles of interlacing centered in the interlinking.
For a first project, assume 24 loops, 12 each of a dark and light colour. The rectangle in the center will be 12 loops wide, with 6 loops on each side, and will be 6 rows high, with 6 rows of plain interlinking above and below.
Pattern:
Repeat
Rows
Description
3
B / 2F <- (B / F) <- 2B / F <- (B / F) <-
plait row. overplait row
3
B / 2F <- (B / F) <- 2B / F <- (6 B / F) <- B \ B <- (10 F \ B) <- F \ F <- (6 B / F)
plait row overplait row with interlacing in the center (interlacing in bold)
3
B / 2F <- (B / F) <- 2B / F <- (B / F) <-
plait row. overplait row
Basically the special row is the overplait row in the interlacing; there for the 24 loops, the first 6 are pull back, push front, then on two front threads push the left thread over the right thread and to the back, next 10 loops are push front, pull back, then on two back threads push the left thread over the right and down, pulling the other back thread up, followed by 6 more pull back, push front. (edited to fix typos)
And now all I have to do is finish the current sample on the loom, where I was trying 2/2 interlacing, and then warp this up and see how it goes. So pictures will have to wait …
Meanwhile, just browsing through the picture plates in his book has me pondering more intertwining approaches, and I still want to teach myself double cloth.
A brief discussion of what I’m looking for when setting up an inkle loom, as far as crucial peg locations go.
I recently spent a week teaching and selling silk at Gulf Wars, a weeklong SCA event, and ended up talking with a nice young lady about the inkle loom she’d bought; she was trying to figure out how to warp it and how to measure the heddles. Coincidentally that’s when I was reminded that a lot of inkle loom makers are not inkle loom weavers. So what follows is a discussion of what I look for in an inkle loom, design wise. (I’m also looking for good construction: pegs and base that aren’t too thin so that it doesn’t bend under tension, construction that’s solid and can withstand occasional drops, etc.)
And yes; I use coloured strings to keep track of what I’m measuring; always check the heddle loop lengths; it’s tempting to assume that it is always the length between the top and heddle pegs, but depending on the loom design this can be quite wrong.
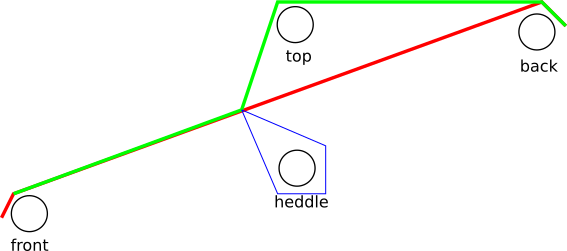
The Four Peg Weaving Area
The four pegs that control the weaving area are the front, top, back, and heddle pegs. Other pegs will be arranged around them, because a pegged inkle loom is warped in a circular warp fashion. These four pegs should not be mobile in any way.
An inkle loom is usually warped with threads following alternating paths – the red path is the “Open” path, which is not controlled by a heddle, and the green path is the “Heddled” path, which has a sharp corner created by the blue heddle. The size of the shed is controlled by the red path, which is moved up or down to create the two possible sheds.
When I start using a new inkle loom, the first thing I do is warp the loom with two loops, one following the open path, the other the heddled path, so that I can measure the length of the heddles, and so that I can check the position of the pegs for weaving. (Sometimes after this check, I decide to use a different peg as the heddle peg.)
Things to look for in the Four Peg Weaving Area
The (red) open path is the one that shifts up and down to create the shed; ideally the green heddled threads stay immobile. As such, I need enough room for the red threads to lift above, and press down below, the green thread. The sheds are created by lifting up/pressing down the red area not covered by the green thread. If the shed is very small, I will need to compensate for that in the weaving, by using a slimmer shuttle or – if possible – choosing a different peg as the heddle peg.
Be careful when checking warping paths, by the way; the warp cannot go around the heddle peg; you wouldn’t be able to advance the band once the woven area reached the heddles.
How to Measure the Length of the Heddles
I like to use double-length heddles; these are loops that sit on the heddledle peg, fold around the warp string, and then back on the heddle peg. That allows you to add heddles easily while warping. When I’m measuring I also tend to colour code my string, so in this case I want to measure a blue (heddle) string long enough to fold the green string down to match the red string, as per the figure above.
Once you’ve got an open and a heddled warp string on the loom, to measure the length of the heddle, start with the blue string above the green. Go down on one side of the green string, around the heddle peg and back up, then do the same on the other side of the green string. Cut, leaving yourself a generous tail, and then carefully tie a square knot so that the green warp string follows the correct path. (For a singled heddle, just go down to the heddle peg once, but now you have to make sure the loop goes around the warp string.)
Once you’ve got a heddle loop cut and knotted to size, you can experiment with the various pegs on the loom to see which two pegs can be used to create a loop of the same size. Use those two pegs to create your heddle loops for the weaving project.
The Tension Bar
The tension bar should not be one of the four pegs that control the weaving area; the tension bar is the movable peg that allows you to shift the band around the loom by releasing the tension, and then tighten everything back into place. If the tension peg is also the front peg, the weaving area will change as you weave, which means the shed created by the heddle loops will change over time.
Having a tension peg near the front usually makes weaving easier since you can adjust it while weaving without having to shift the loom around; it just shouldn’t be the front peg.
Enjoy your weaving …
Now that you have the heddle loops knotted, you can go ahead and warp, alternating open and heddled strings as per the usual inkle weaving.
I must go back to the loom again, to the lonely warp bereft,
And all I ask is the pattern sweet, and a shuttle holding weft.
And the harness’ rise, and the shuttle’s clack, and the weft’s waves flying
And the reed’s pull on the fabric, and the waves straightened lying.
I’ve always been fond of John Masefield’s “Sea Fever”.
So this happened today. Just needs a name, really, since “Weave Fever” doesn’t work and “Loom Fever” is also wrong on some level> And this is also a reminder to myself to start posting again, dangit.
I must go back to the loom again, to the lonely warp bereft, And all I ask is the pattern sweet, and a shuttle holding weft. And the harness’ rise, and the shuttle’s clack, and the weft’s waves flying And the reed’s pull on the fabric, and the waves straightened lying.
I must go back to the loom again, for the call of the warp I’ve tied Is a wild call, and a clear call, that may not be denied; And all I ask is a cosy day, with the sunlight glowing, And the shuttle’s throw and the treadle’s rise and the weaving flowing.
I must go back to the loom again, to the gentle weaving life, To the rose path, and the diamond twill, where the pattern turns are rife, And all I ask is a pretty yarn for a laughing fellow-rover, And a quiet sleep and a sweet dream when the long warp’s over.
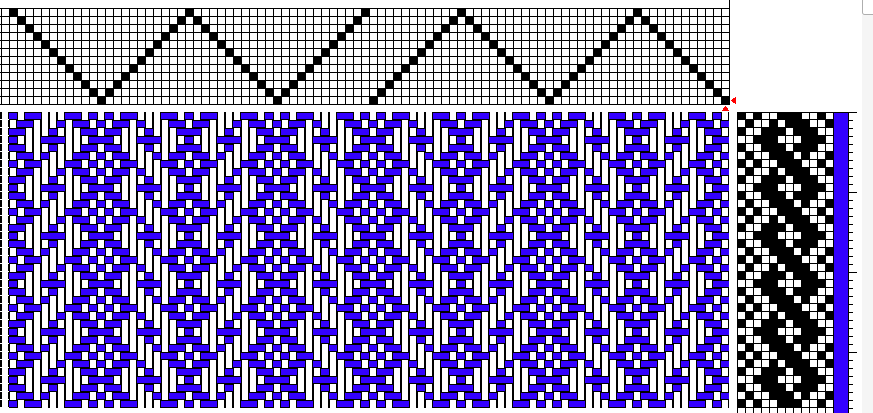
Today is a twiddling kind of day, while watching software install.
I haven’t had the energy to play with the 12 harness loom for a while, but I’m hoping to get back to that soon. Meanwhile here’s one more pattern I can try weaving on Esme when time and energy allow. If it wasn’t for the M-W warping that’s already on the loom, I could just warp threads from 1 – 12, and repeat, and all the chains would face the same way.
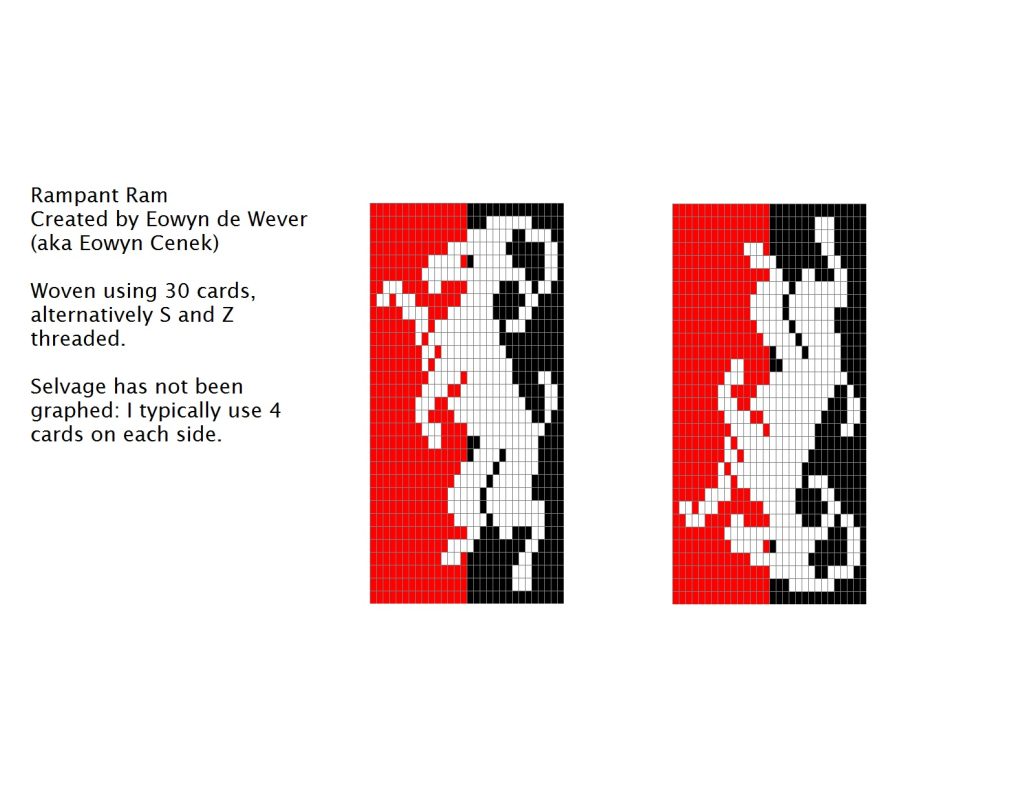
It’s a pattern for the Gleann Abhann rampant ram, in all its tabletweaving glory.
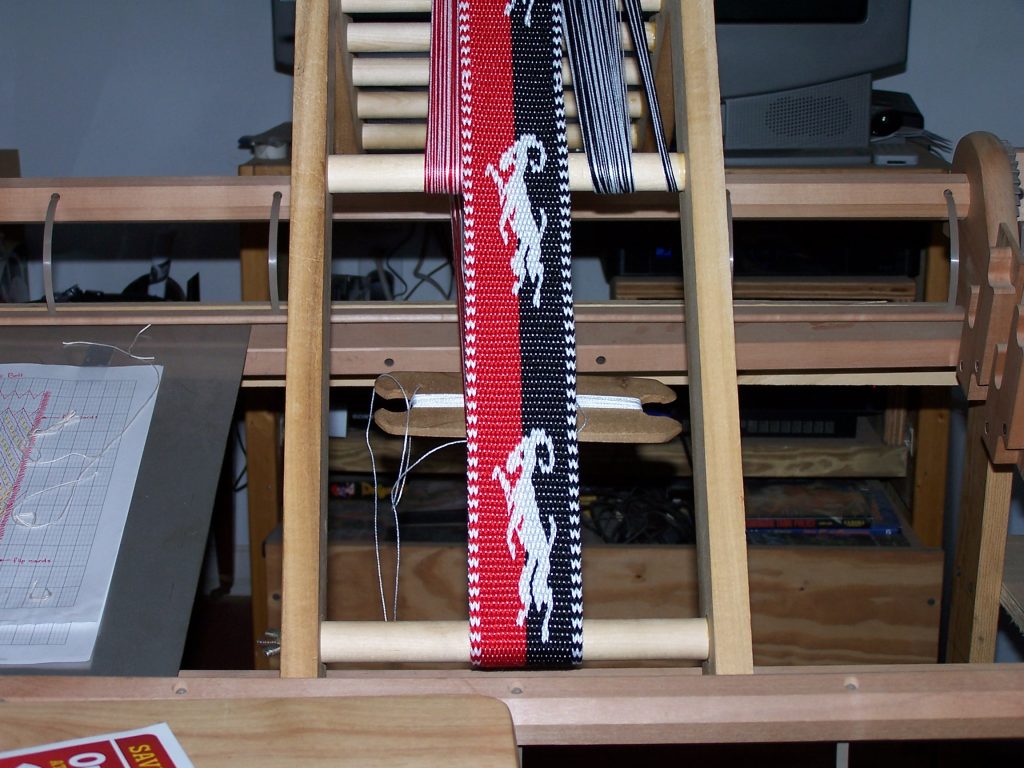
So I was recently reminded that lo these many years ago I had woven some rampant rams in a baldric or two in kingdom colours, and someone asked me for patterns.
Now the Gleann Abhann colours are red/ black, and white: the background being red and black, and the ram being sheepishly white. And I will admit my ram isn’t pizzled (although that fleck of black almost hints to me …)
And having found a picture dating back to April 2015, next was to see if I still had the graphed pattern. back then, many patterns were graphed on paper, rather than in the computer, because paper was handy.
And look what I found. Ready for printing. It’s doubleface, the pattern is only 30 cards wide, and will look best if you start weaving the pattern (which is woven from the bottom up) when the white in the right hoof creates a \/\ pattern. If it doesn’t, back up and weave one more row of background before you start the pattern.
This pattern, btw, is free to use to make Gleann Abhann tokens. Attribution would always be preferred, but it’s not suitable for commercial use.
So as I mentioned in the previous post, there’s an enchanting stitch along of 36 blackwork squares. And while I don’t have the energy, yet, to commit to 36 squares in one project, I was reminded of an old project I had previously enjoyed, which requires two squares of fabric to make a pin cushion.
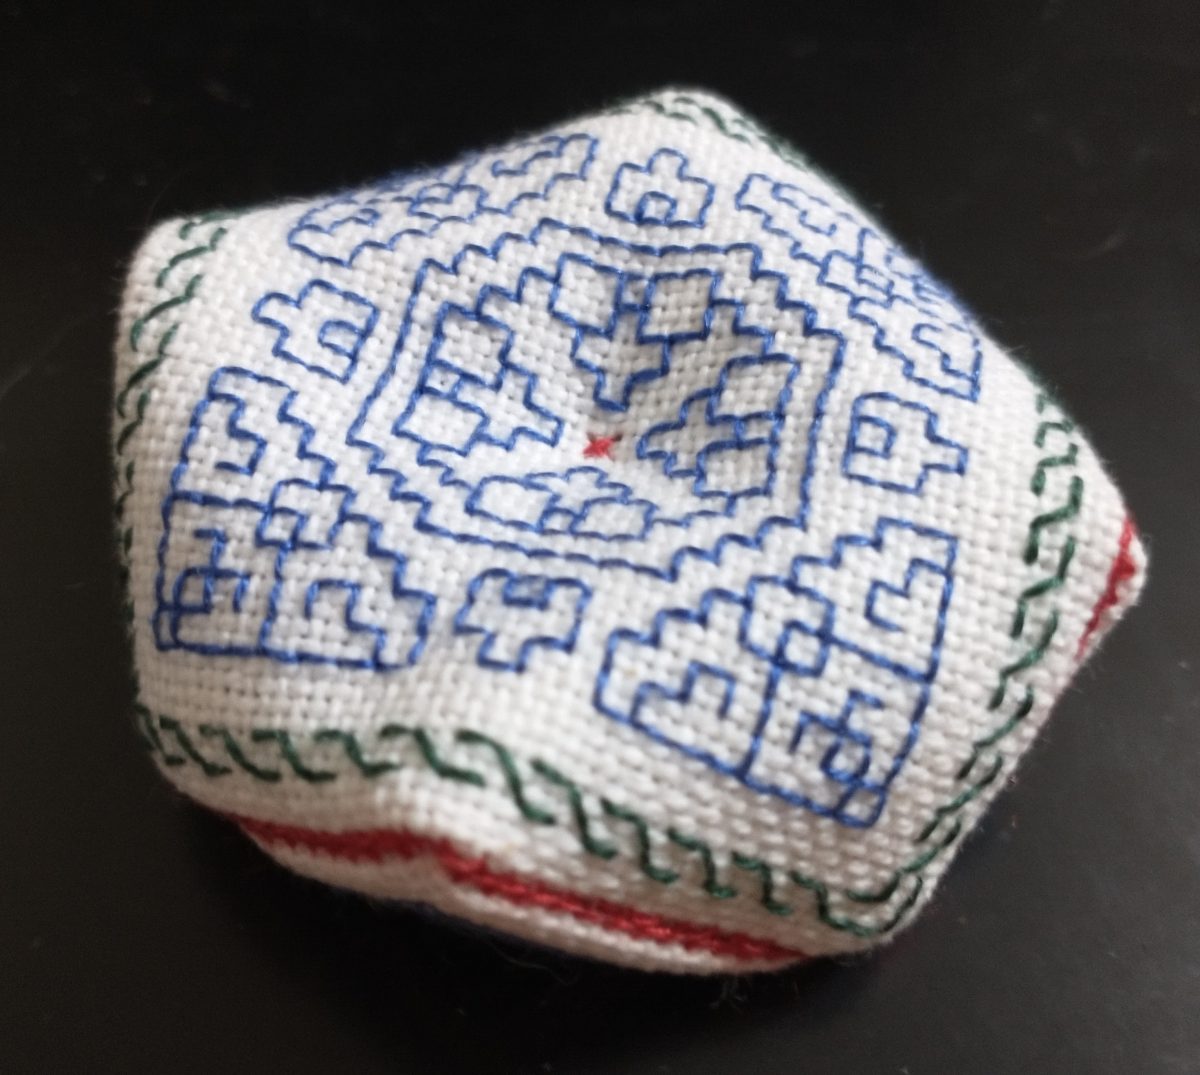
Specifically, a biscornu, which is a kind of pin cushion created by sewing two squares together along the edges so that the resulting three dimension shape is octagonal.
The finished biscornu.
The biscornu was created by first embroidering two squares on 28ct even weave fabric, using 60/2 silk (because I have lots of 60/2 silk handy) using the doublesided running stitch commonly used for black work. (Or in this case blue and green work?)
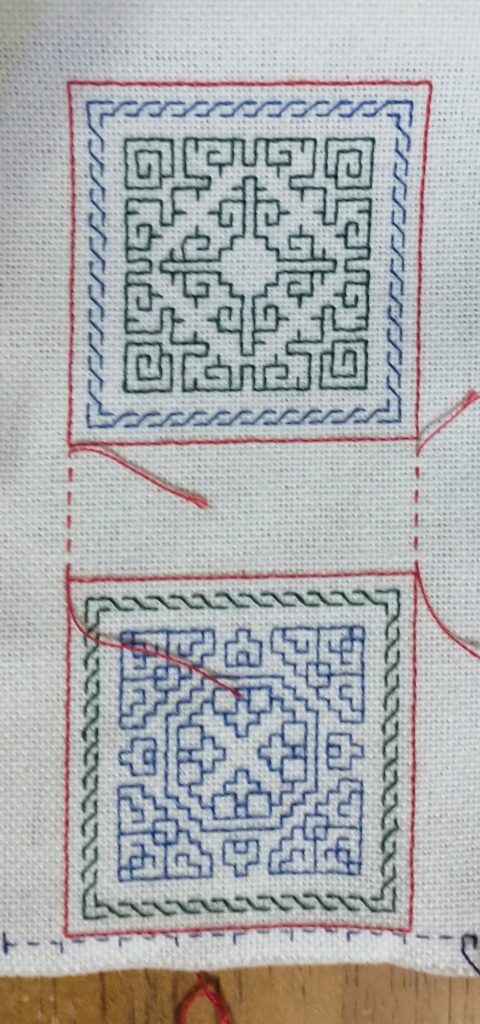
Then the squares are each surrounded by a red square, embroidered using the back stitch and keeping the tension loose. As you can see in the picture, the center of the top most edge of the lower square is marked with an extra stitch.
Both squares embroidered. There are some guide stitches basted in; I didn’t remove the urple since it ended up in the middle of the pincushion.
Assembly is harder to describe than to do, but basically the two squares are cut apart and then whip stitched together by looping under the red loops and slowly drawing it tight. Almost like lacing the two sides together.
The key point is that the corner of one square will always meet the center of one side of the other square. So when you start, you place the corner of the other square right up against that center little mark, and whip stitch together half a side. Then continue going around the corner, leaving the yarn loose until you’ve whipped around 4 or 5 stitches and then tightening the lacing.
I stuffed the pin cushion with some merino roving I had on hand when I had one side left to whip together. In hindsight I should have used more stuffing. Final step was to stitch together through both sides in the center and tie off. Without that final stitch, the result is much more like a pumpkin …
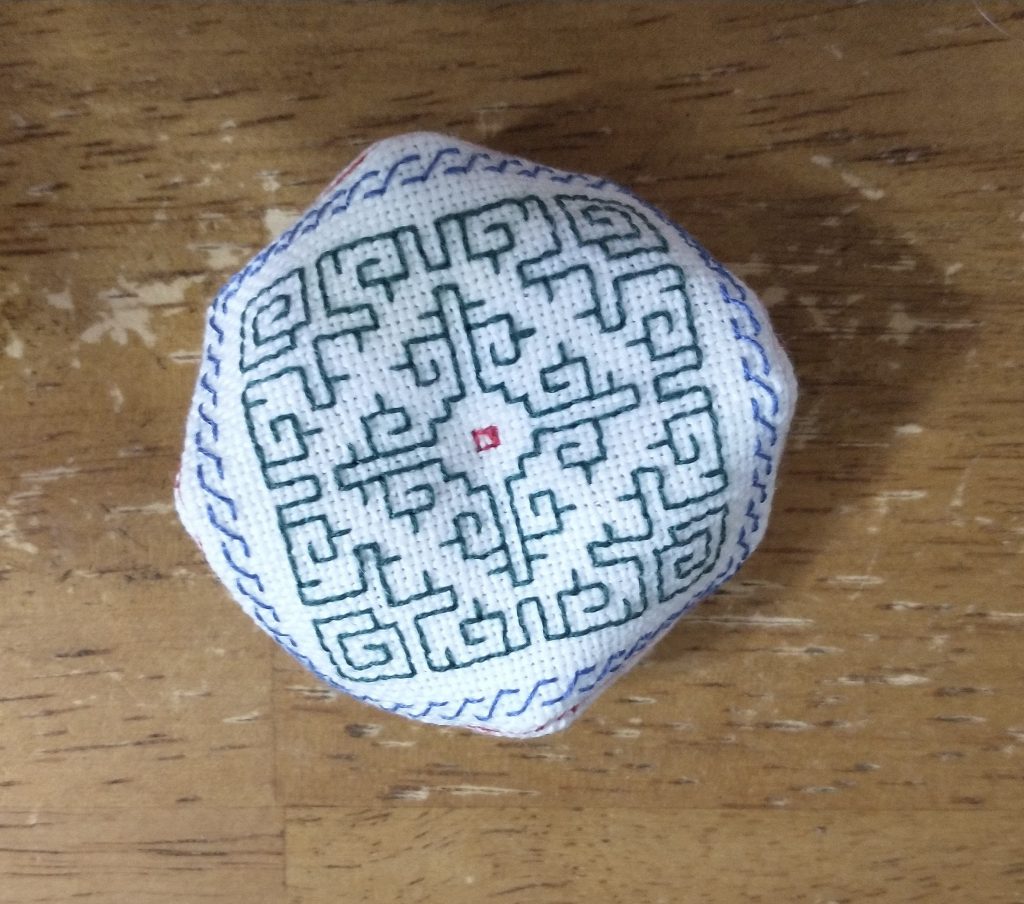
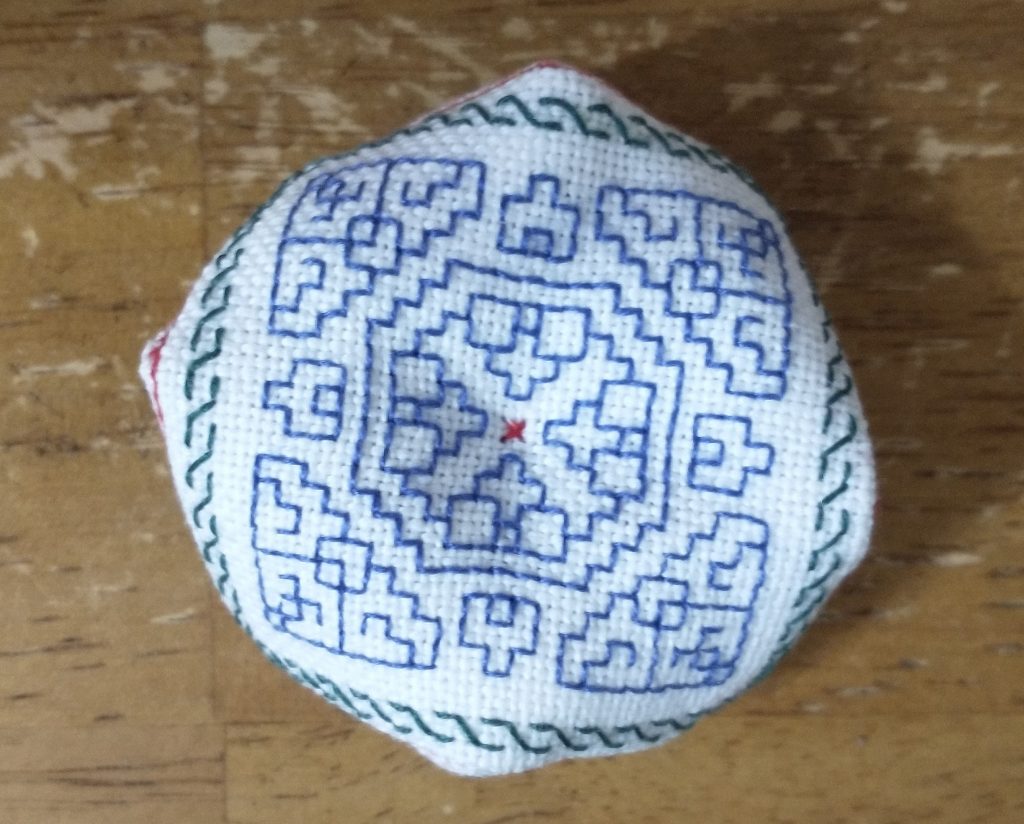
Both sides of the finished biscornu, seen from above.
These are patterns from a lady who describes herself as follows in the About section:
I’m a needlework designer and stitcher, specializing in modern interpretations of traditional motifs from around the world. My designs are not meant to be historically accurate reproductions. I frequently adapt patterns and colors to appeal to a 21st-century sensibility, while respecting the spirit of the original source. Although I employ a variety of techniques including canvaswork and surface embroidery, I am particularly attracted to cross stitch and blackwork because of their widespread use in many cultures and time periods.
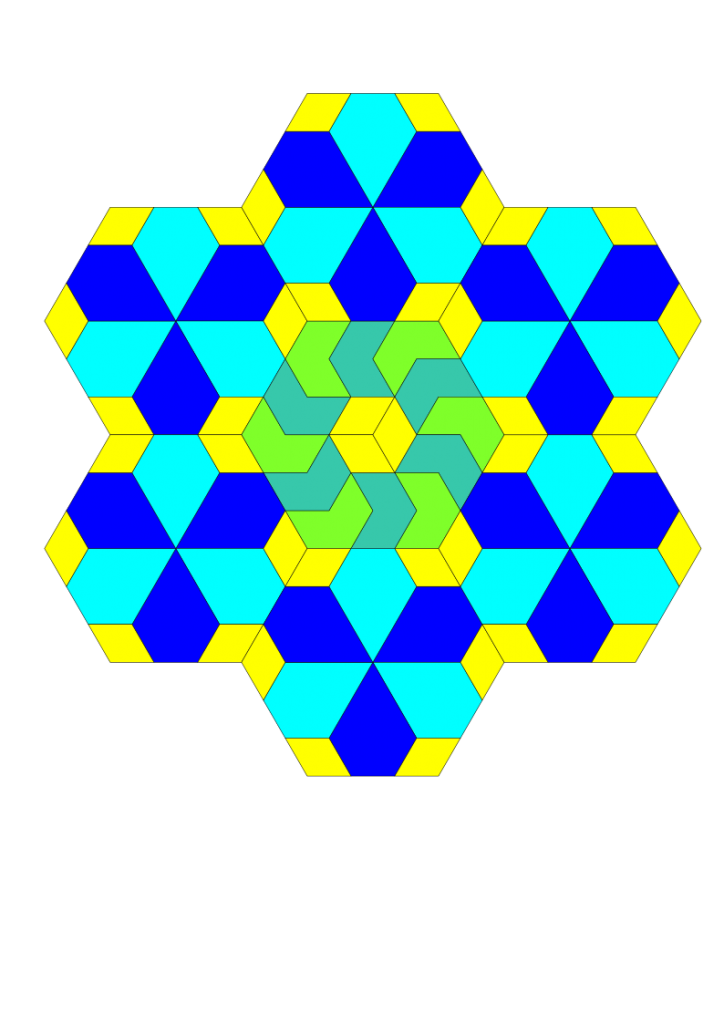
So for Christmas this year I acquired a modular pinloom from a seller on etsy (https://www.etsy.com/shop/TotaLoom). The looms are modular, with pin bars and angled corner pieces, so that you can arrange it into hexes and diamonds, and squares, etc. (The angles I have so far are 60, 90, and 120 degrees.) Of course, then the question becomes what to make. I started with making diamonds with some yellow acrylic I had left over from mom’s visit.
And then this morning I started noodling about patterns. This pattern block uses the hexagon as it’s main inspiration, although all the shapes are variations of the hexagon so that they can all be woven with the continuous warp approach. I’m calling this one the Field of Flowers, and I’m thinking I can vary the fields by using different colours.