There’s something about John Masefield’s “Sea Fever” that is very … adaptable. I’ve been inspired by his poem before to write about weaving in the Fever post. But today I realized I hadn’t made a sprang pouch in 2 days, and was feeling the pangs of withdrawal … and this happened.
Sprang Fever

I must go back to the sprang again, to the lonely warp and the frame,
And all I ask is a pattern and a safety rope to tame,
And the yarns' twist, as the colours' travel, all interlinking,
And the twining slides on the fabric's face, and the small dots blinking.

I must go back to the sprang again for the call of the intertwined
Is a wild call and a clear that cannot be left behind.
And all I ask is a clear warp with the colours alternating,
And the twined slide and the sudden turn and the midpoint waiting ...

I must go back to the sprang again, to the stretchy warp of yore
To the pouch sewn and the hair net that was worn in the far before.
And all I ask is a merry yarn dyed the cheerful colours adored,
And a pile of pouches stacking high to form a loving hoard.
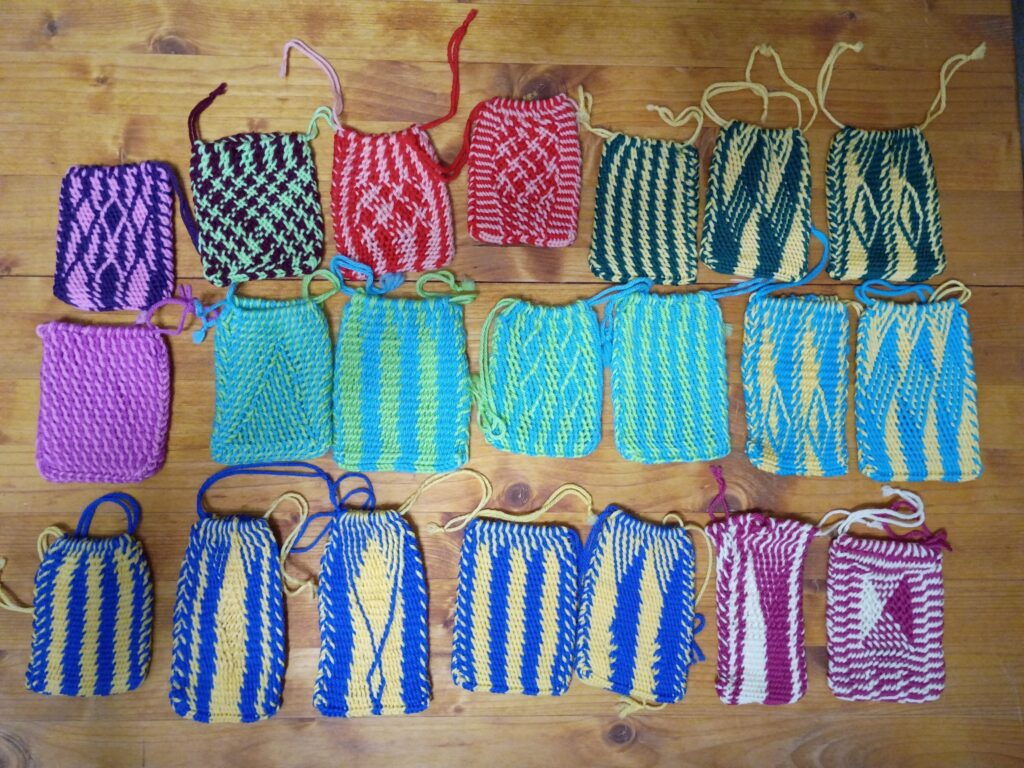
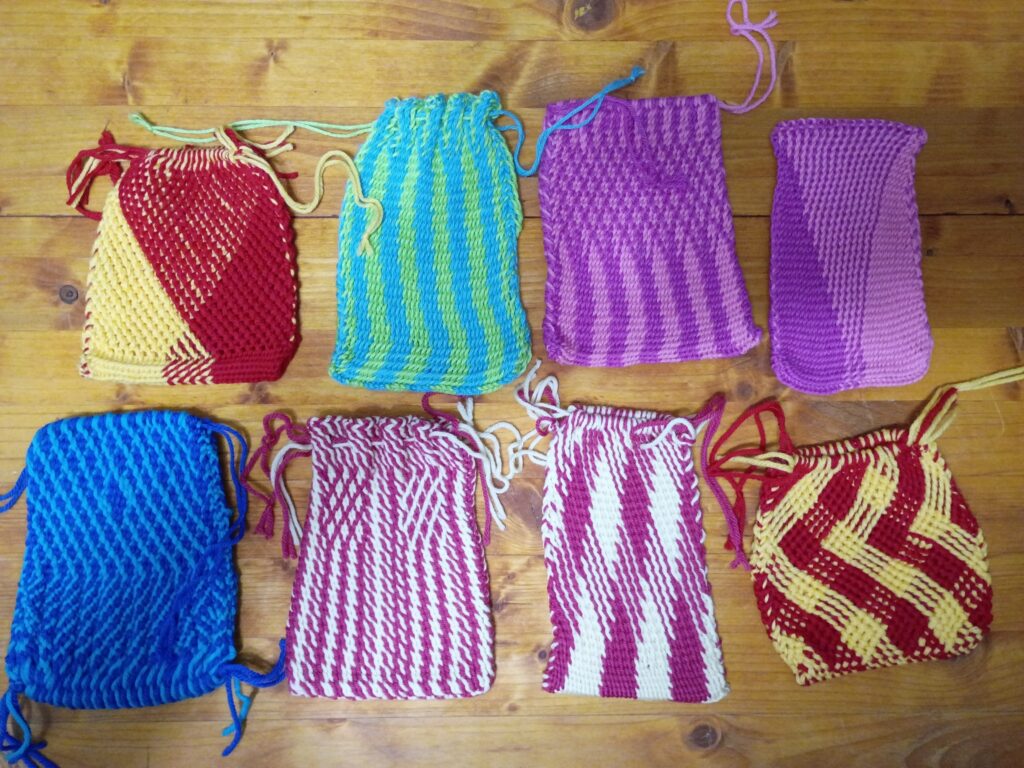
I had a little hoard of pouches; they’ve traveled to White Wolf and Phoenix in search of new homes. I have, of course, immediately started the new collection, but these are the ones on the road.
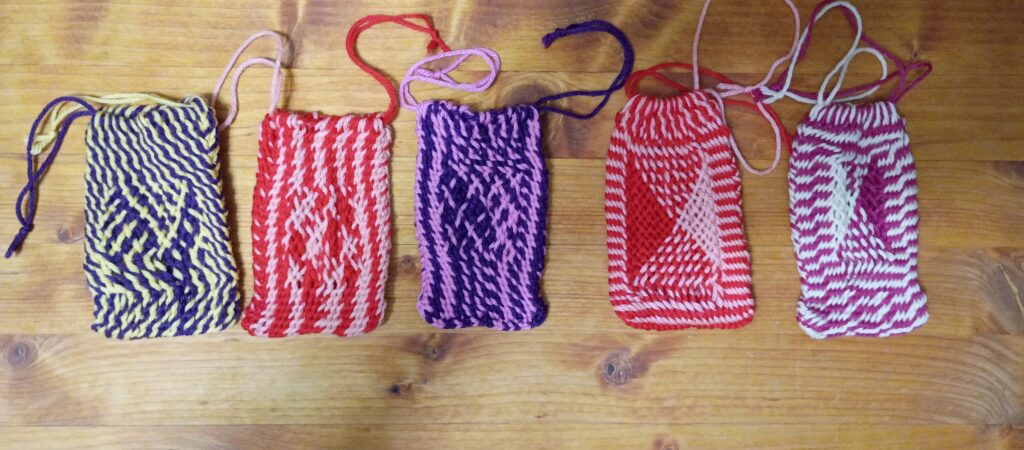
So as I described in the previous post, I’ve been working on blending regular interlinked and interlaced sprang. The first picture below shows the progress I made in chronological order, left to right, and then below that I’m going to discuss each pouch in greater detail. All five pouches were warped with 24 loops, alternating between two colours.
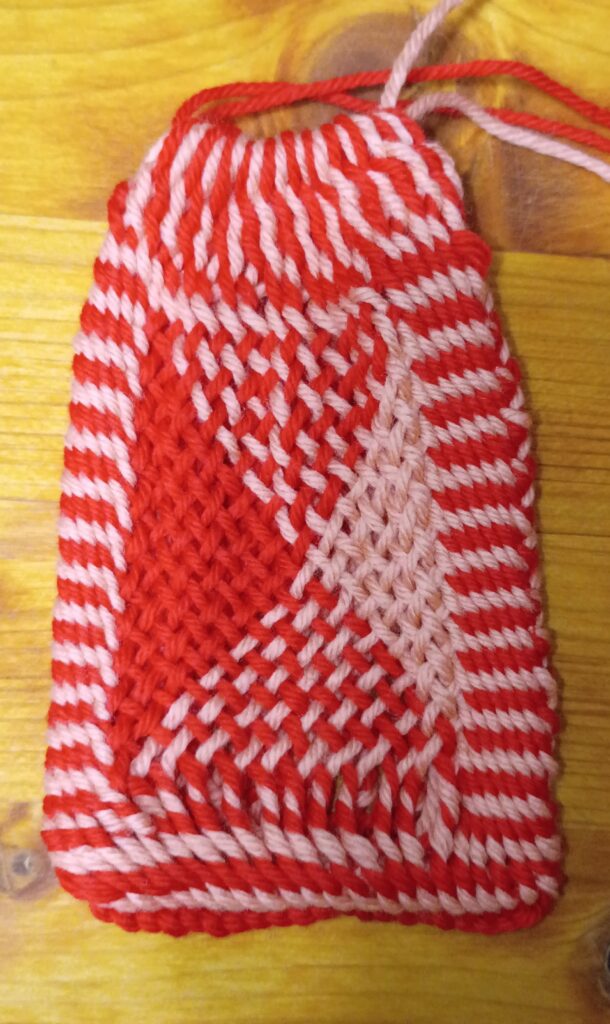
The first pouch where I tried to follow the pattern described in the previous post, where the interlinking started out as z-twist. After years of spranging in s-twist, this was more complicated than expected. The sprang is very loose, and for the bottom few rows I switched back to s-twist. Also, looked nothing like what I expected.
So I changed the startup position for the interlacing from AABB to AAAABBBB. This looked less busy, but there were still tension issues, and moreover, the diagonal stripes were 4 threads wide.
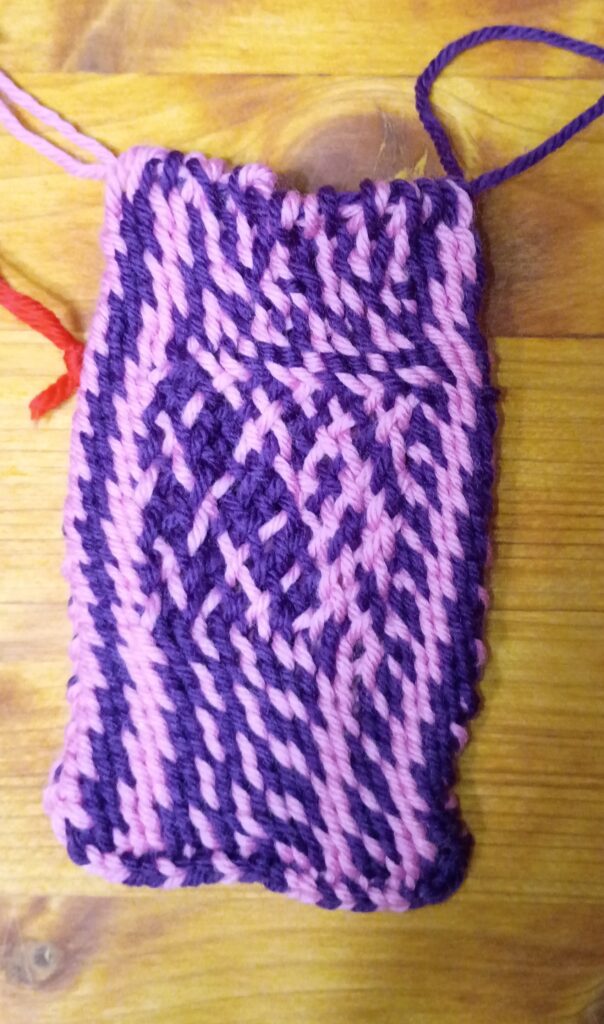
Which led to the next design, where the interlacing was arranged with repeated AAABBB; so that one colour had two adjacent threads on the front, and the other on the back. And the interlacing panel looked nothing like what I’d expected. It was at this point that I finally (belatedly?) realized that the threads that started on the back would slide to the left, an the ones starting on front would slide to the right, so that AAABBB did not produce thinner diagonals, but instead unbalanced diagonals. Back to the drawing board.
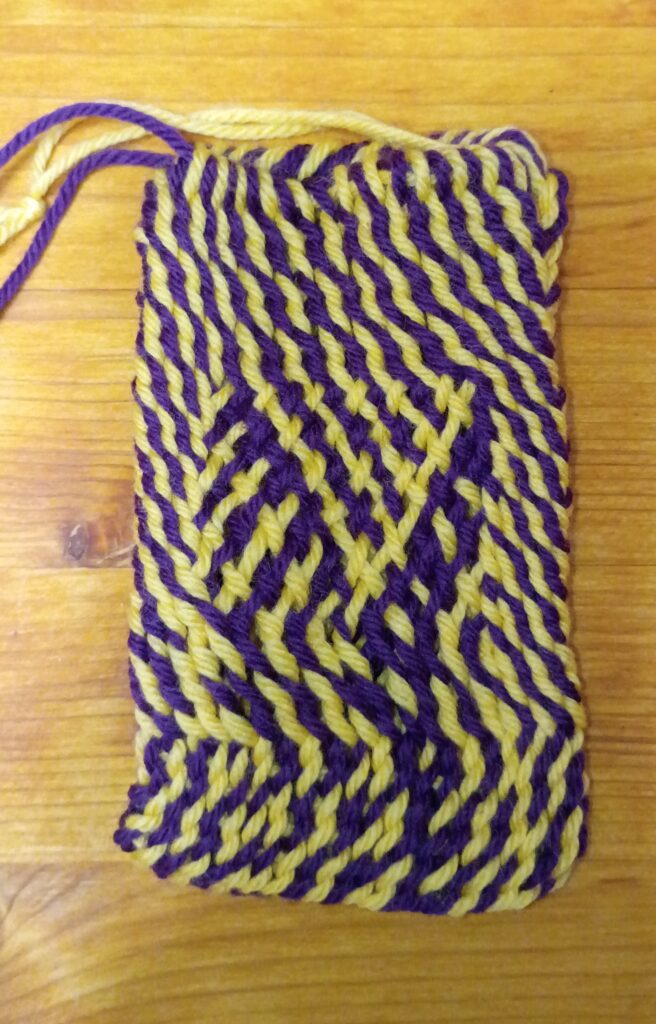
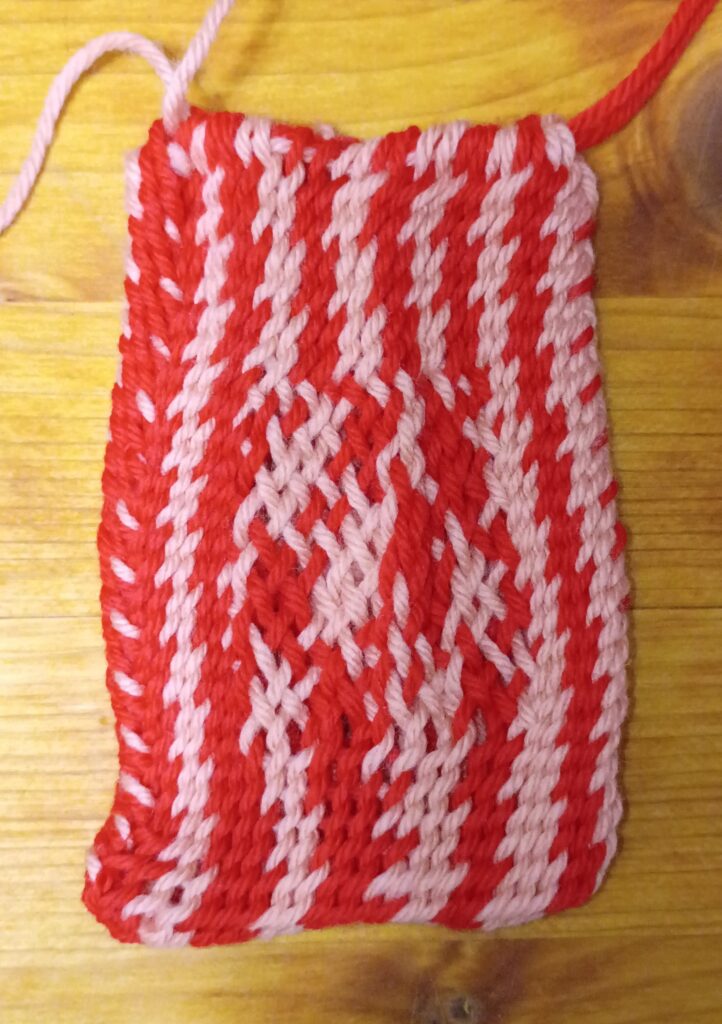
For a complete change in setup, when warping the loops were still alternating colour, but after the first two rows to set the sprang, extra twists were added so that all the front threads were one colour, and the back threads the other colour. This finally created the look I was trying for, inspired by Collingwood. I also beat the individual rows a lot harder, switching from a safety string to 4 skewers; two high and two low, left inserted in the previous two rows. After every row, the oldest skewer was extracted, then placed in the new shed, and a lot of pressure was applied because interlacing is naturally much looser than interlinking. Everything went swimmingly until I switched back to interlinking, where I accidentally repeated one row instead of switching between braid and overplait. A mistake I didn’t catch until I’d sewn the pouch together. Oops.
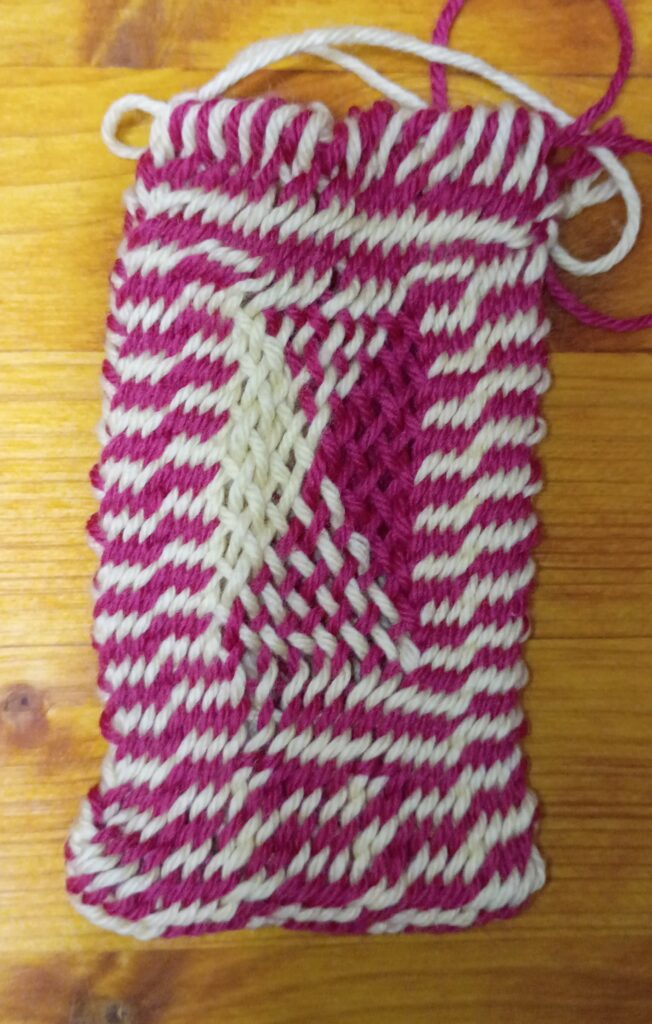
For the last pouch, I changed the width of the interlaced panel so that it was only 8 loops wide, instead of 12, which also meant the interlaced pattern didn’t run as many rows, leaving me with some extra space to place with colour changes near the bottom of the pouch.
The nice thing about churning out a set of five small pouches with variations is that it makes it easier both to understand what I’m doing, and to modify and improve, without necessarily undoing and starting over many times. And now we go on experimenting with other patterns, more colour combos, etc.
So lately I’ve been futzing with sprang. Mostly, just doing the simple designs that I use when teaching; warp is two colour, warped alternating colour, and intertwining can move coloured yarn from side to side to make vertical stripes or diamonds or what have you.
But then I started dreaming about more complex patterns.
And then I dug out a copy of Collingwood’s 1974 “Techniques of Sprang”. Collingwood’s writing is very dense, and moreover, what he’s written is a compendium of techniques. There are no “projects” included to try out, and the information density of each page is high. So there are two things I want to try eventually: one is doublecloth, where the bicoloured sprang separates into two layers, and by switching threads between layers you can switch colours, and the other is to combine interlacing and regular 1/1 interlinking.
And today’s dream is all about a piece of sprang where the borders are all 1/1 interlinking, but in the center there are 1 or more rectangles of 1/1 interlacing. The first attempts will be small, so will be turned into little pouches, and we will see where it goes from there. The notes I’m writing here are primarily to help myself remember what Collingwood is talking about as I combine information from Chapter 5 (basic 1/1 interlinking, p 68-73) and Chapter 7 (Interlacing p 184-187, 197).
Notation (and translations into what I do)
When I teach, we start with the simple s-twist version where threads start on the left hand, and we always push the next one thread (or two threads on the right edge) to the back before picking up the back. In Collingwood’s notation this is written as “B\F“. The alternate is z-twist, where the back thread is picked up first and then the front thread is pushed to the back. This is written as “B/F“. The key point is the direction of the diagonal: the thread that moves first is the one closest to the bottom of the diagonal.
Notation (spaces added for easier readability)
Translation
B / F
pull back up, push front down
B \ F
push front down, pull back up
B / 2F <- (B / F) <- 2B / F
plait row (z-twist)
<- (B / F) <-
overplait row (z-twist)
B \ B <- (F \ B) <- F \ F
overplait row (s-twist, interlacing)
Translation Table for Notation
Row instructions are typically read from right to left, as the threads all start on the left hand, are manipulated by the right hand, and end up on the right hand. Combinations in brackets are repeated multiple times across the project.
The plait and overplait row are alternated; it’s just that when I teach the two rows I use the S-twist variant. I’ve leaving the Z-twist version in the translation table because that’s what Collingwood uses.
1/1 Interlacing
1/1 interlacing alternates the usual z-twisted plait row followed by a row of S-twist interlinking, with special moves at the selvages. The F \ F and B \ B are special moves. For F \ F work with two front threads, rather than a front and a back thread, and the left front thread is pulled over the right front thread and pushed to the back. Similarly for B \ B, work with two back threads; again the left thread is pulled across the right back thread and pushed to the back, while the back thread that’s been crossed over (originally the right back thread) s pulled to the front. In Collingwood’s notation he uses (F \ B) for the repeated step in the middle, but that’s primarily because a normal plait row would begin with a B \ 2F, and so that back thread still has to be deal with, throwing off the tempo, as it were. So the over plait row could also be written as B \ B <- (B / F) <- F \ F, but that looks as though you’re dealing with 3 front threads in the beginning, when you’re not.
Combining interlinking and interlacing
Here’s where the magic begins … or here’s where I have been rereading this section since last night, and now I’m writing stuff down just so it will hopefully stick. The project will consist of two types of areas: interlinking all the way across, created by alternating standard plait and overplait rows, and rectangles of interlacing centered in the interlinking.
For a first project, assume 24 loops, 12 each of a dark and light colour. The rectangle in the center will be 12 loops wide, with 6 loops on each side, and will be 6 rows high, with 6 rows of plain interlinking above and below.
Pattern:
Repeat
Rows
Description
3
B / 2F <- (B / F) <- 2B / F <- (B / F) <-
plait row. overplait row
3
B / 2F <- (B / F) <- 2B / F <- (6 B / F) <- B \ B <- (10 F \ B) <- F \ F <- (6 B / F)
plait row overplait row with interlacing in the center (interlacing in bold)
3
B / 2F <- (B / F) <- 2B / F <- (B / F) <-
plait row. overplait row
Basically the special row is the overplait row in the interlacing; there for the 24 loops, the first 6 are pull back, push front, then on two front threads push the left thread over the right thread and to the back, next 10 loops are push front, pull back, then on two back threads push the left thread over the right and down, pulling the other back thread up, followed by 6 more pull back, push front. (edited to fix typos)
And now all I have to do is finish the current sample on the loom, where I was trying 2/2 interlacing, and then warp this up and see how it goes. So pictures will have to wait …
Meanwhile, just browsing through the picture plates in his book has me pondering more intertwining approaches, and I still want to teach myself double cloth.