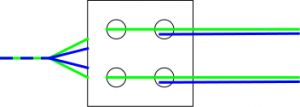
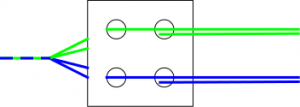
While trying to teach a friend to weave 3/1 broken twill, I stumbled on another way of looking at the cards to determine what the next turn should be. To illustrate that method, I’m going to discuss doubleface first, since more of my readers are familiar with doubleface weaving. All cards will be threaded two light and two dark, and we describe the positions of the cards as follows. (Here the light is green, and the dark is blue. We will also assume that the green will be the background.)
Horizontal and Vertical Position
We consider the position of the cards relative to the warp threads. In these diagrams the warp extends to the right while the already woven portion extends to the left. Horizontal and vertical are used to describe the position of the threads relative to the warp.

In the vertical position, the two green threads go through the holes closest to the woven ribbon. Those holes are one above the other, so I call this position vertical. If I turn this card forwards, the two green threads will lie above the warp and I will weave a green row. Turn backwards, and the blue threads will be uppermost, and I will weave a blue row.
 In the horizontal position, the top two threads are both green. In this position, I will weave another green row regardless of whether I turn forwards or backwards.
Weaving Doubleface
Weaving doubleface with the 2 pack method, the cards are separated into two packs. We can call these two groups “Background” and “Pattern”. When we start all the cards are in the background pack, and we start with the cards in vertical position. If we consider “Front vertical” as the case where the background threads are all in the holes closest to the woven ribbon, and “Back Vertical” as the case where the background threads are closest to the unwoven warp threads, then the turning directions for each row in the pattern are as follows:
- Make sure any foreground/pattern cards are in the foreground pack and all other cards are in the background pack.
- If the background pack is in front vertical position, turn the background pack forwards and the pattern pack backwards, and put the shuttle through. (Do this twice so that all cards are once more in vertical position.)
- If the background pack is in back vertical position, turn the background pack backwards and the pattern pack forewards, and put the shuttle through. (Again, do this twice.)
For each row in the pattern you will complete either step 2 or step 3, but not both. Notice how the pattern and background pack always move in opposite directions, and all the cards should all be in exactly the same vertical position every time you return to step 1.
Weaving 3/1 Broken Twill
The setup of the cards in 3/1 broken twill is slightly more complicated, and is a multi-step process:
- Divide the cards into two packs as follows.
- Card 1 goes into the Odd pack
- Card 2 goes into the Even pack
- Card 3 goes into the Odd pack
- Card 4 goes into the Even pack
- …
- Flip the cards as needed so that the threading alternates between S and Z in each pack
- Turn the cards in each pack so that they are all in vertical front position.
- Turn the Even pack only once forward so that it is in horizontal top position.
Now the key point of weaving 3/1 broken twill is that the cards never shift between the packs. Colour changes are made by flipping a card on its vertical axis, but only when that card is in vertical position. (This reverses the threading for the card, and also switches between front and back vertical position.)
The turning direction now also never changes. Each row will be one of four possible scenarios, and you can see which scenario comes into play by looking at the vertical or horizontal position of the two packs. Be careful to key off cards which have not been flipped to produce pattern; but look at background cards. Then the turning directions are:
| Position of Odd Pack | Position of Even Pack | Turning directions Odd – Even |
| Front vertical | Horizontal | Turn both packs forwards |
| Horizontal | Back vertical | Turn odd pack forward, even pack backwards |
| Back vertical | Horizontal | Turn both packs backwards |
| Horizontal | Front vertical | Turn odd pack backwards, even pack forwards |
At first try weaving only the background, without flipping any cards. Notice how before every turn exactly one pack is in vertical position, and the other is in horizontal position. Which also means that I can only effect colour changes in one pack, or the other, but not both at the same time.
Then eventually when it comes time to weave patterns, I like to use brick graph paper like 3/1 twill graph paper where each rectangle represents one card and two turns, emphasizing that the ability to change colours alternates between the odd and even packs.
Edited to add: At some point I will be adding a second article which focuses solely on weaving 3/1 twill patterns. The purpose of this article is to get you weaving the basic 3/1 twill structure.