Noodling with an MMM WWW Threading

An M-W threading is named for the threading through the heddles, which looks like repeating Ms and Ws on the form. The pattern I was playing with is a modified M W, where each M and W has three high (or low) points.  I’ve warped up umpty yards (he warp was measured for a sampler, so … I forget?), and enough ends for 8 repeats, warped alternating 2 olive repeats and 1 tan repeat.  The goal is to vary the weft in multiple projects.  Unfortunately I forgot to photograph the first two stretches, where the weft was respectively burgundy, and white, so that will have to wait until it comes off the loom.
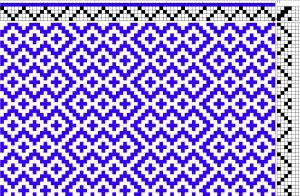
Once the threading through the headings was decided, and going with a simple twill tie up, the next step is to decide the treadling. (I.e. in which order do the four harnesses get raises, or in what order are the treadles pressed?)  This first version looks more complicated than it actually is, mostly because I didn’t pick the best starting point.

In a simple twill weave, the treadling is 1-2-3-4 and repeat.  A twill diamond pattern, on the other hand, will treadle 1-2-3-4 followed by 3-2-1-4 for a 8 line pattern.  In my way of thinking, that would be a 4 row diamond.  In the pattern above, we have a 6-row diamond twill: 4-1-2-3-4-1 followed by 4-3-2-1-4-3.  This looks confusing at first, but by thinking of it as a six row diamond, I can reuse the muscle memory from previous projects.

On the other hand, the pattern looked very horizontal; it’s hard to make striped with just diamonds, but by golly I managed.  Also; I had woven two 19 or so inch lengths, and was bored.
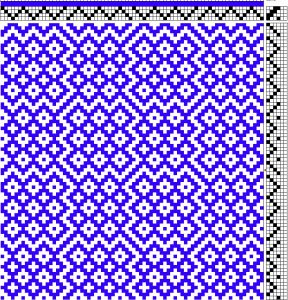
Time to start playing with alternating treadlings.  This is where I once again thank my husband for the gift of a lovely piece of software (Fiberworks Bronze) which allows me to both typeset and change patterns up quickly and easily.  I’m still far from adept at pattern design, but the software lets me experiment with different treadlings really, really quickly.

My first idea was to treadly the same way as the heddles were threaded in extended Ms and Ws.  As it turned out, that gave a slightly unbalanced pattern and I experimented a little more, resulting in this pattern.

Oddly enough, I didn’t realize that this is still an extended MW treadling, except that if the extended M’s are treadled just as they’re threaded, the extended W’s are shifted one over, resulting in a 3-2-1-4-1-2-3 effect.  There’s exactly 1 extra treadling (using 4) between the M’s and W’s which makes this pattern again really easy to memorize.  Plus there’s lots of visual cues in the weaving, of course.
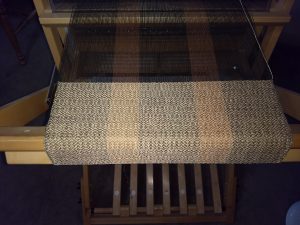
So what does the fabric look like? The weft is a lighter brown than the tan warp, keeping the pattern visible (albeit more subtle) on the tan stripes. As well, the edges are the best I’ve had on this yardage yet; there’sa floating selvage on both sides, but here I’m always treadling an even treadle when entering from the right, where in the previous bitsy bobs I always entered from the right on an odd treadle.  Funny the different that can make.
Brocading – A Lovely Link

Just a quick entry, as much so that I don’t lose it as anything else.

Anna Neuper had written a book of brocading patterns, which was translated by Nancy Spies. But it turns out that her notebook wasn’t the only book of patterns from that general time and place. Ute Bargmann wrote an article about another such manuscript. The 11 page paper is available at Woven Bands, Medicines and Recipes: Cod. Pal. Germ. 551. The Adventures, Provenance and Contents of a 15th Century Manuscript Held at the Library of Heidelberg University in Germany. and includes several patterns for leaves that would look perfect for a headband or trim.

ETA Heather English was able to find a link to the original manuscript, which is available at http://digi.ub.uni-heidelberg.de/diglit/cpg551/0021/image

Adventures in Tapestry Weaving

So one of the things I got my hands on last year was a tapestry loom, from Schacht.  It’s currently sitting assembled in my office, and I am hoping to warp it this afternoon.   Right after I can find te wool I want to use as weft; I have some really nice embroidery wool samples that I want to play with.

But meanwhile I had been thinking and thinking about the continuous warp.  The warping instructions from Schacht are available at Tapestry Loom Manual but I was struggling to make sense of how the warp was advanced (since it’s a continuous loop).  But a bit more digging found me this excellent article https://www.afieldguidetoneedlework.com/blog/long-warp-short-loom which provided the A-HA moment I needed.  The key point is that after the warping is complete, the warping bar is essentially free floating because it’s held in place by the tension of the warp.

So hopefully I can warp the loom up this afternoon, and then I want to try knitting heddles as described by Laverne Waddington in her tutorial at https://backstrapweaving.wordpress.com/tutorials/tutorial-continuous-string-heddles/. It’s also possible to make fixed length reusable heddles, as in inkle weaving, but … we’re experimenting.

Valkyrie Christmas

Valkyrie Holy Night

Tune: O Holy Night
Lyrics: Eowyn de Wever

Oh holy night, We hear Valkyrie voices,
The sun has set, now the slain shall rise.
Long was the war, the battles fiercely raging,
From dawn to dusk we fought with glorious joy.
Come now the night,
The Valkyries are calling,
Valhalla is waiting,
The mead is set to flow.

Oh come, oh come, oh come to Odin’s Hall.

Long shall we feast, the mead now everflowing,
By day we train for Ragnarok.
Once foes we were, now brothers and united,
We train as one, And long to face our foe!
Lead us, oh Tyrr,
The Horn of Heimdal’s calling,
The Giants are raging,
When comes the Final War!

Rise up, march forth, march forth to Ragnarok!

Weaving Directions in Doubleface and 3/1 Broken Twill using the 2 pack method

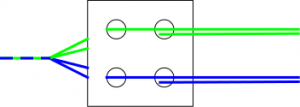
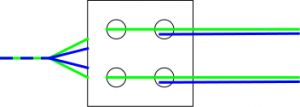
While trying to teach a friend to weave 3/1 broken twill, I stumbled on another way of looking at the cards to determine what the next turn should be.  To illustrate that method, I’m going to discuss doubleface first, since more of my readers are familiar with doubleface weaving.  All cards will be threaded two light and two dark, and we describe the positions of the cards as follows.  (Here the light is green, and the dark is blue.  We will also assume that the green will be the background.)

Horizontal and Vertical Position

We consider the position of the cards relative to the warp threads.  In these diagrams the warp extends to the right while the already woven portion extends to the left.  Horizontal and vertical are used to describe the position of the threads relative to the warp.

Card is shown with woven ribbon on left, warp extending on right, and the light coloured threads are in the two front holes closest to the woven ribbon

In the vertical position, the two green threads go through the holes closest to the woven ribbon.  Those holes are one above the other, so I call this position vertical.  If I turn this card forwards, the two green threads will lie above the warp and I will weave a green row.  Turn backwards, and the blue threads will be uppermost, and I will weave a blue row.


Card is shown with woven ribbon on left, warp extending on right, and the light coloured threads are in the two top holes above the warp. In the horizontal position, the top two threads are both green.  In this position, I will weave another green row regardless of whether I turn forwards or backwards.
Weaving Doubleface

Weaving doubleface with the 2 pack method, the cards are separated into two packs.  We can call these two groups “Background”  and “Pattern”.  When we start all the cards are in the background pack, and we start with the cards in vertical position.  If we consider “Front vertical” as the case where the background threads are all in the holes closest to the woven ribbon, and “Back Vertical” as the case where the background threads are closest to the unwoven warp threads, then the turning directions for each row in the pattern are as follows:

  1. Make sure any foreground/pattern cards are in the foreground pack and all other cards are in the background pack.
  2. If the background pack is in front vertical position, turn the background pack forwards and the pattern pack backwards, and put the shuttle through.  (Do this twice so that all cards are once more in vertical position.)
  3. If the background pack is in back vertical position, turn the background pack backwards and the pattern pack forewards, and put the shuttle through.  (Again, do this twice.)

For each row in the pattern you will complete either step 2 or step 3, but not both.  Notice how the pattern and background pack always move in opposite directions, and all the cards should all be in exactly the same vertical position every time you return to step 1.

Weaving 3/1 Broken Twill

The setup of the cards in 3/1 broken twill is slightly more complicated, and is a multi-step process:

  1. Divide the cards into two packs as follows.
    1. Card 1 goes into the Odd pack
    2. Card 2 goes into the Even pack
    3. Card 3 goes into the Odd pack
    4. Card 4 goes into the Even pack
  2. Flip the cards as needed so that the threading alternates between S and Z in each pack
  3. Turn the cards in each pack so that they are all in vertical front position.
  4. Turn the Even pack only once forward so that it is in horizontal top position.

Now the key point of weaving 3/1 broken twill is that the cards never shift between the packs.  Colour changes are made by flipping a card on its vertical axis, but only when that card is in vertical position.  (This reverses the threading for the card, and also switches between front and back vertical position.)

The turning direction now also never changes.  Each row will be one of four possible scenarios, and you can see which scenario comes into play by looking at the vertical or horizontal position of the two packs.  Be careful to key off cards which have not been flipped to produce pattern; but look at background cards.  Then the turning directions are:

Position of Odd Pack Position of Even Pack Turning directions Odd – Even
 Front vertical  Horizontal  Turn both packs forwards
 Horizontal  Back vertical  Turn odd pack forward, even pack backwards
 Back vertical  Horizontal  Turn both packs backwards
 Horizontal  Front vertical  Turn odd pack backwards, even pack forwards

At first try weaving only the background, without flipping any cards.  Notice how before every turn exactly one pack is in vertical position, and the other is in horizontal position.  Which also means that I can only effect colour changes in one pack, or the other, but not both at the same time.

Then eventually when it comes time to weave patterns, I like to use brick graph paper like 3/1 twill graph paper where each rectangle represents one card and two turns, emphasizing that the ability to change colours alternates between the odd and even packs.

Edited to add: At some point I will be adding a second article which focuses solely on weaving 3/1 twill patterns.  The purpose of this article is to get you weaving the basic 3/1 twill structure.

In Honor of all the Ladies who inspire

John Downland’s “Shall I sue” was published in his “Second Booke of Songs” in 1600.  There is a complete score available at http://imslp.org/wiki/Shall_I_Sue,_Shall_I_Seeke_for_Grace_(Dowland,_John).


Testing the Armor
To the Tune of John Dowland’s “Shall I sue”
Words by Eowyn de Wever

Shall I bow, shall I smite my shield,
Is my challenge heard,
As I wait to enter the lists
At the herald’s word.
There is none so fair as the one
For whom I fight,
Whose fair face and gentle smile
Gives such delight.

Bow we now, to the crown, to our love,
And to the crowd,
Let the marshal’s cry “Lay on!”
Ring out loud.
There’s no flinch, no cry
As she gazes upon the fight,
Though my wounds run red she smiles
At my wild delight.

Swords we cross, shields we raise in joy
Of a mighty bout,
As the knight’s fierce blows teach me
That my armor is stout.
Stoutly built, stoutly made
By my lady’s fair hands and mind,
Kept me safe this day – mildly bruised –
As I step back in line.

Weaving Broken Twill on a 4 harness loom

These are notes for a project currently on my 4 harness loom.  The wool I’m using is 8/2 Jaggerspun wool, from the Maine line, in royal blue and dark green.  I wanted to make fabric that was stripey and that displayed the broken twill diamonds encountered in Viking weaving.  The final fabric will be used to make a bag with Hedeby handles, as described in https://nattmal.wordpress.com/2015/05/14/haithabu-bag/. Unlike her bag, however, I will be using a tabletwoven rather than a leather strap.

The measured warp: 208 eights, in 13 groups of 16, to produce a striped fabric.

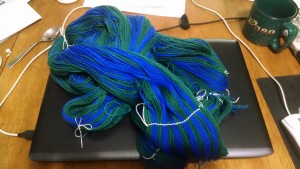
Step 1 was to measure out the warp.   As a computer programmer, binary in all its glories is very attractive, so I decided the diamonds would be 16 threads wide, and 16 picks high.  Sizes can vary of course.  So I measured out 13 strips of 16 ends each, on the horizontal warping mill; to make counting easier, the white thread groups the warp in bundles of 8 threads each.  This allows me to easily stretch the threads across the width of the backbeam using the raddle.  Since the epi for this wool is listed as 15-18 for twill, I decided to start with 16 epi, so the diamonds should be about an inch square.


Step 2 was to wind the warp on to the backbeam; to do this I used what some call “Angel Wings”: a pair of dowels which are put through the warp on both sides of the cross, and kept together with hairbands.  I use loops of string to hold the dowels in place.  This allows me to wind the warp on to the backbeam while maintaining the cross.  It usually maintains a nice even tension too, although here the wool was being very sticky and obstreperous.

Threading the heddles in groups of 8

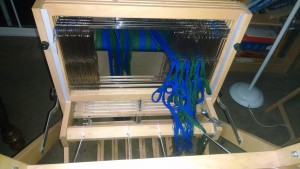
Step 3: threading the heddles.  We left the dowel sticks in place and heddles from right to left.  The pattern repeats: first 8 heddles 1-2-3-4-1-2-3-4 and then 8 heddles 2-1-4-3-2-1-4-3.  Keeping track of count was easy since everything was being done in bundles of 8.  The outermost thread on each side was not heddled, and will form the floating selvage.

The reed I have for this loom is 10 ends per inch, so it took me a while to puzzle out how to thread it to get 16 ends to the inch.  Finally I decided that solving 8 ends to the half inch (and 5 slots) was easier, and threaded in a 2 – 1 – 2 – 1 – 2 pattern through the slots.


Broken twill, alternating between two shuttles every 16 picks.

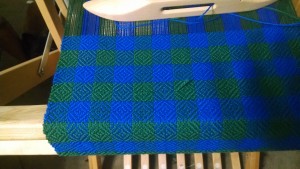
Step 4: We weave!  Took a bit of monochrome weaving to get the edges right, and I realized that perhaps I could have set the threads closer together on the outside on both sides, but I got it to square up eventually.  And that’s when I added the second colour.  There are two shuttles loaded with blue and green respectively, and the one not in use is perched on the desk next to me.  The shuttle in use treats the thread from the other colour as a second floating selvage, so there’s a little bit of oddness on the right hand side of the fabric.

For now, though, my concern is still on getting the edges even, and trying to keep the squares … we.. square, which means managing the interplay between the tension of the warp threads, and the force with which I beat.  (And when a bobbin runs out, as you can see in the green, you just double up for an inch or so and keep going.)

The last picture, btw, was taken with flash so that you can really see the structure.  In natural light the patterning – especially in the monochrome areas – is much more subtle.

Filking about the Fiber Arts

I was recently reminded I tend to filk about fiber arts topics .. So here I present two filks sung to the tunes of The Irish Rover and the Three Ravens, respectively.


The Wild Seamstress
by Eowyn de Wever, and inspired by Mistress Isolde’s five year and running tapestry project
(Tune: The Irish Rover)

I’ve been a wild seamstress for many’s the year
And I traded my stitches for whiskey and beer.
But now I’m returning, my stitches are done
And the tapestry’s finished, about to be hung.

Chorus:
And it’s no, nay, never,
No, nay, never, no more,
Will I be a wild seamstress,
No never, no more.

I came to a yarn house I used to frequent,
And I told the shopkeeper my money was spent.
I asked her for credit, she answered me nay,
For such stitches as mine she could see every day!

I pulled from my pockets a charter so bright
That the shopkeeper’s eyes opened wide with delight.
She said “I have linen and yarn of the best
And the words that I spoke then were only in jest.”

I stretched out the linen, drew on the cartoon,
And I set to, the deadline was looming in June.
My stitches were even, my colour choice fine,
Yet I fear I must surely be out of my mind.

And it’s no, nay, never,
No nay, never, no more,
For I’m now a tame seamstress,
And get paid before.


Three Weavers
Words by Eowyn de Wever (written at Kingdom A&S 2011)
Tune: Three Ravens

There were three weavers sat at a loom,
Down a down hey down a down,
They traced out life and traced out doom,
With a down.
The first, she spun the living thread,
That held his life, his blood so red,
With a down, derry derry derry down down.

The second wove the gift of life.
Down a down hey down a down,
She wove him love and loss and strife
With a down.
She wove in gold, she wove in ache,
She wove him down to the earthen lake,
With a down, derry derry derry down down.

The third, she cut the final length,
Down a down hey down a down,
And as thread snapp’d so did his strength,
With a down.
Fates and Furies mote these be,
Spinner, Weaver, Cutter three,
With a down, derry derry derry down down.

Clothes Make the Man

Last summer C. R. Brandenburgh completed his doctoral dissertation at the University of Leiden.  His dissertation, titled “Clothes make the man : early medieval textiles from the Netherlands” is available at the Leiden Universitory Repository and the Full Text version (first of the download links) includes an english version of the dissertation.

To quote from his summary:

This study has focused on the use of cloth and clothing in the area now defined as the Netherlands, in the period between 400 and 1000 AD. (p. 198)

There’s still a lot of reading to do, but the first fascinating observation was that it wasn’t just the shape of the clothes that varied according to gender; it was also the type of fabric used.  Twills and tabbies, while similar, require slightly different weaving set-ups.  In tabby, you only need two heddles that raise alternately, and in a pinch you can make do with one heddle and one separator.  (We still do this in modern timed when inkle weaving; the two paths that the open and heddled threads take, respectively, through the loom, help create the high and low positions.)  For twill, on the other hand, you need multiple sets of heddles, as each heddle in turn is kept high (or low) for two (or more) picks at a time.  Thus in a 2/2 twill is thread is high twice and the low twice, but the high/low state changes are offset, creating the effect of diagonal structures (as seen, for instance, in plaids and herringbone twills).  A 1/3 twill on the other hand will see each thread high once, and low three times.

Reading 4 harness weaving drafts

(Right after I started planning out 10 days of posts, I got hit by the crud, so these posts will be a bit delayed.  Sigh.

At Gulfwars this year, I picked up a lovely little 4 harness loom – a Wolf Pup LT. It’s got an 18 inch weaving width, which is perfect for sampling and trying to work out how patterns work. That, along with a copy of Anne Dixon’s The Handweaver’s Pattern Directory, meant that I could start experimenting with patterns.  First weaving some of the many many patterns in her book, and eventually moving on to my own.  (Not there yet.)

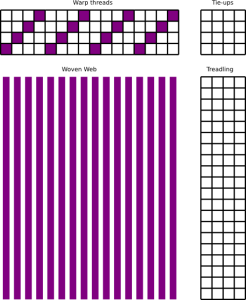
So today I’m going to talk a little about patterns.  Now the way they’re drafted in her book, you have the threading along the top, the treadling (which treadles are pressed for each row) along the right hand side, and the tie-ups (which harnesses are lifted when a treadle is pressed) in the top right hand corner.

Consider for instance Warped threadsthis set up.  Here the tie-ups and treadling aren’t listed yet, and all we’re concerned with is the warp threads.  The warp threads grid is structured as follows: each row represents one of the harnesses, and each column represents one thread.  For now, each thread will be controlled by only one harness.

Later when I’m trying out more complicated patterns I may switch to a different type of heddle.  The loom currently uses eye heddles which means that the thread high is controlled by the harness; if the harness goes up, so does the thread, and if the harness stays down … the thread can’t rise.  If I use an open heddle, lifting the harness will raise the thread, but lowering the harness won’t force the thread down.

In any case, in this set up the threads are set up so that from left to right you have one thread each through harness 1, 2, 3, and 4, and then you repeat.

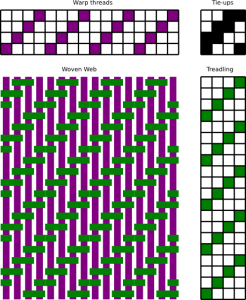
Simple 2/2 TwillNow we add the tie-ups and the treadling.  This is a standard 2/2 twill tie up: the first treadle lifts harnesses 1 and 2, the second lifts harness 2 and 3, then the third lifts 3 and 4, and the last lifts 4 and 1.

The treadling is actually read from the bottom up, since when weaving on modern looms you usually weave away from you.  (On standing looms it would be quite plausible to read the pattern from the top down.  Unlike cardweaving there’s no twist to worry about, so either way would work.)

The nice thing about this setup is that as long as the twill goes in the same direction, you can just keep treading 1-2-3-4 over and over.  (Or for a twill in the other direction, 4-3-2-1 repeated ad nauseum.)


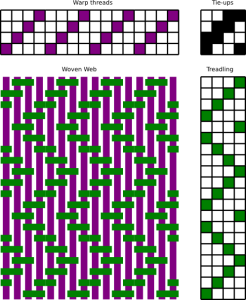
Simple 2/2 twill with reversalBut let’s say, for the sake of argument, you want diagonals that change direction after every fourth throw of the shuttle.  You can start with 1-2-3-4 for the first four rows, but following that up with 4-3-2-1 gives an odd effect (or rather, you end up unweaving what you just wove, unless you have a floating selvage), so that doesn’t really work.

Instead, when you reverse the direction of twill, you will weave 4 rows, but start with 3-2-1-4 , and by doing that you get a lovely zig zag.

But notice the long stretches of purple thread on the edges?  Those are – as I discovered on my first piece – going to be a problem because the weft won’t go out to the very edge.  The simplest solution is a “floating selvage”, which is an extra warp string on each side that isn’t passed through any heddles.  Then while weaving, you push the shuttle underneath the first free floating string, and over the second on the far side, so that the shuttle always ends up going around the selvage strings on each side.

For an even nicer edge, you could use multiple selvage strings, but I confess, I haven’t figured out how to tie them into the harnesses yet to get some sort of tabby weave.  Having two extra harnesses would really come in handy here.