So for Christmas this year I acquired a modular pinloom from a seller on etsy (https://www.etsy.com/shop/TotaLoom). The looms are modular, with pin bars and angled corner pieces, so that you can arrange it into hexes and diamonds, and squares, etc. (The angles I have so far are 60, 90, and 120 degrees.) Of course, then the question becomes what to make. I started with making diamonds with some yellow acrylic I had left over from mom’s visit.
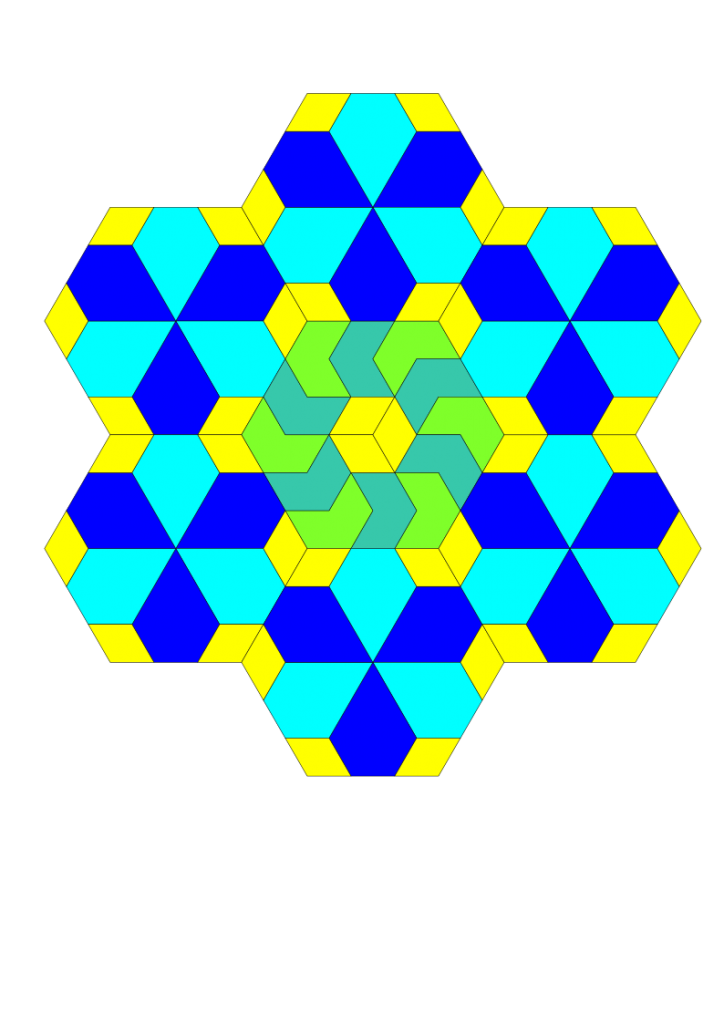
And then this morning I started noodling about patterns. This pattern block uses the hexagon as it’s main inspiration, although all the shapes are variations of the hexagon so that they can all be woven with the continuous warp approach. I’m calling this one the Field of Flowers, and I’m thinking I can vary the fields by using different colours.
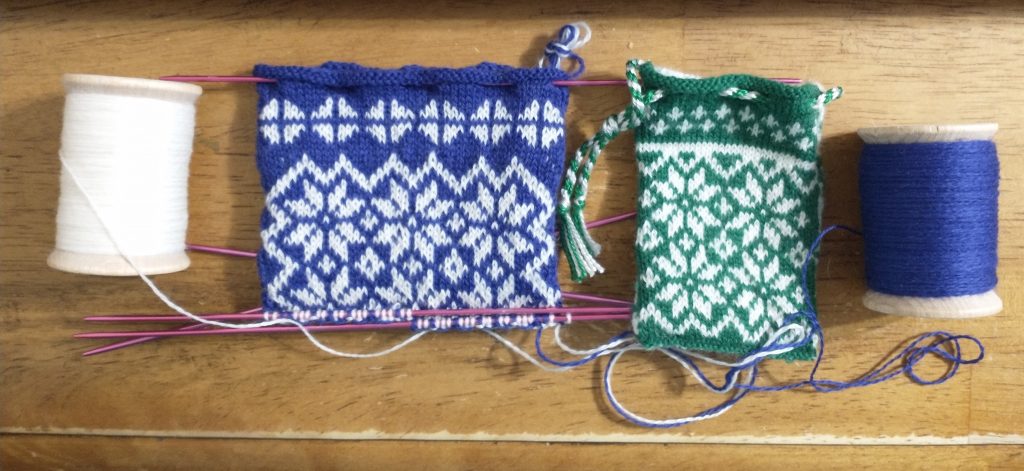
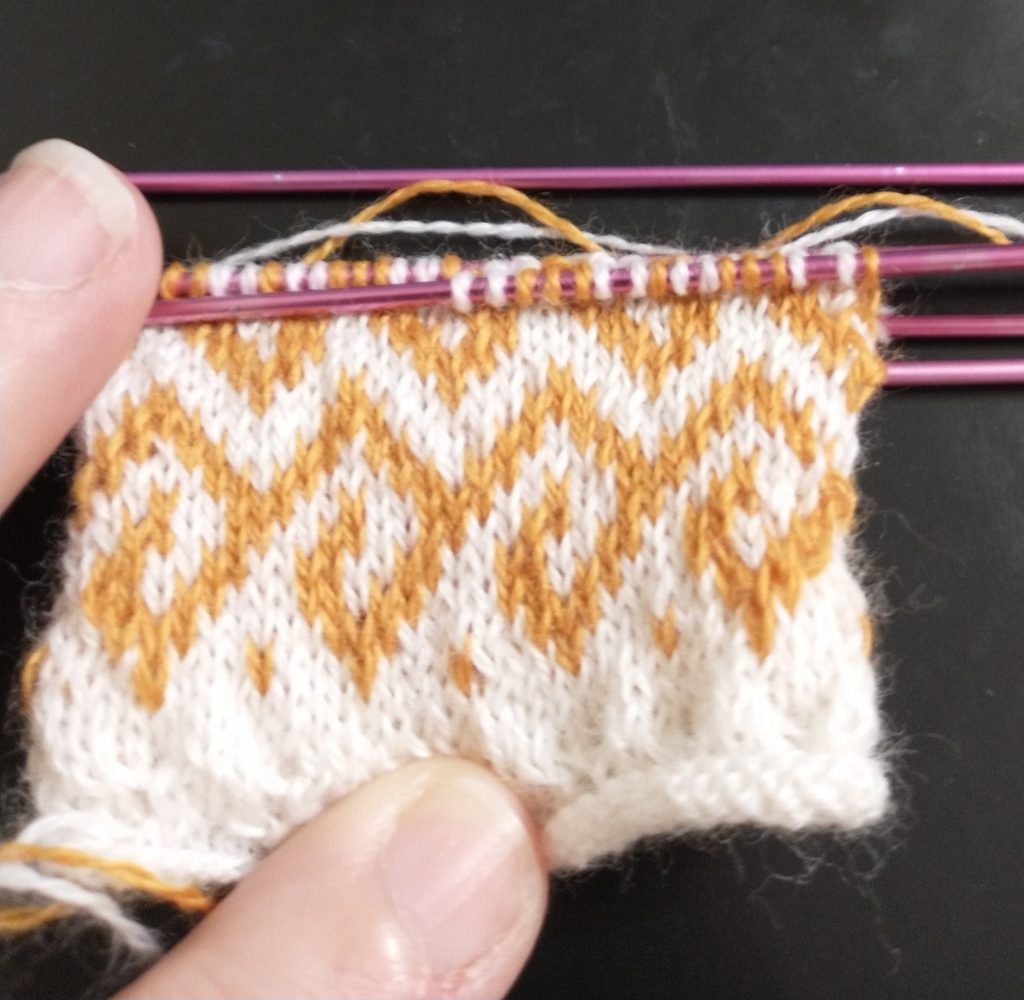
So it started with the green pouch, which was knitted on 000 needles with 2/18 merino wool, and each side was 33 stitches wide. The green pouch is a cute little pouch, and the other side is actually a reverse image colour wise, as you can see in the picture below where the needles are rearranged so that the eventual side seam is in the center of the picture.
In progress, you can see the colour change happening on the side seam.
So in the new blue and white pouch I had some design choices to make. For starters, I wanted to make it larger, so decided I would use larger needles – 00 rather than 000 – and I would have three pattern repeats across a side rather than two. Switching the needle size results in a slightly less dense fabric after finishing; when I knit this wool the 000 ends up being just a little tight. The 00 size is hitting a sweet spot; 0 produces a light and flowy fabric that is not ideal for pouches. (So now I have to train Sammie to stop eating the pink knitting needles, those being the size 00 ones.)
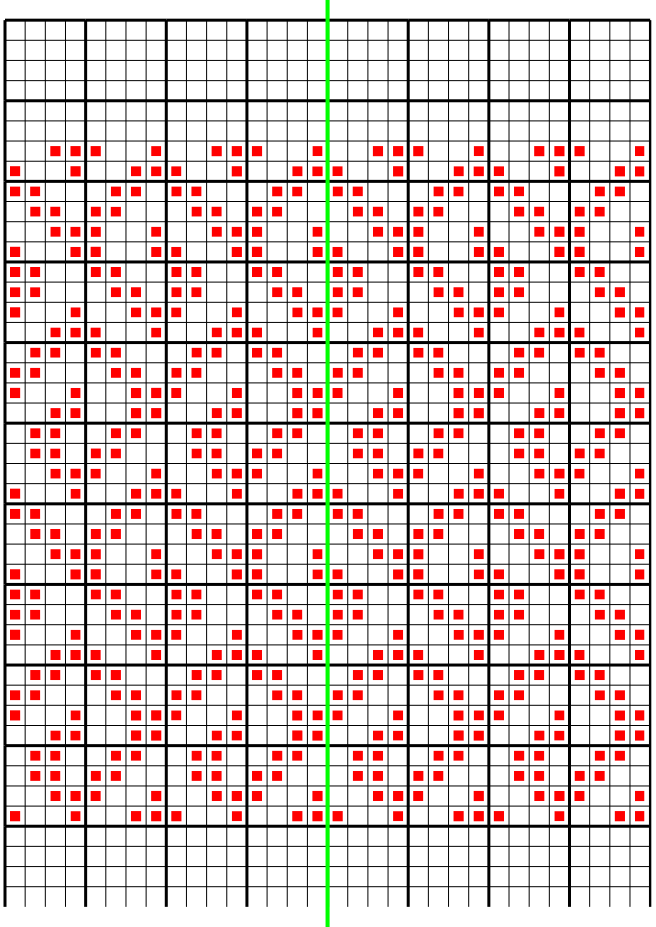
So I was just going to grab the previous pattern and insert an extra flower. Easy. The original pattern is 33 stitches wide – 2 times 16 and a 1 stitche repeat on the edge, so just add another 16 stitches making each side 49 stitches wide.
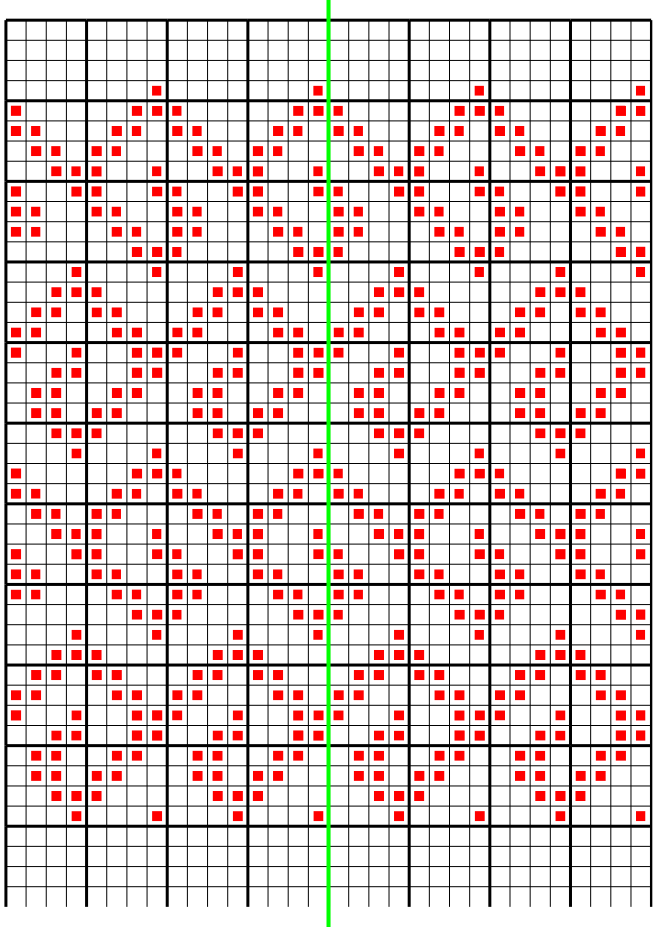
It wasn’t until I’d knitting past the row of 6 florets on the top that I grabbed the graphed pattern and realized my mistake. In the original pattern the flowers are not in the middle of each half of the pouch, but are a little closer to the center. Adding another flower means adding 13 stitches, not 16. But I was already half an inch into the pouch, which means I’d been knitting for well over an hour. Time to pull out the inkscape again and fix the problem.
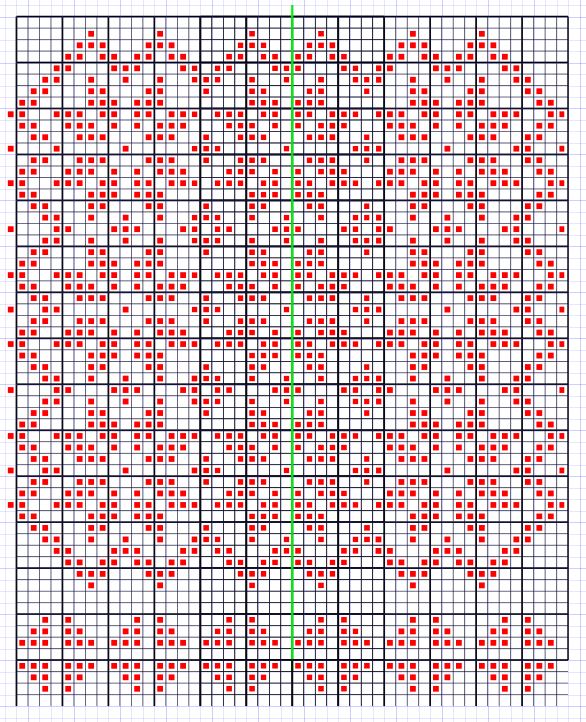
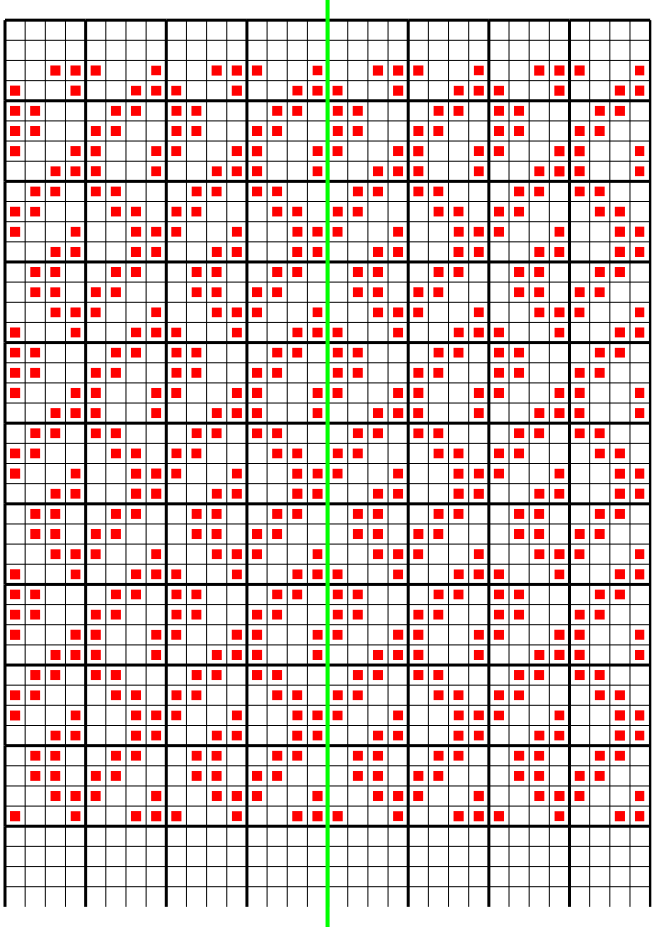
The new and improved flowers pattern
So this pattern looks a little odd because of the dots on the left side; that’s the 49th stitch which didn’t fit on the graph but is there. (Since someone asked, as always, the pattern is knitted from the bottom up, which is a habit I developed while tablet weaving. It doesn’t matter much either way, but knitting it top down results in the little crosses not looking like fleur de lys.) The green line, by the way, is the dividing line between two of the four needles holding stitches. I knit these using 5 double pointed needles, so each side of the pouch is 2 needles wide.
Sometimes an appendix in A&S documentation screams to be be turned into class notes. In this case, the class notes are for fingerloop braiding: specifically to braid a sampler that on eight loops … except when some loops are doubled up and you work with effectively six or four loops.
I’ve added the new class notes to Class Notes, but the pdf is available here, all 4 shiny pages.
Blathering a bit about designing and iterating a design.
So musing some more about pattern design, and specifically designing for small pouches. I wanted to do something with a greek key design so I started with a simple pattern. (Okay, I was inspired by the thought of thorny rose stems, but then got carried away … It happens) And as you can see below, this is how I usually expand and iterate patterns until I get things I like.
First attempt at Greek Keys
Problem was, as I started knitting it, that the space between the rows was one stitch too large, resulting in an uneven pattern, as you can see below.
So I fiddled some more, bringing the stripes closer together, and then for a final attempt I tried to super impose the stripes, resulting in the following two patterns. Now, of course, I have more pouches to knit, to see which looks best.
This is a food for thought post for people who wonder why I recommend obsessively making many small things when learning a new string related skill.
It all started with a comment that reminded me of the pottery school story.
Students in a pottery school were graded one of two ways. One group was graded on how many pots they finished, by weight, and the other group was graded on the best pot they produced.
To many people’s surprise, the first group produced, on average, much better pots.
I’m seeing a similar metric play out in my tiny knitting. I’m just knitting little pouches. Each is small enough that I *will* finish it, even if its imperfect. Some mistakes are being repeatedly, until I eventually cut that out. Others are design features.
Even when I can’t visually spot the improvement, I can *feel* it. The fingers move more easily, the yarn tangles less, there is less need for coffee …
And there’s a similar effect in pattern designing. As I’m designing more little patterns, and then knitting them, I’m getting a better feel for how the knitting will look. I’m currently on my 19th or 20th pouch, I think. (I stopped counting, mostly.)
The patterns I’m knitting are all 2-stranded, so usually 2 colours at a time. That means the pattern graphs are simple grids. Usually 32 stitches (or 2 needles) wide, because when I’m making tiny pouches, they’re usually 74 stitches in the round. (I’m a computer geek: 8 stitches = 1 byte, so these are 8 byte pouches.)
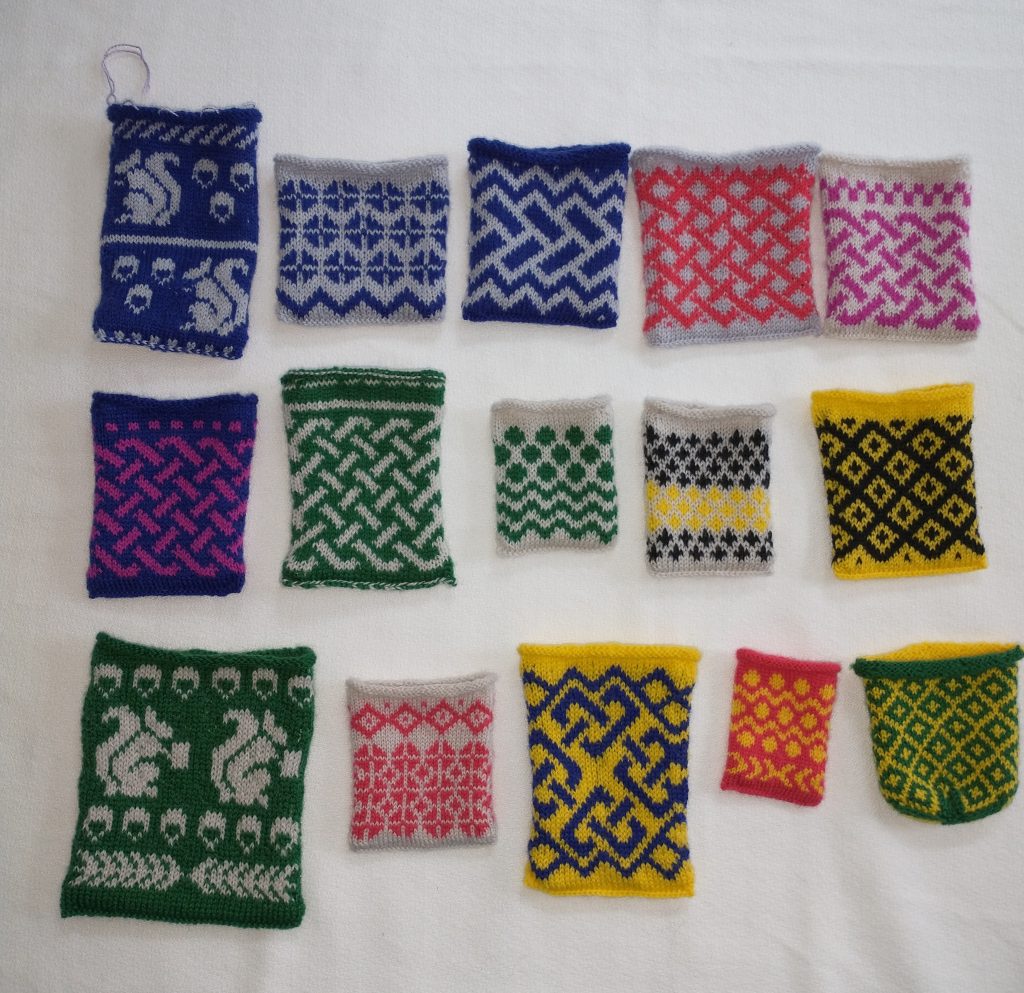
So lately I’ve been on a kick knitting little pouches in 2 colours. The pouches are usually 64 stitches in the round, knitted with 5 needles, so each needle (except the active one) has 16 stitches on it. They’re small enough that they knit up quickly and I can play with patterns. The last few pouches, I’ve been playing with interlaced patterns. These pouches are all knitted with 2/18 merino wool, on size 0 needles and are large enough to hold some coins, or a medallion, or some such.
Based on medieval (but much larger) pouches, they’re knitted top down, with holes near the top edge for the eventual drawstring, and finished on the bottom with a 3 needle bindoff. Basically, transfer the stitches onto 2 needles in parallel, and then on each stitch go through a stitch from each needle together. This sounds more awkward than it should.
While I think about it, the holes are made by knitting together, on each of the four needles, stitches 3&4, 5&6, 11&12, and 13&14. Then on the next row after the 3rd and 9th stitches, add 2 stitches back in using yarnovers.
First Attempt
Second Attempt
Doublesided
Still Doublesided
Experiments in Interweaving
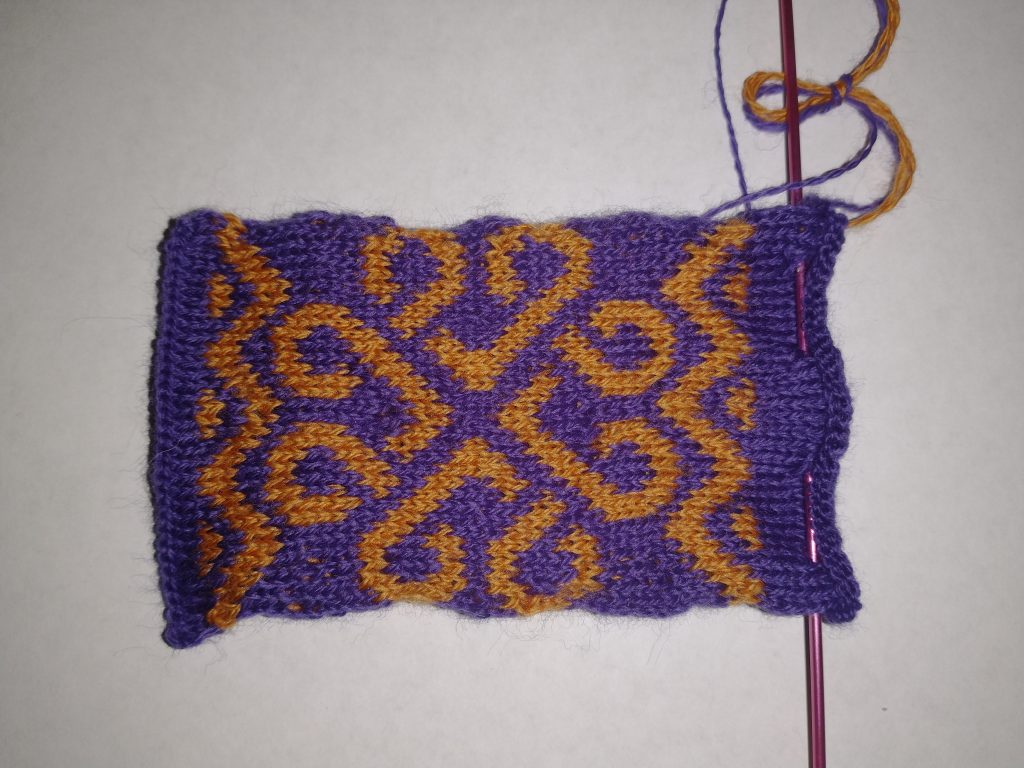
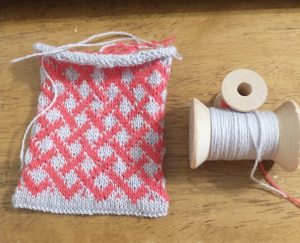
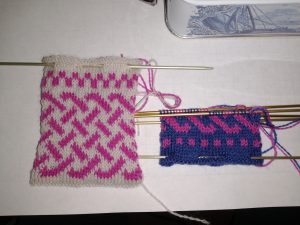
So the red and grey was my first attempt at interlacing. While technically interlaced, the diagonal bars were two close together so you can’t really see what’s going on.
After that I started playing with the magenta, which worked better. What you can’t see in these pouches of course is the crossing point at one edge where everything looks just a little wonky because you’re knitting in the round.
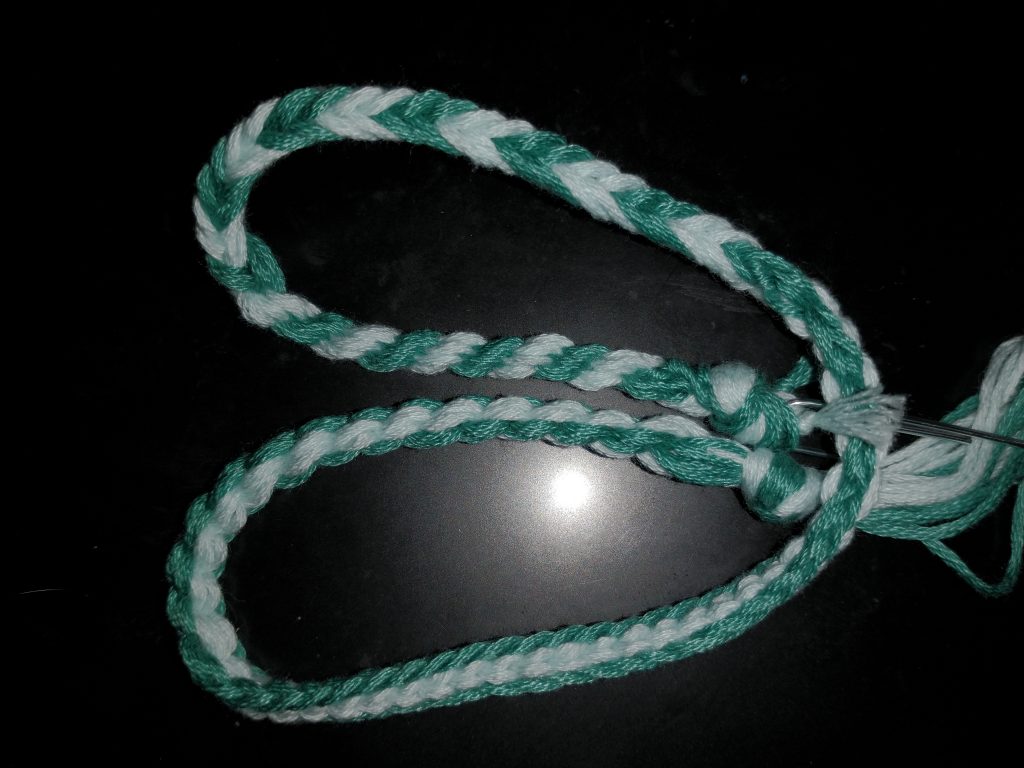
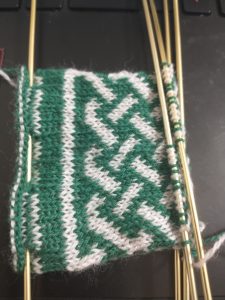
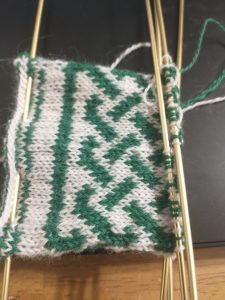
Which brought me to the current attempt in green and vanilla, where the two sides of the pouch are mirror images. That way the pattern extends exactly to the edge, but no further.
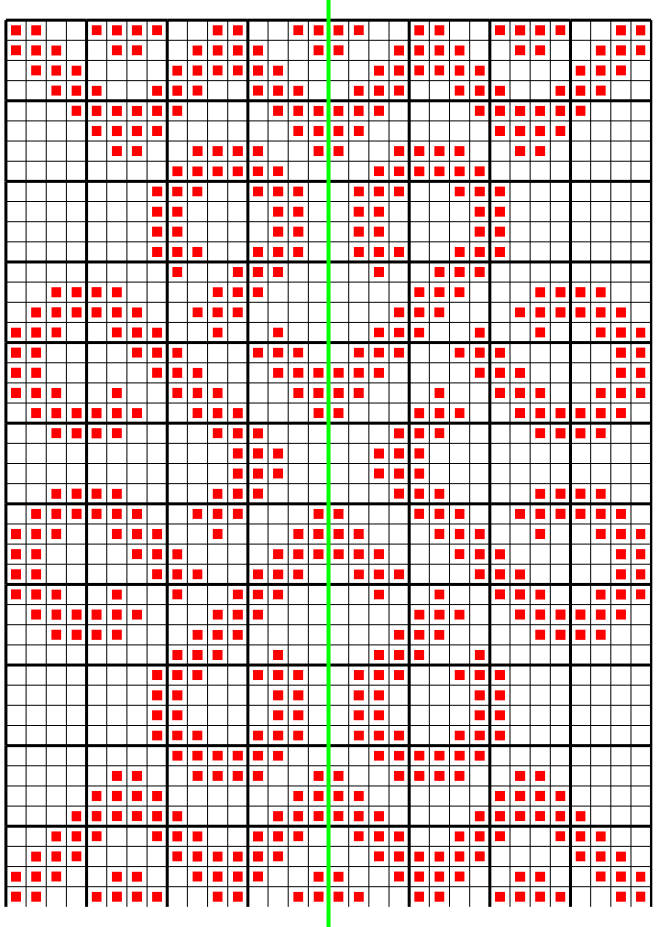
Pattern for Interweaving – 32 stitches wide
The pattern here is for one side of the pouch – 2 needles wide. The light green line marks the boundary between the two needles.
Note: this is a picture heavy post. And I’m learning about wordpress’s new block editor, which is its own brand of fun. So layout is a trifle simplistic.
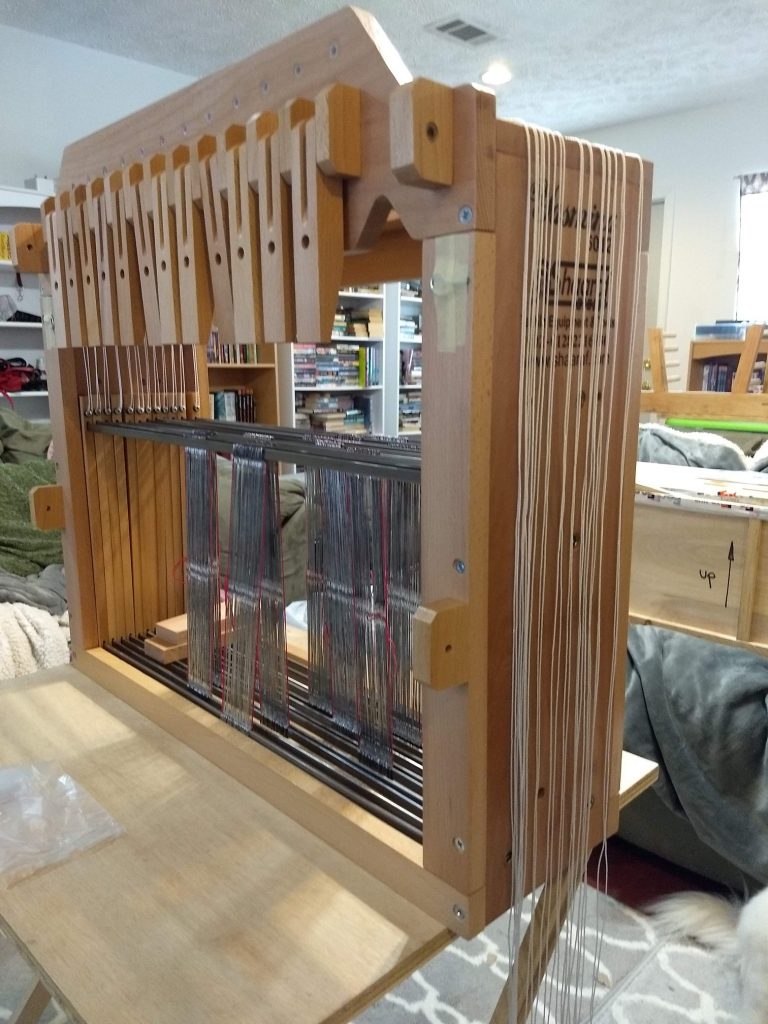
In the summer of 2019 I purchased a 12 harness tableloom from Egypt; it came packed in a lovely box, some assembly required. Which also allowed me to learn a lot baout how the whole loom was constructed. Here is what she looks like as I’ve assembled the castle – the structure that houses the 12 harnesses – and am about to tie the harnesses up to the levers that control them.
Esme’s Castle is assembled …
Since then she was assembled, I warped her up, I started weaving, I had shoulder surgery, covid hit, cancer hit, and … just recently I started weaving again. And I’ve been playing with weaving patterns that use 12 harnesses. I’ve been posting quick pics on facebook, but realistically, I would like to start collecting the patterns in a logical place. Like, uh, here …
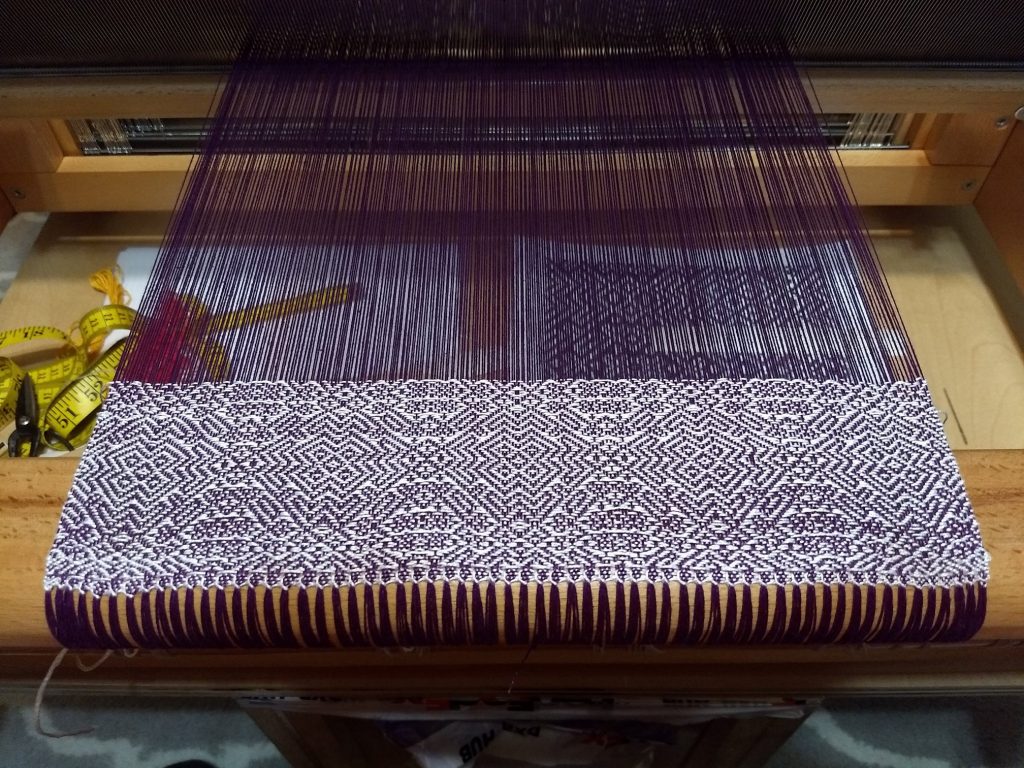
The first placemat on Esme
So this first placemat wasn’t too complicated, because it was a modification of twill, and I could follow along with my pattern so I knew where I was. Also, I finished this first placemat before the shoulder surgery. And then I started the second placemat …
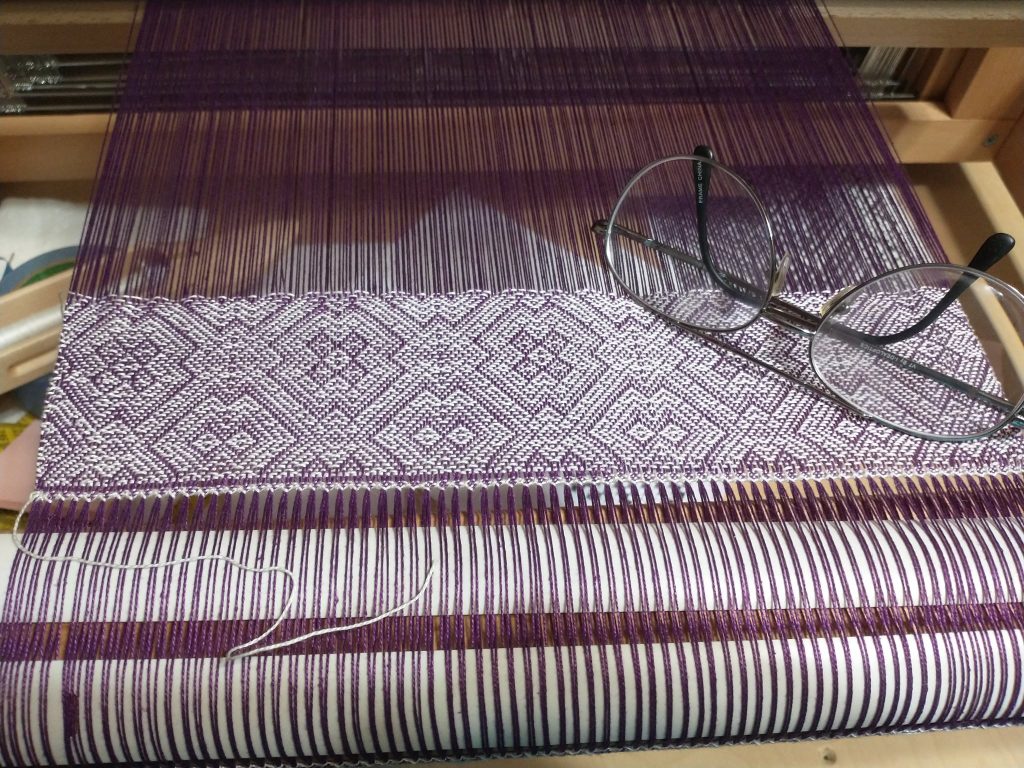
2nd placemat on Esme
And then I made the colossal mistake of stopping for 2 years … and not marking my spot in the pattern. (So the restart had … issues. And then I made a weaving mistake. And then … yeah. We’ll weave this one off and hide the bad bits.)
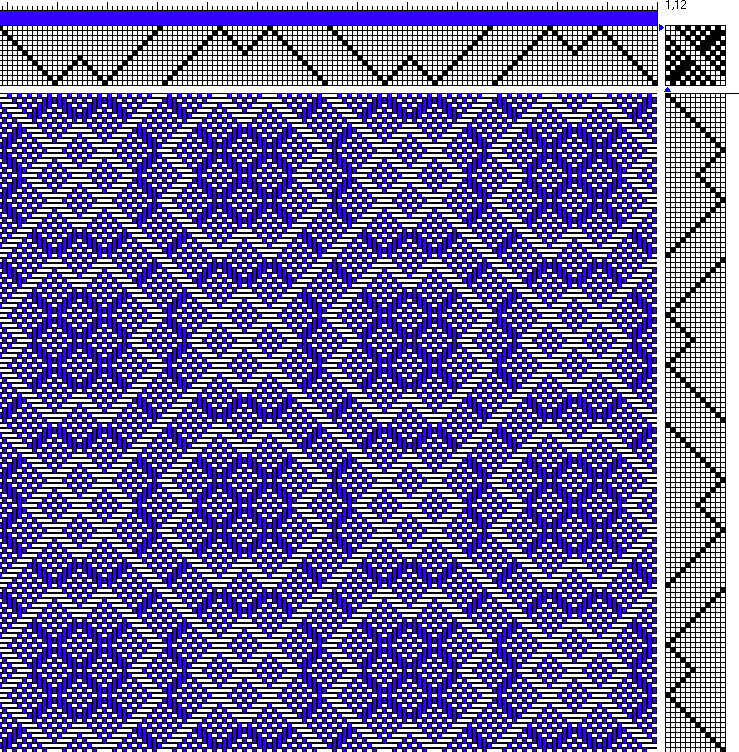
But meanwhile as I’m weaving I’m fantasizing about new patterns. Preferably ones that are less fiddly than this one because the fiddly doesn’t work as well as I would like because I’m working with fairly fine thread (10/2 cotton) so that the individual details fade out over any kind of distance. So after some inspirations from handweaving.net (where I had oodles of fun searching for other patterns with the same threading) the next two patterns I want to try are below. The difference is that these patterns are easier on the brain, because the changes are very predictable. Well, at least the first one.
New pattern to try
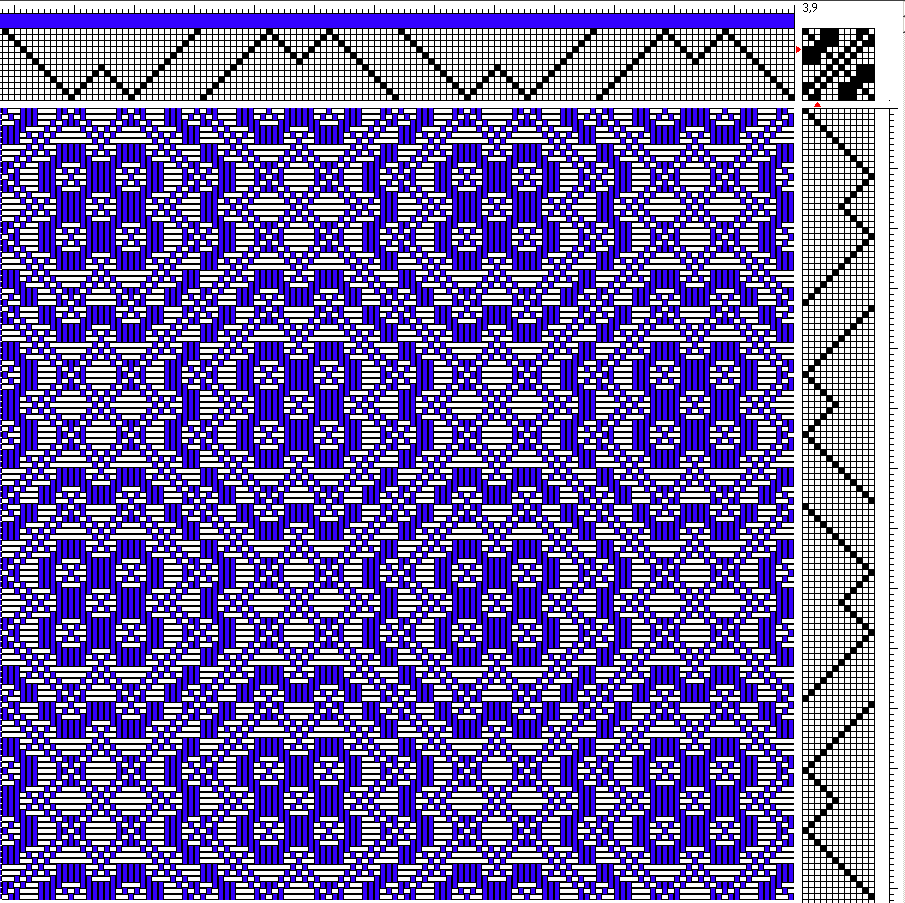
In contrast this pattern below is very different from the previous patterns, in that it has much longer floats. Now if I was weaving in wool the floats wouldn’t worry me in the slightest, because in the wet finishing the wool always felts to itself at least a little. But the current warp is cotton, which will shrink but not felt. On the other hand, this warp is set at 30 epi (ends per inch) so a 5 thread float is one sixth of an inch long. That’s about 4mm. It may be manageable. Especially if I end up throwing these into the feast kit for placemats.
It’s been a rough 2020, especially after the breast cancer diagnosis June 1st. Surgery June 4th, extra surgery June 27th or so to remove the infected bits, then one more surgery to install the port just in time for chemo.
We’re on radiation now.
Today I noticed the site had been hacked, for which I apologize: it has been cleaned up with malice etc.
Weaving posts should resume in 2021, when I have the energy to do some weaving. It may be the most basic of weaving, but at some point I will weave again.
Backstrap weaving using the minimum required while making fabric, and can be improvised anywhere you can acquire stick like objects.
I’ve been diving into youtube looking for helpful videos on how to set up and weave, and this is an unordered collection of links to videos and sites that intrigued me:
Rhade Warping – Brief video from Laverne Waddington showing how rhade weavers add their string heddles as they are winding the warp. (No voice over, visual only.)
I am intrigued by the variety of heddles and how tightly they are attached to the heddle stick, because these three offer three separate options. If you want to weave using more than 2 sheds, you can add additional heddle sticks to accomplish that. The biggest challenge seems to be keeping the length of the heddles consistent: this is less of a problem with the first two methods, where the loops aren’t tied in place.