Celtic Chains on 12 harness looms

Today is a twiddling kind of day, while watching software install.

I haven’t had the energy to play with the 12 harness loom for a while, but I’m hoping to get back to that soon. Meanwhile here’s one more pattern I can try weaving on Esme when time and energy allow. If it wasn’t for the M-W warping that’s already on the loom, I could just warp threads from 1 – 12, and repeat, and all the chains would face the same way.

Rampant Ram of Gleann Abhann

It’s a pattern for the Gleann Abhann rampant ram, in all its tabletweaving glory.

So I was recently reminded that lo these many years ago I had woven some rampant rams in a baldric or two in kingdom colours, and someone asked me for patterns.

Now the Gleann Abhann colours are red/ black, and white: the background being red and black, and the ram being sheepishly white. And I will admit my ram isn’t pizzled (although that fleck of black almost hints to me …)

And having found a picture dating back to April 2015, next was to see if I still had the graphed pattern. back then, many patterns were graphed on paper, rather than in the computer, because paper was handy.

And look what I found. Ready for printing. It’s doubleface, the pattern is only 30 cards wide, and will look best if you start weaving the pattern (which is woven from the bottom up) when the white in the right hoof creates a \/\ pattern. If it doesn’t, back up and weave one more row of background before you start the pattern.

This pattern, btw, is free to use to make Gleann Abhann tokens. Attribution would always be preferred, but it’s not suitable for commercial use.

Blackwork and Pincushions

Brief description of making a biscornu.

So as I mentioned in the previous post, there’s an enchanting stitch along of 36 blackwork squares. And while I don’t have the energy, yet, to commit to 36 squares in one project, I was reminded of an old project I had previously enjoyed, which requires two squares of fabric to make a pin cushion.

Specifically, a biscornu, which is a kind of pin cushion created by sewing two squares together along the edges so that the resulting three dimension shape is octagonal.

The finished biscornu.

The biscornu was created by first embroidering two squares on 28ct even weave fabric, using 60/2 silk (because I have lots of 60/2 silk handy) using the doublesided running stitch commonly used for black work. (Or in this case blue and green work?)

Then the squares are each surrounded by a red square, embroidered using the back stitch and keeping the tension loose. As you can see in the picture, the center of the top most edge of the lower square is marked with an extra stitch.

Both squares embroidered. There are some guide stitches basted in; I didn’t remove the urple since it ended up in the middle of the pincushion.

Assembly is harder to describe than to do, but basically the two squares are cut apart and then whip stitched together by looping under the red loops and slowly drawing it tight. Almost like lacing the two sides together.

The key point is that the corner of one square will always meet the center of one side of the other square. So when you start, you place the corner of the other square right up against that center little mark, and whip stitch together half a side. Then continue going around the corner, leaving the yarn loose until you’ve whipped around 4 or 5 stitches and then tightening the lacing.

I stuffed the pin cushion with some merino roving I had on hand when I had one side left to whip together. In hindsight I should have used more stuffing. Final step was to stitch together through both sides in the center and tie off. Without that final stitch, the result is much more like a pumpkin …

Stitchalong Blocks – Quick link

Quick link to two lovely embroidery stitchalongs.

This is mostly to remind myself of these stitchalongs when I have time again. (Stop giggling back there, I can hear you. Ditto the smirking.)


https://cliffsidestitches.com/stitch-alongs/

These are patterns from a lady who describes herself as follows in the About section:

I’m a needlework designer and stitcher, specializing in modern interpretations of traditional motifs from around the world. My designs are not meant to be historically accurate reproductions. I frequently adapt patterns and colors to appeal to a 21st-century sensibility, while respecting the spirit of the original source. Although I employ a variety of techniques including canvaswork and surface embroidery, I am particularly attracted to cross stitch and blackwork because of their widespread use in many cultures and time periods.

https://cliffsidestitches.com/about/

Playing with Quilting Block designs – Field of Flowers

So for Christmas this year I acquired a modular pinloom from a seller on etsy (https://www.etsy.com/shop/TotaLoom). The looms are modular, with pin bars and angled corner pieces, so that you can arrange it into hexes and diamonds, and squares, etc. (The angles I have so far are 60, 90, and 120 degrees.) Of course, then the question becomes what to make. I started with making diamonds with some yellow acrylic I had left over from mom’s visit.

And then this morning I started noodling about patterns. This pattern block uses the hexagon as it’s main inspiration, although all the shapes are variations of the hexagon so that they can all be woven with the continuous warp approach. I’m calling this one the Field of Flowers, and I’m thinking I can vary the fields by using different colours.

Resizing a pouch – adjusting the pattern

It started with the green pouch …

So it started with the green pouch, which was knitted on 000 needles with 2/18 merino wool, and each side was 33 stitches wide. The green pouch is a cute little pouch, and the other side is actually a reverse image colour wise, as you can see in the picture below where the needles are rearranged so that the eventual side seam is in the center of the picture.

In progress, you can see the colour change happening on the side seam.

So in the new blue and white pouch I had some design choices to make. For starters, I wanted to make it larger, so decided I would use larger needles – 00 rather than 000 – and I would have three pattern repeats across a side rather than two. Switching the needle size results in a slightly less dense fabric after finishing; when I knit this wool the 000 ends up being just a little tight. The 00 size is hitting a sweet spot; 0 produces a light and flowy fabric that is not ideal for pouches. (So now I have to train Sammie to stop eating the pink knitting needles, those being the size 00 ones.)

So I was just going to grab the previous pattern and insert an extra flower. Easy. The original pattern is 33 stitches wide – 2 times 16 and a 1 stitche repeat on the edge, so just add another 16 stitches making each side 49 stitches wide.

It wasn’t until I’d knitting past the row of 6 florets on the top that I grabbed the graphed pattern and realized my mistake. In the original pattern the flowers are not in the middle of each half of the pouch, but are a little closer to the center. Adding another flower means adding 13 stitches, not 16. But I was already half an inch into the pouch, which means I’d been knitting for well over an hour. Time to pull out the inkscape again and fix the problem.

The new and improved flowers pattern

So this pattern looks a little odd because of the dots on the left side; that’s the 49th stitch which didn’t fit on the graph but is there. (Since someone asked, as always, the pattern is knitted from the bottom up, which is a habit I developed while tablet weaving. It doesn’t matter much either way, but knitting it top down results in the little crosses not looking like fleur de lys.) The green line, by the way, is the dividing line between two of the four needles holding stitches. I knit these using 5 double pointed needles, so each side of the pouch is 2 needles wide.

Adding more class notes

Braid using 8 loops and 3 different techniques.

Sometimes an appendix in A&S documentation screams to be be turned into class notes. In this case, the class notes are for fingerloop braiding: specifically to braid a sampler that on eight loops … except when some loops are doubled up and you work with effectively six or four loops.

I’ve added the new class notes to Class Notes, but the pdf is available here, all 4 shiny pages.

Variations on a Theme of Grecian Keys

Blathering a bit about designing and iterating a design.

So musing some more about pattern design, and specifically designing for small pouches. I wanted to do something with a greek key design so I started with a simple pattern. (Okay, I was inspired by the thought of thorny rose stems, but then got carried away … It happens) And as you can see below, this is how I usually expand and iterate patterns until I get things I like.

First attempt at Greek Keys

Problem was, as I started knitting it, that the space between the rows was one stitch too large, resulting in an uneven pattern, as you can see below.

So I fiddled some more, bringing the stripes closer together, and then for a final attempt I tried to super impose the stripes, resulting in the following two patterns. Now, of course, I have more pouches to knit, to see which looks best.

Fixing the spacing on the bands of the Greek Keys

Food for Thought or Why So Many Pouches

This is a food for thought post for people who wonder why I recommend obsessively making many small things when learning a new string related skill.

It all started with a comment that reminded me of the pottery school story.

Students in a pottery school were graded one of two ways. One group was graded on how many pots they finished, by weight, and the other group was graded on the best pot they produced.

To many people’s surprise, the first group produced, on average, much better pots.

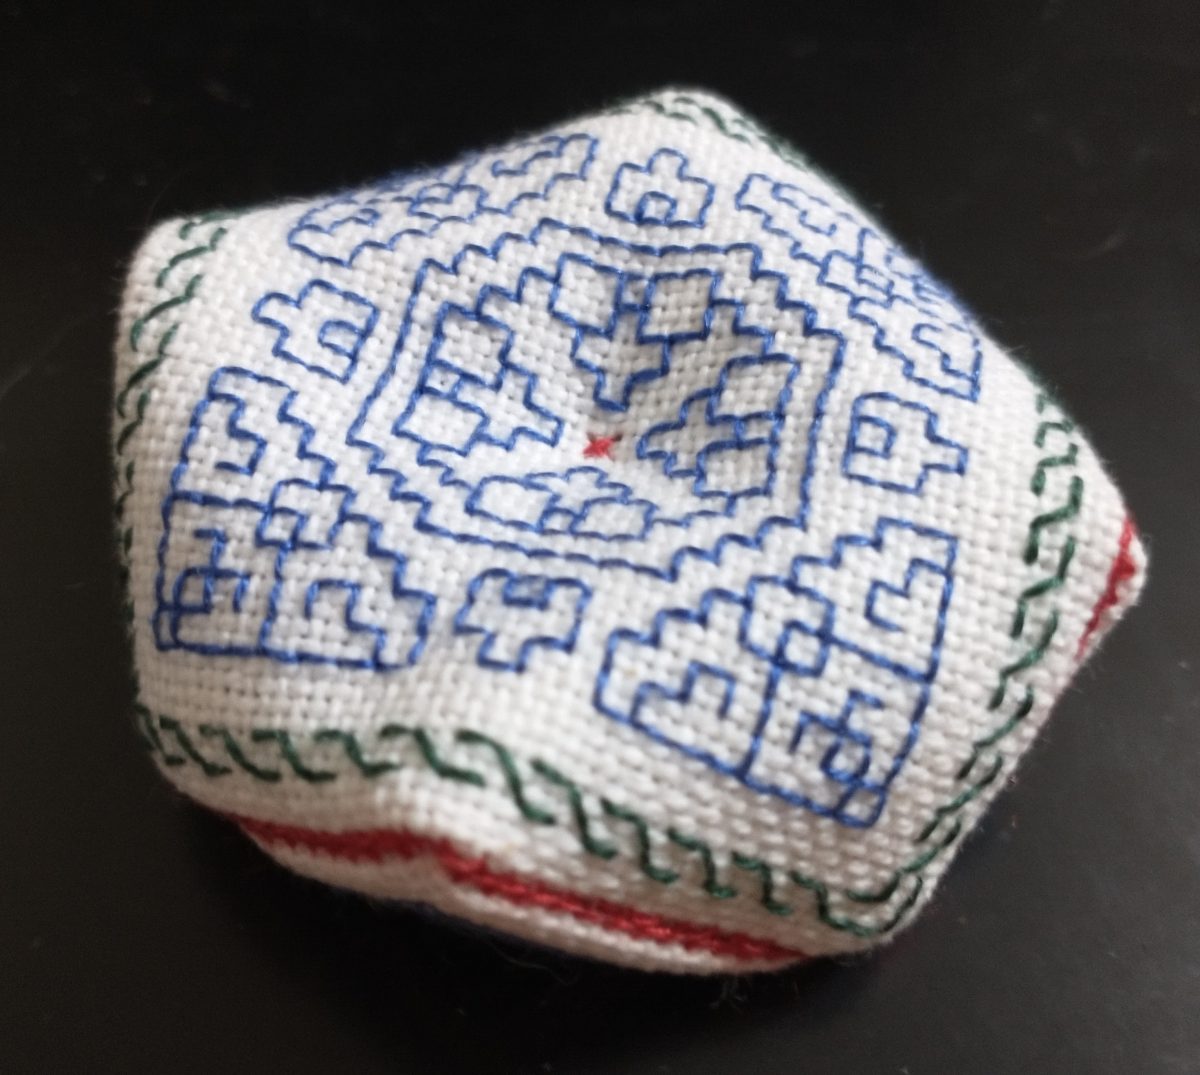
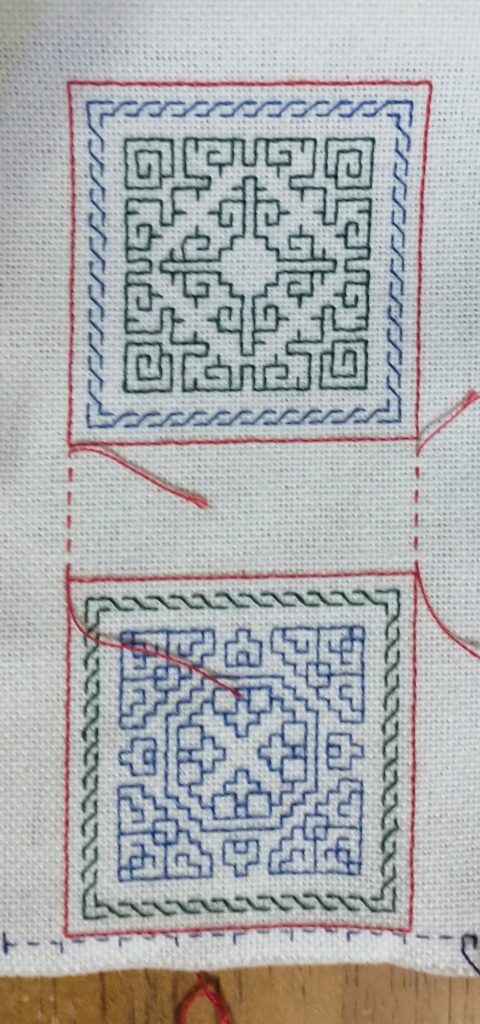
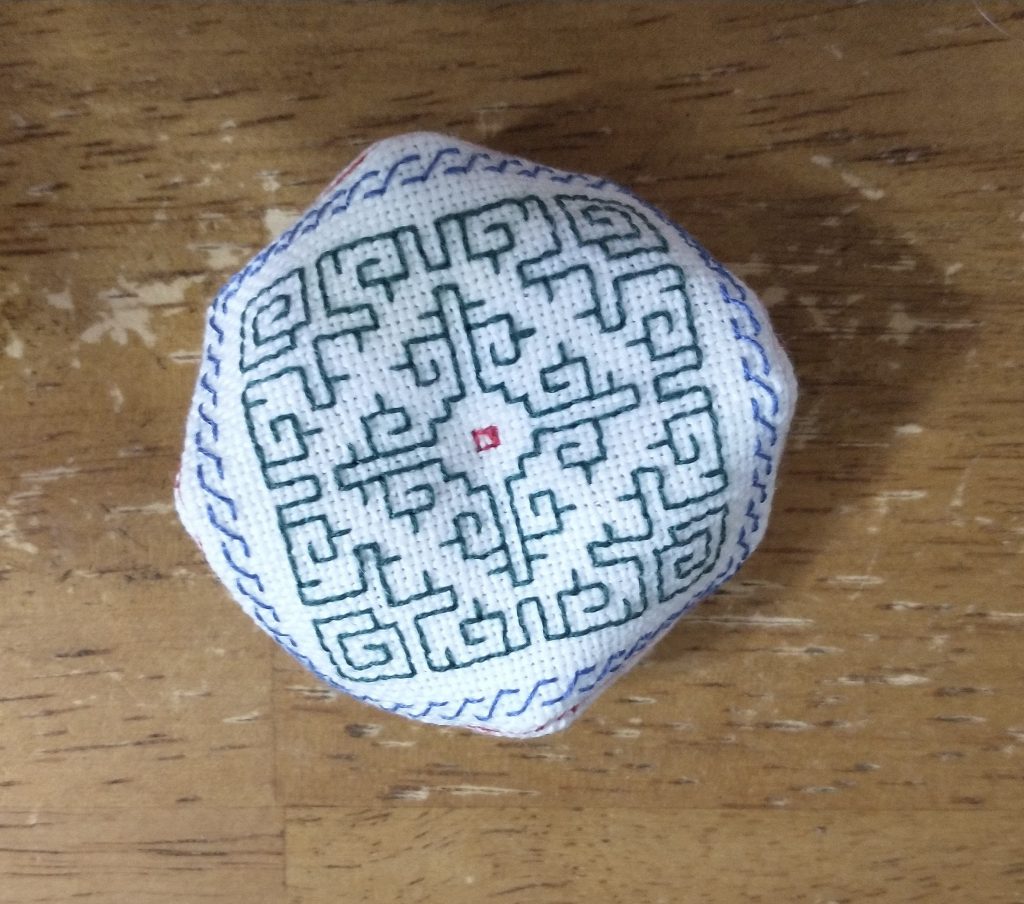
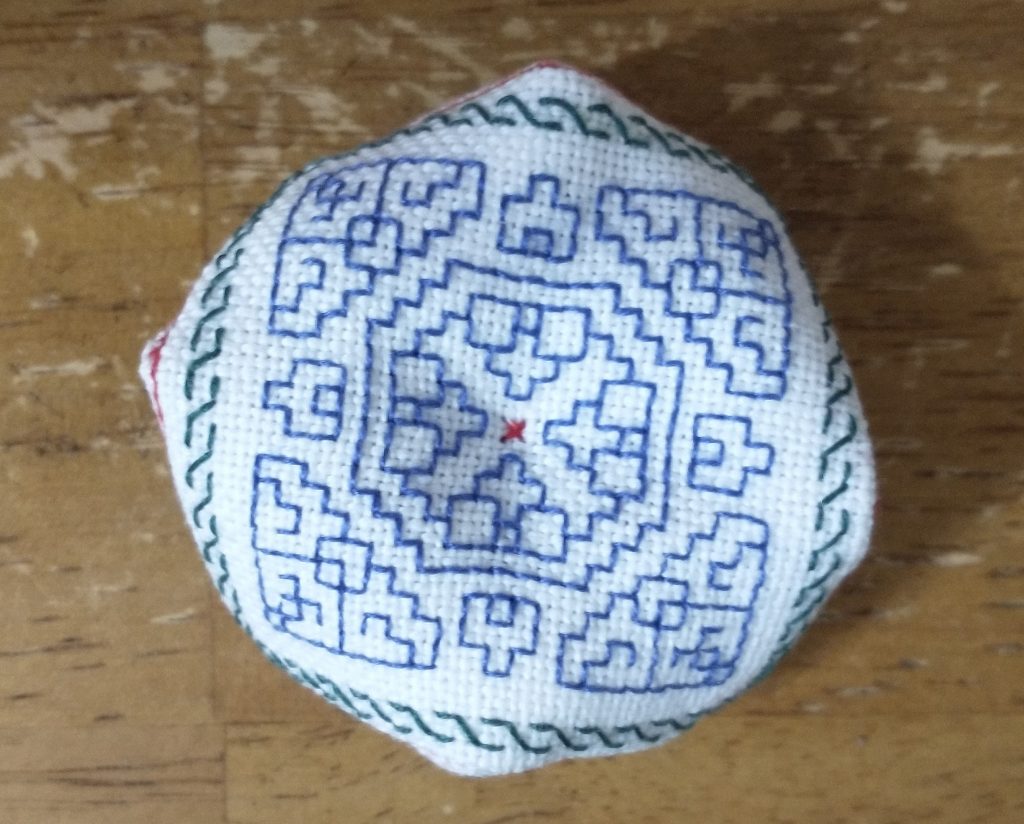
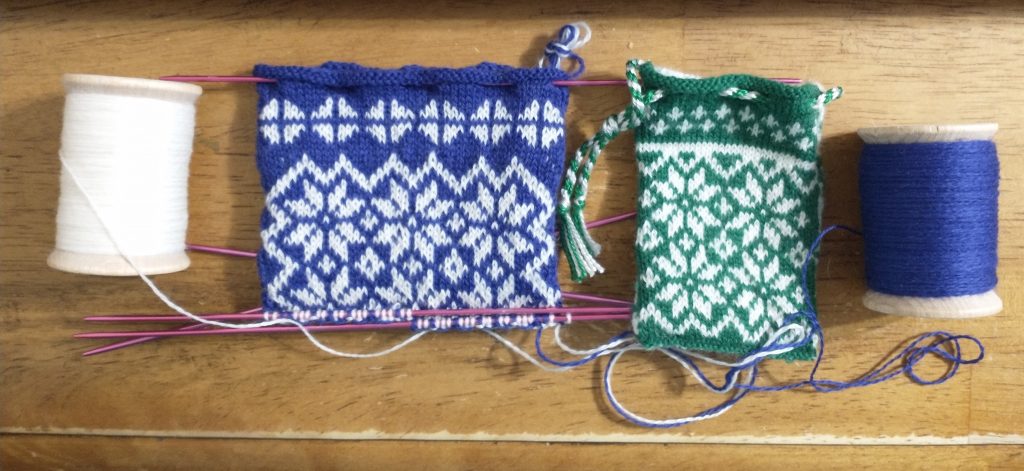
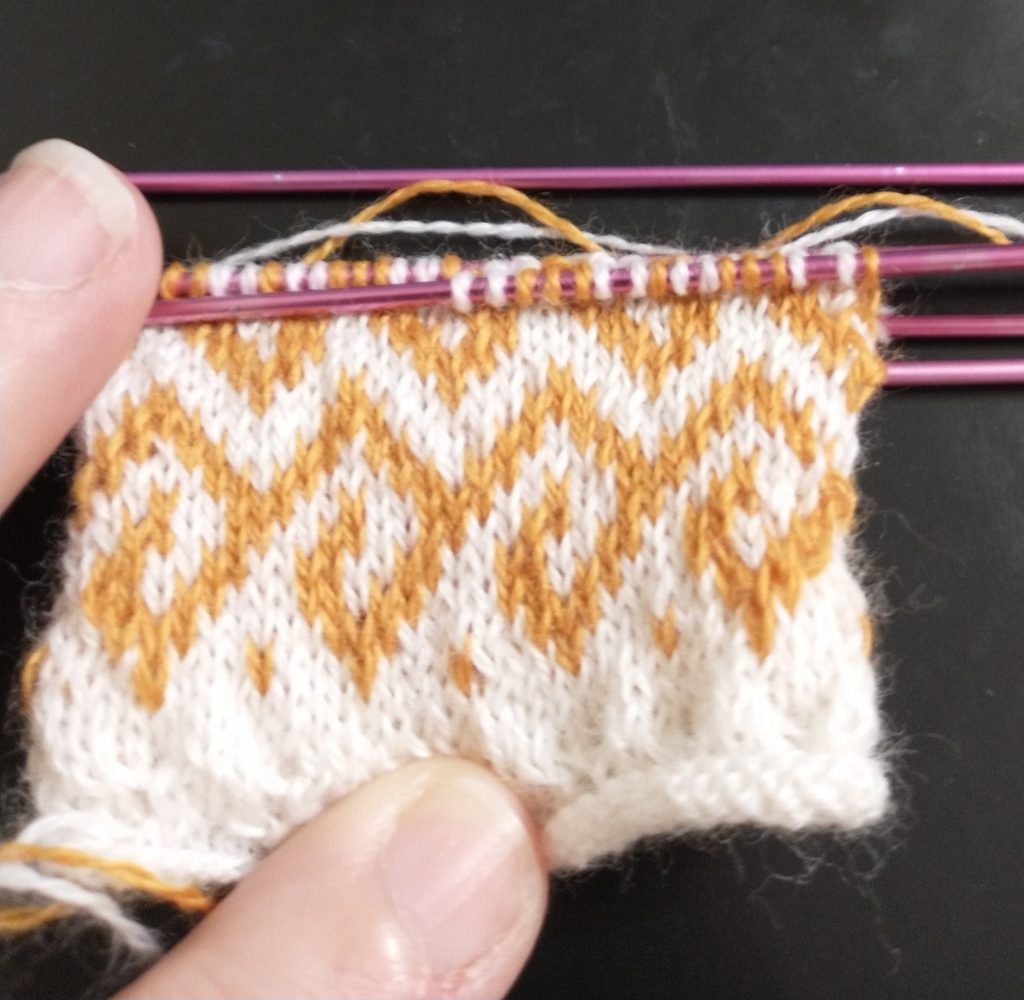
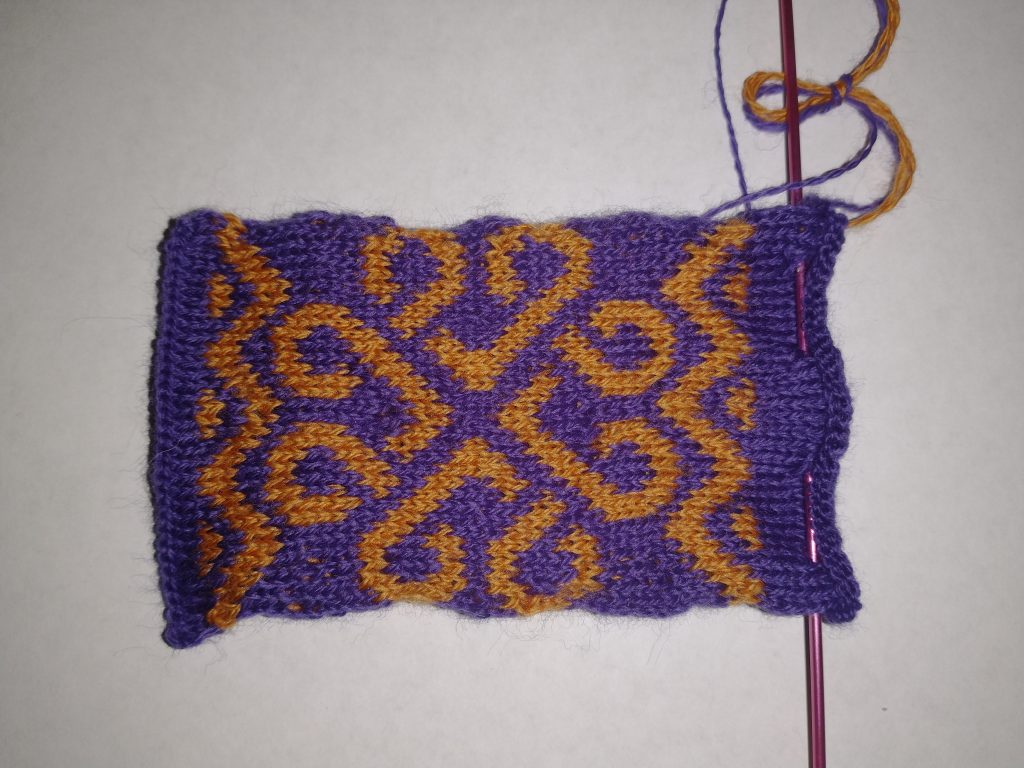
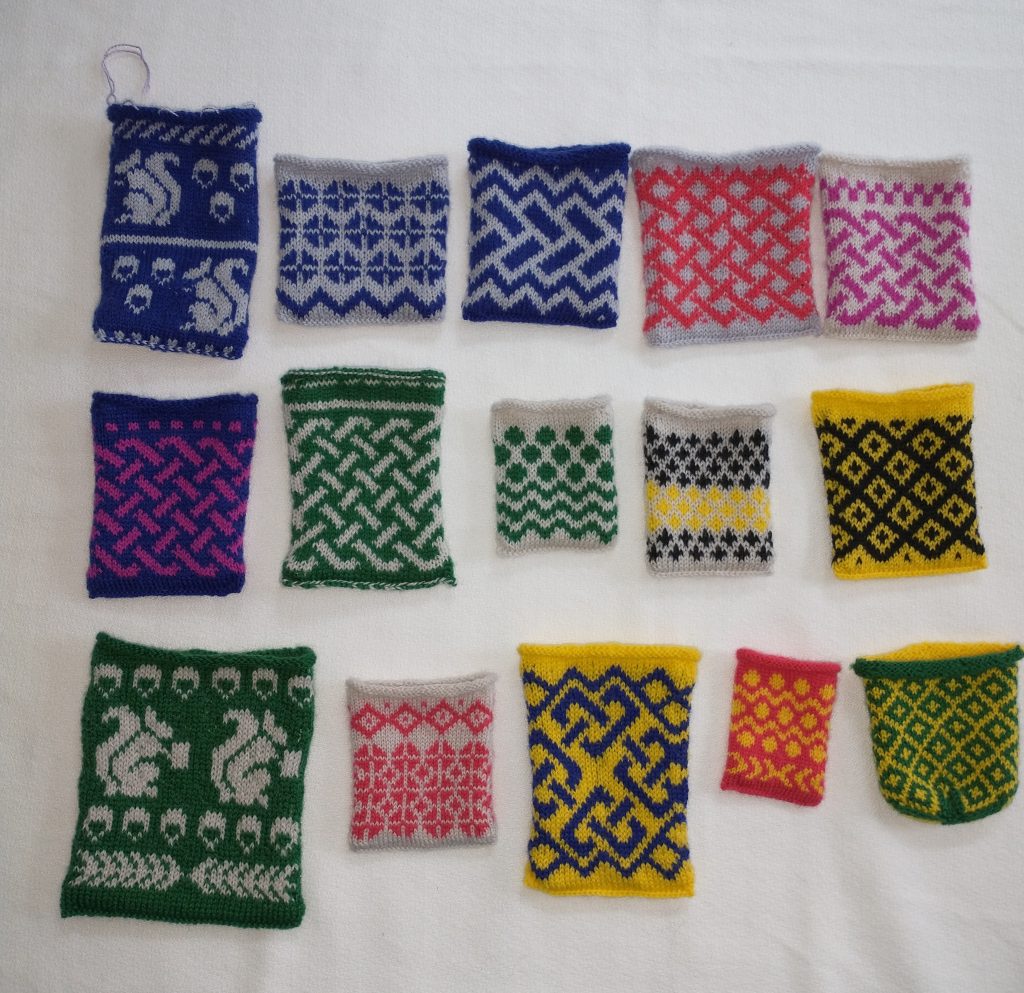
I’m seeing a similar metric play out in my tiny knitting. I’m just knitting little pouches. Each is small enough that I *will* finish it, even if its imperfect. Some mistakes are being repeatedly, until I eventually cut that out. Others are design features.

Even when I can’t visually spot the improvement, I can *feel* it. The fingers move more easily, the yarn tangles less, there is less need for coffee …

And there’s a similar effect in pattern designing. As I’m designing more little patterns, and then knitting them, I’m getting a better feel for how the knitting will look. I’m currently on my 19th or 20th pouch, I think. (I stopped counting, mostly.)

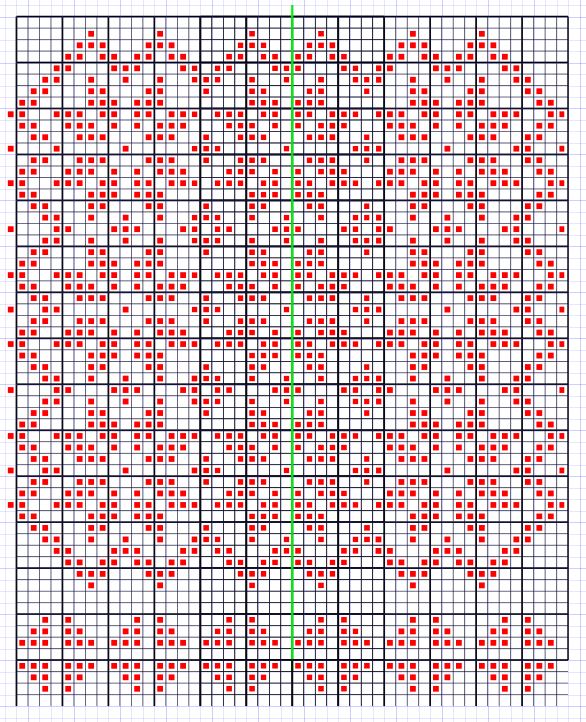
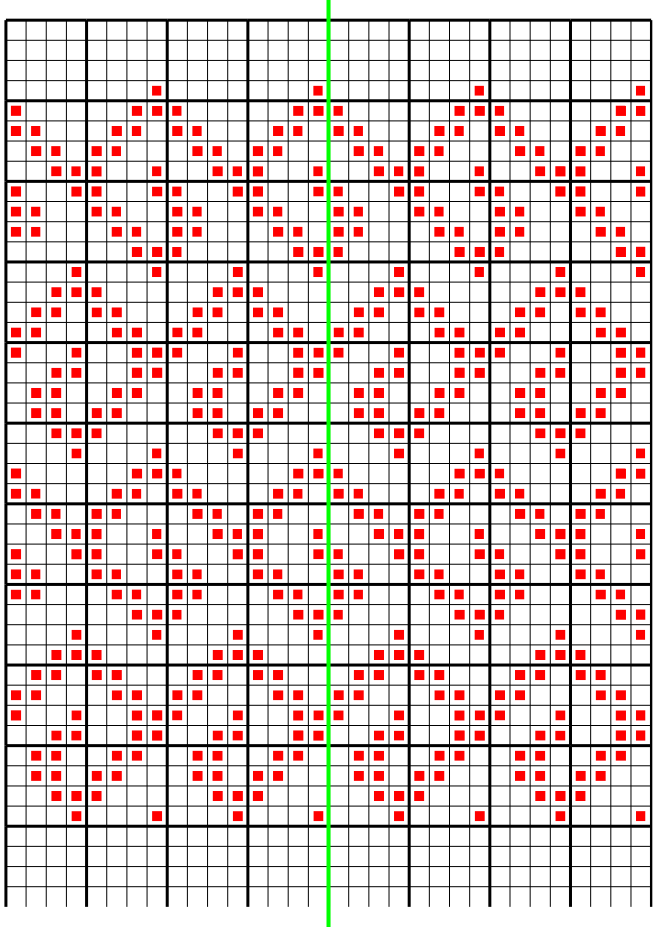
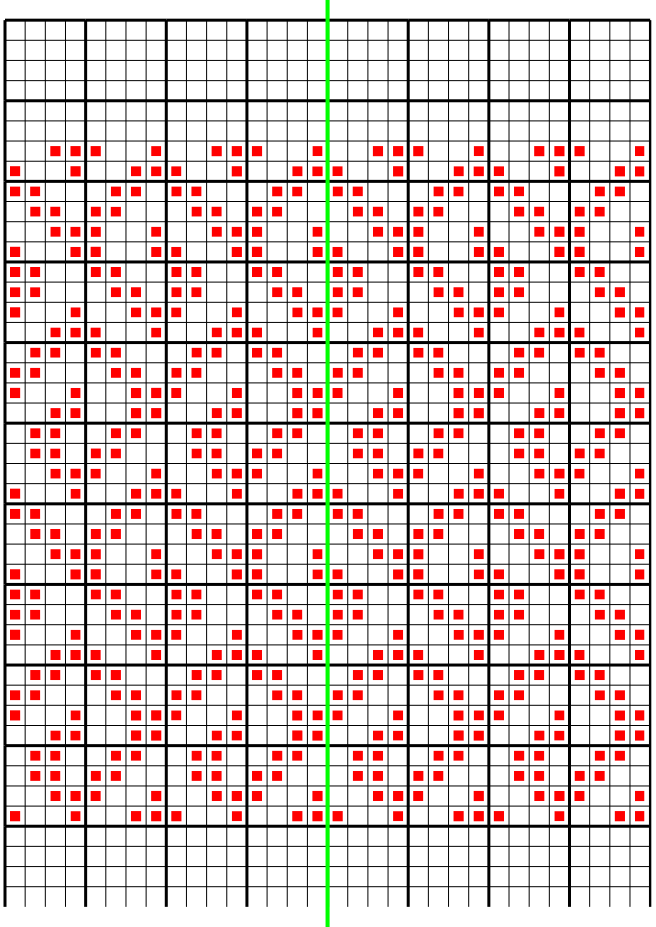
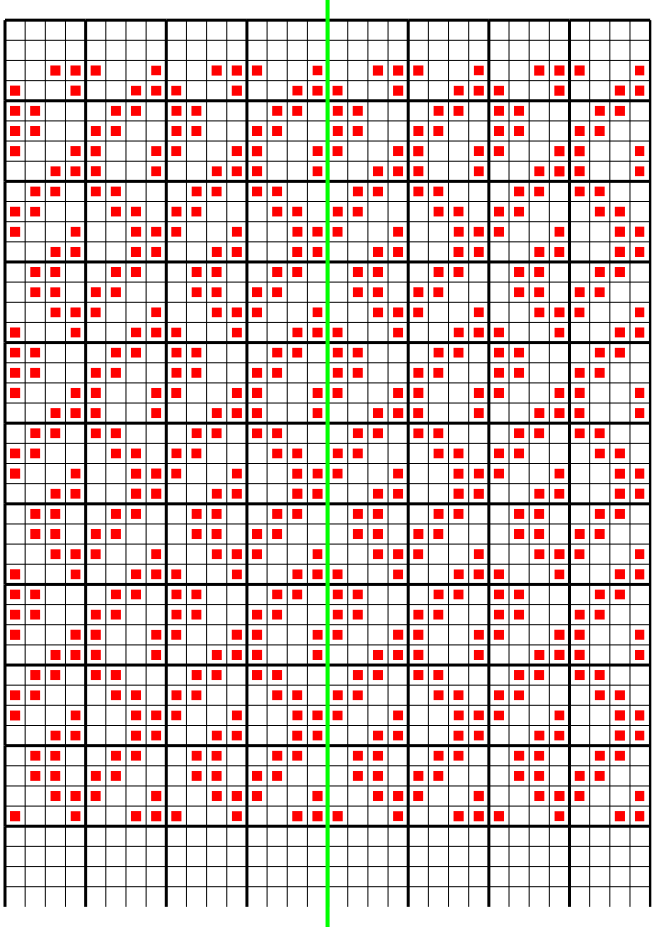
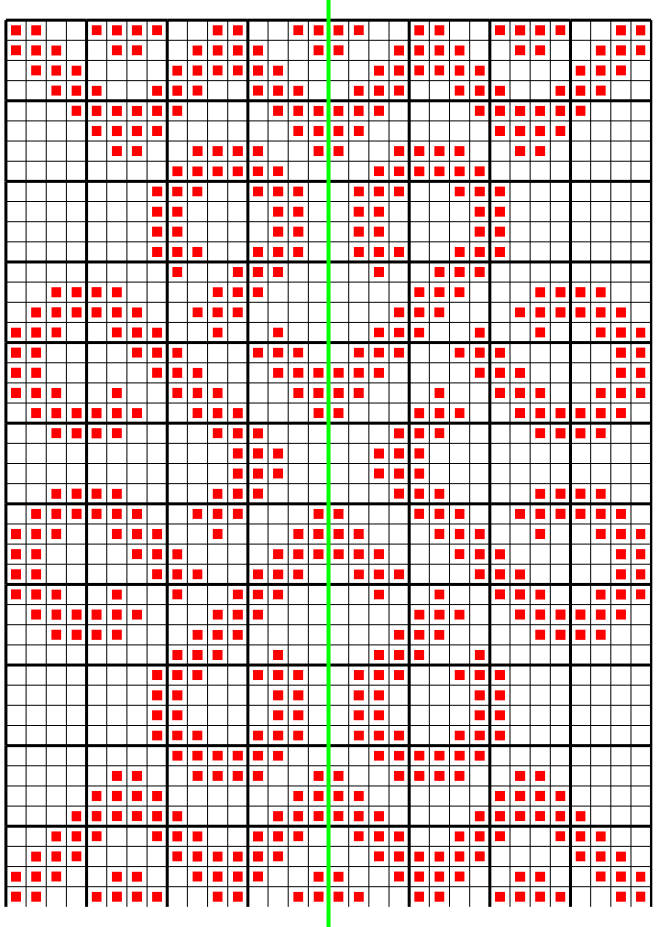
The patterns I’m knitting are all 2-stranded, so usually 2 colours at a time. That means the pattern graphs are simple grids. Usually 32 stitches (or 2 needles) wide, because when I’m making tiny pouches, they’re usually 74 stitches in the round. (I’m a computer geek: 8 stitches = 1 byte, so these are 8 byte pouches.)