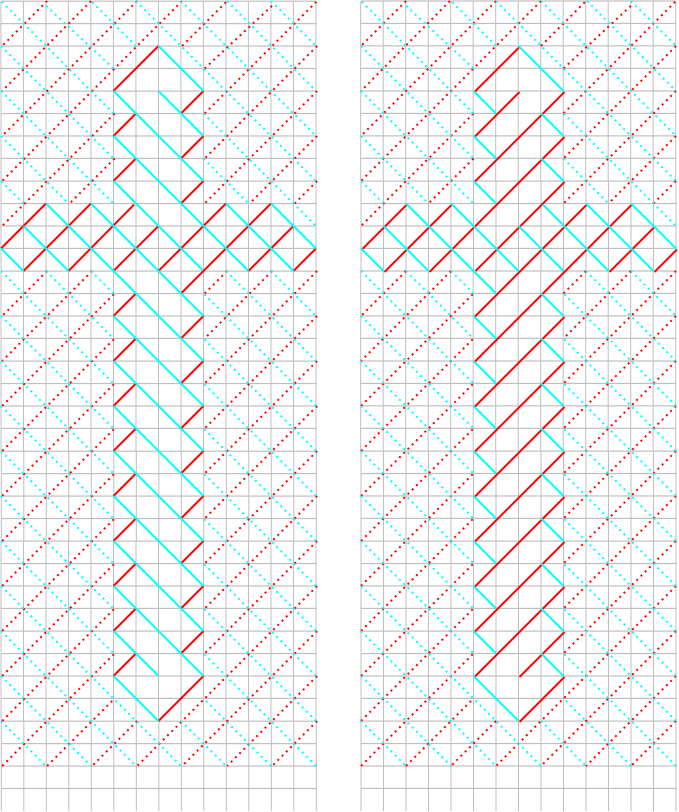
Playing with Baltic Pickup style inkle weaving

Threading diagramBaltic pickup style inkle is woven using background threads and pickup threads; the pickup threads are usually either thicker, or doubled up.  In the threading diagram, you can see how each pickup thread is place between two threads in the opposite heddle; the white boxes representing the pickup threads.  In the diagram one row represents the heddled threads and the other the open threads, and the rows aren’t labeled since it actually doesn’t matter which is which in this case, so why complicate things?


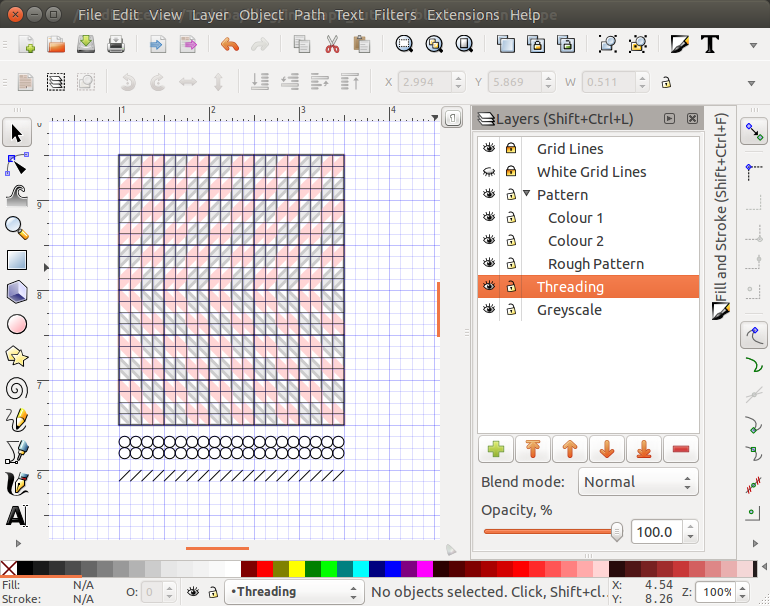
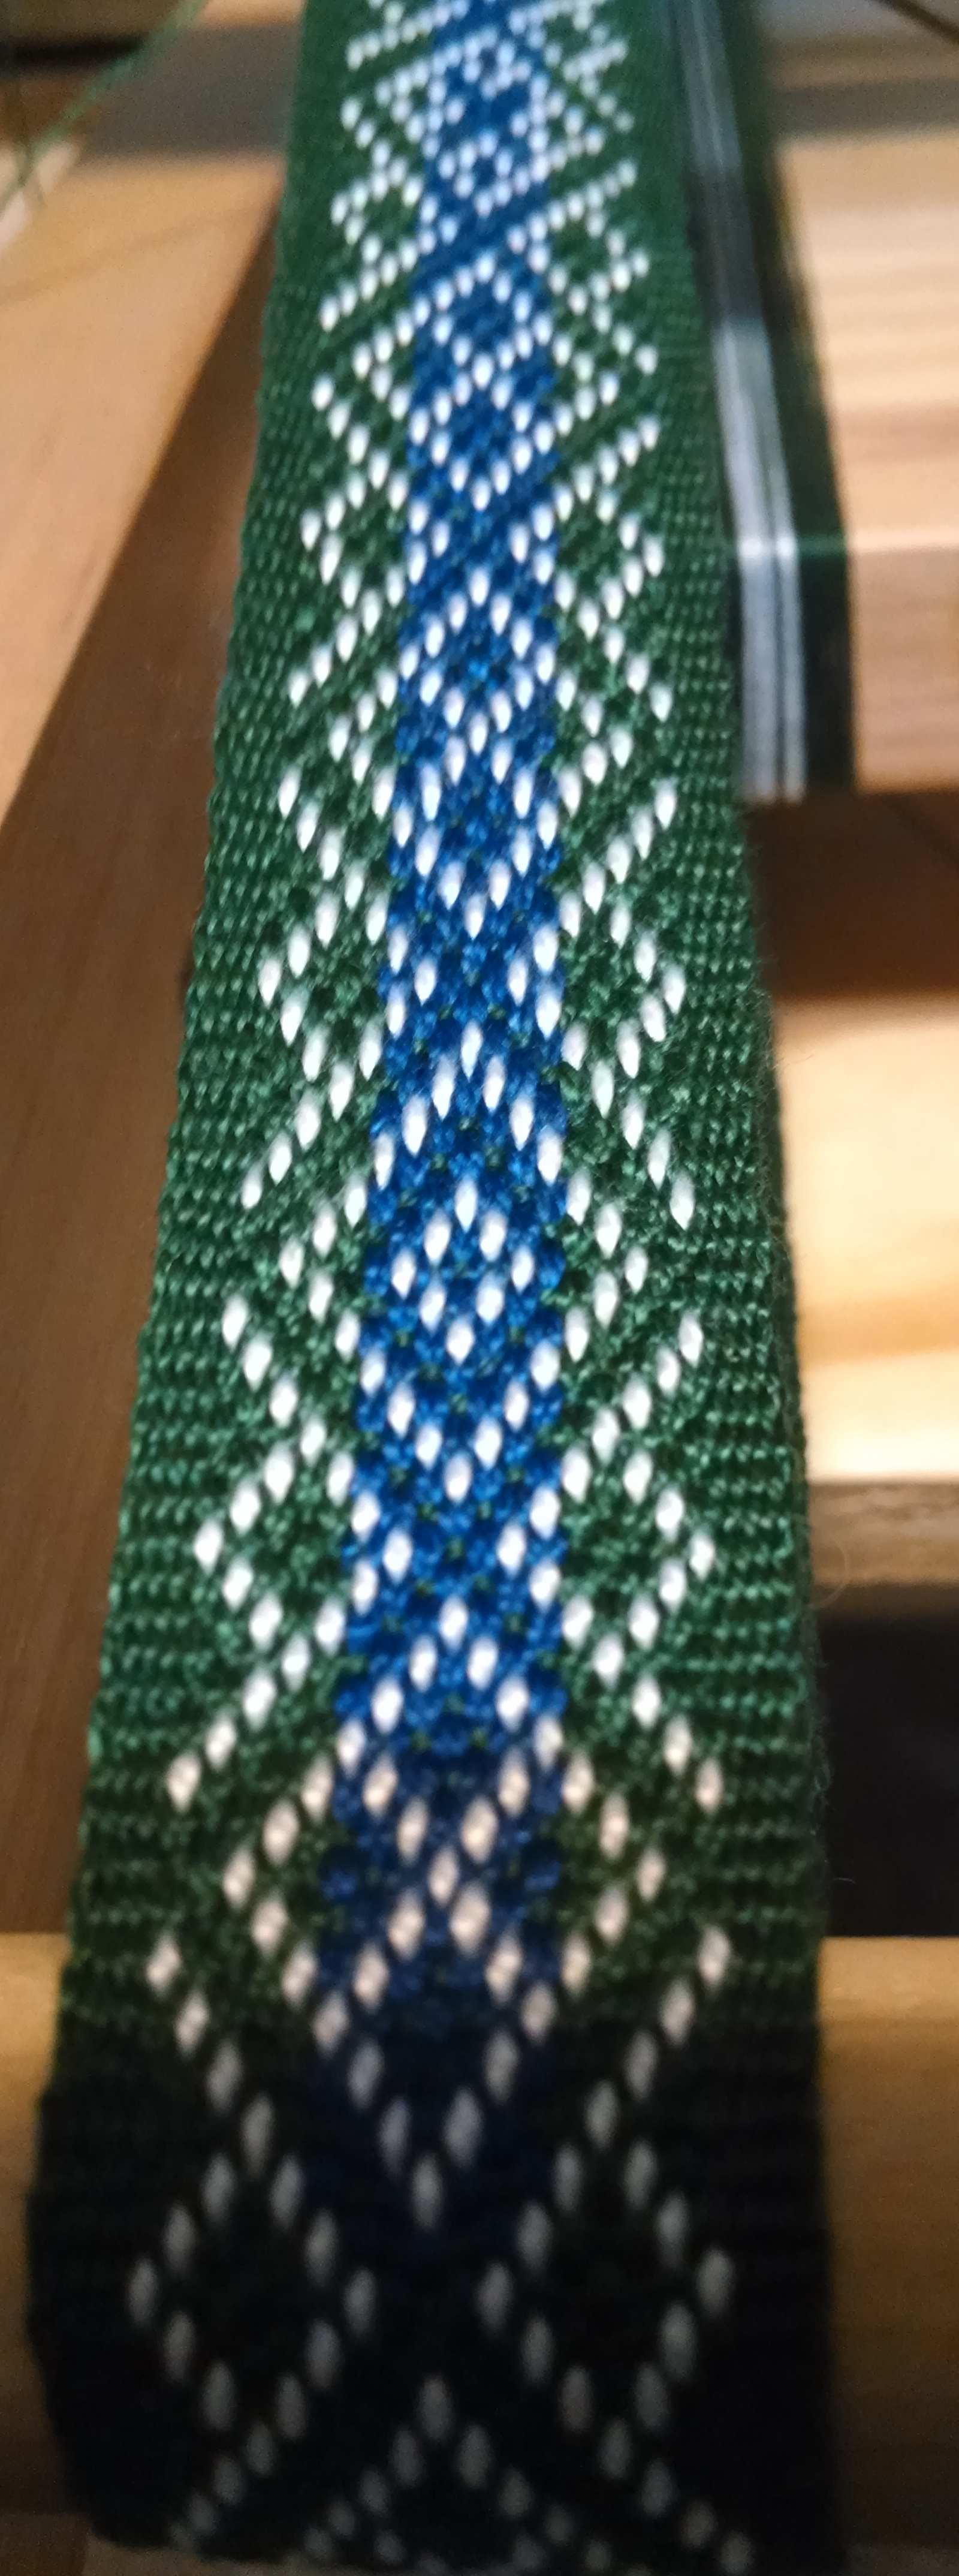
The patterns here use 17 background threads; the 5 leftmost and rightmost threads are woven over a green background, while the middle 7 pick up threads lie nestled between dark blue background threads.  The plan is to eventually experiment with the Kostrup patterns, since those are 17 cards wide also, but I needed simple patterns to weave while out and about Monday.

The current patterns are simple diamonds, and by weaving them upside down I only ever have to drop threads from the current row, rather than having to pick up.  In the pattern (Baltic Diamonds) squares with circles in them are the pickup threads that are high in each row.  If a pickup thread is high but has a grey background, then it gets dropped, resulting in the front patterns we see on the left below.

Small Diamonds (back side)Small Diamonds (front side)
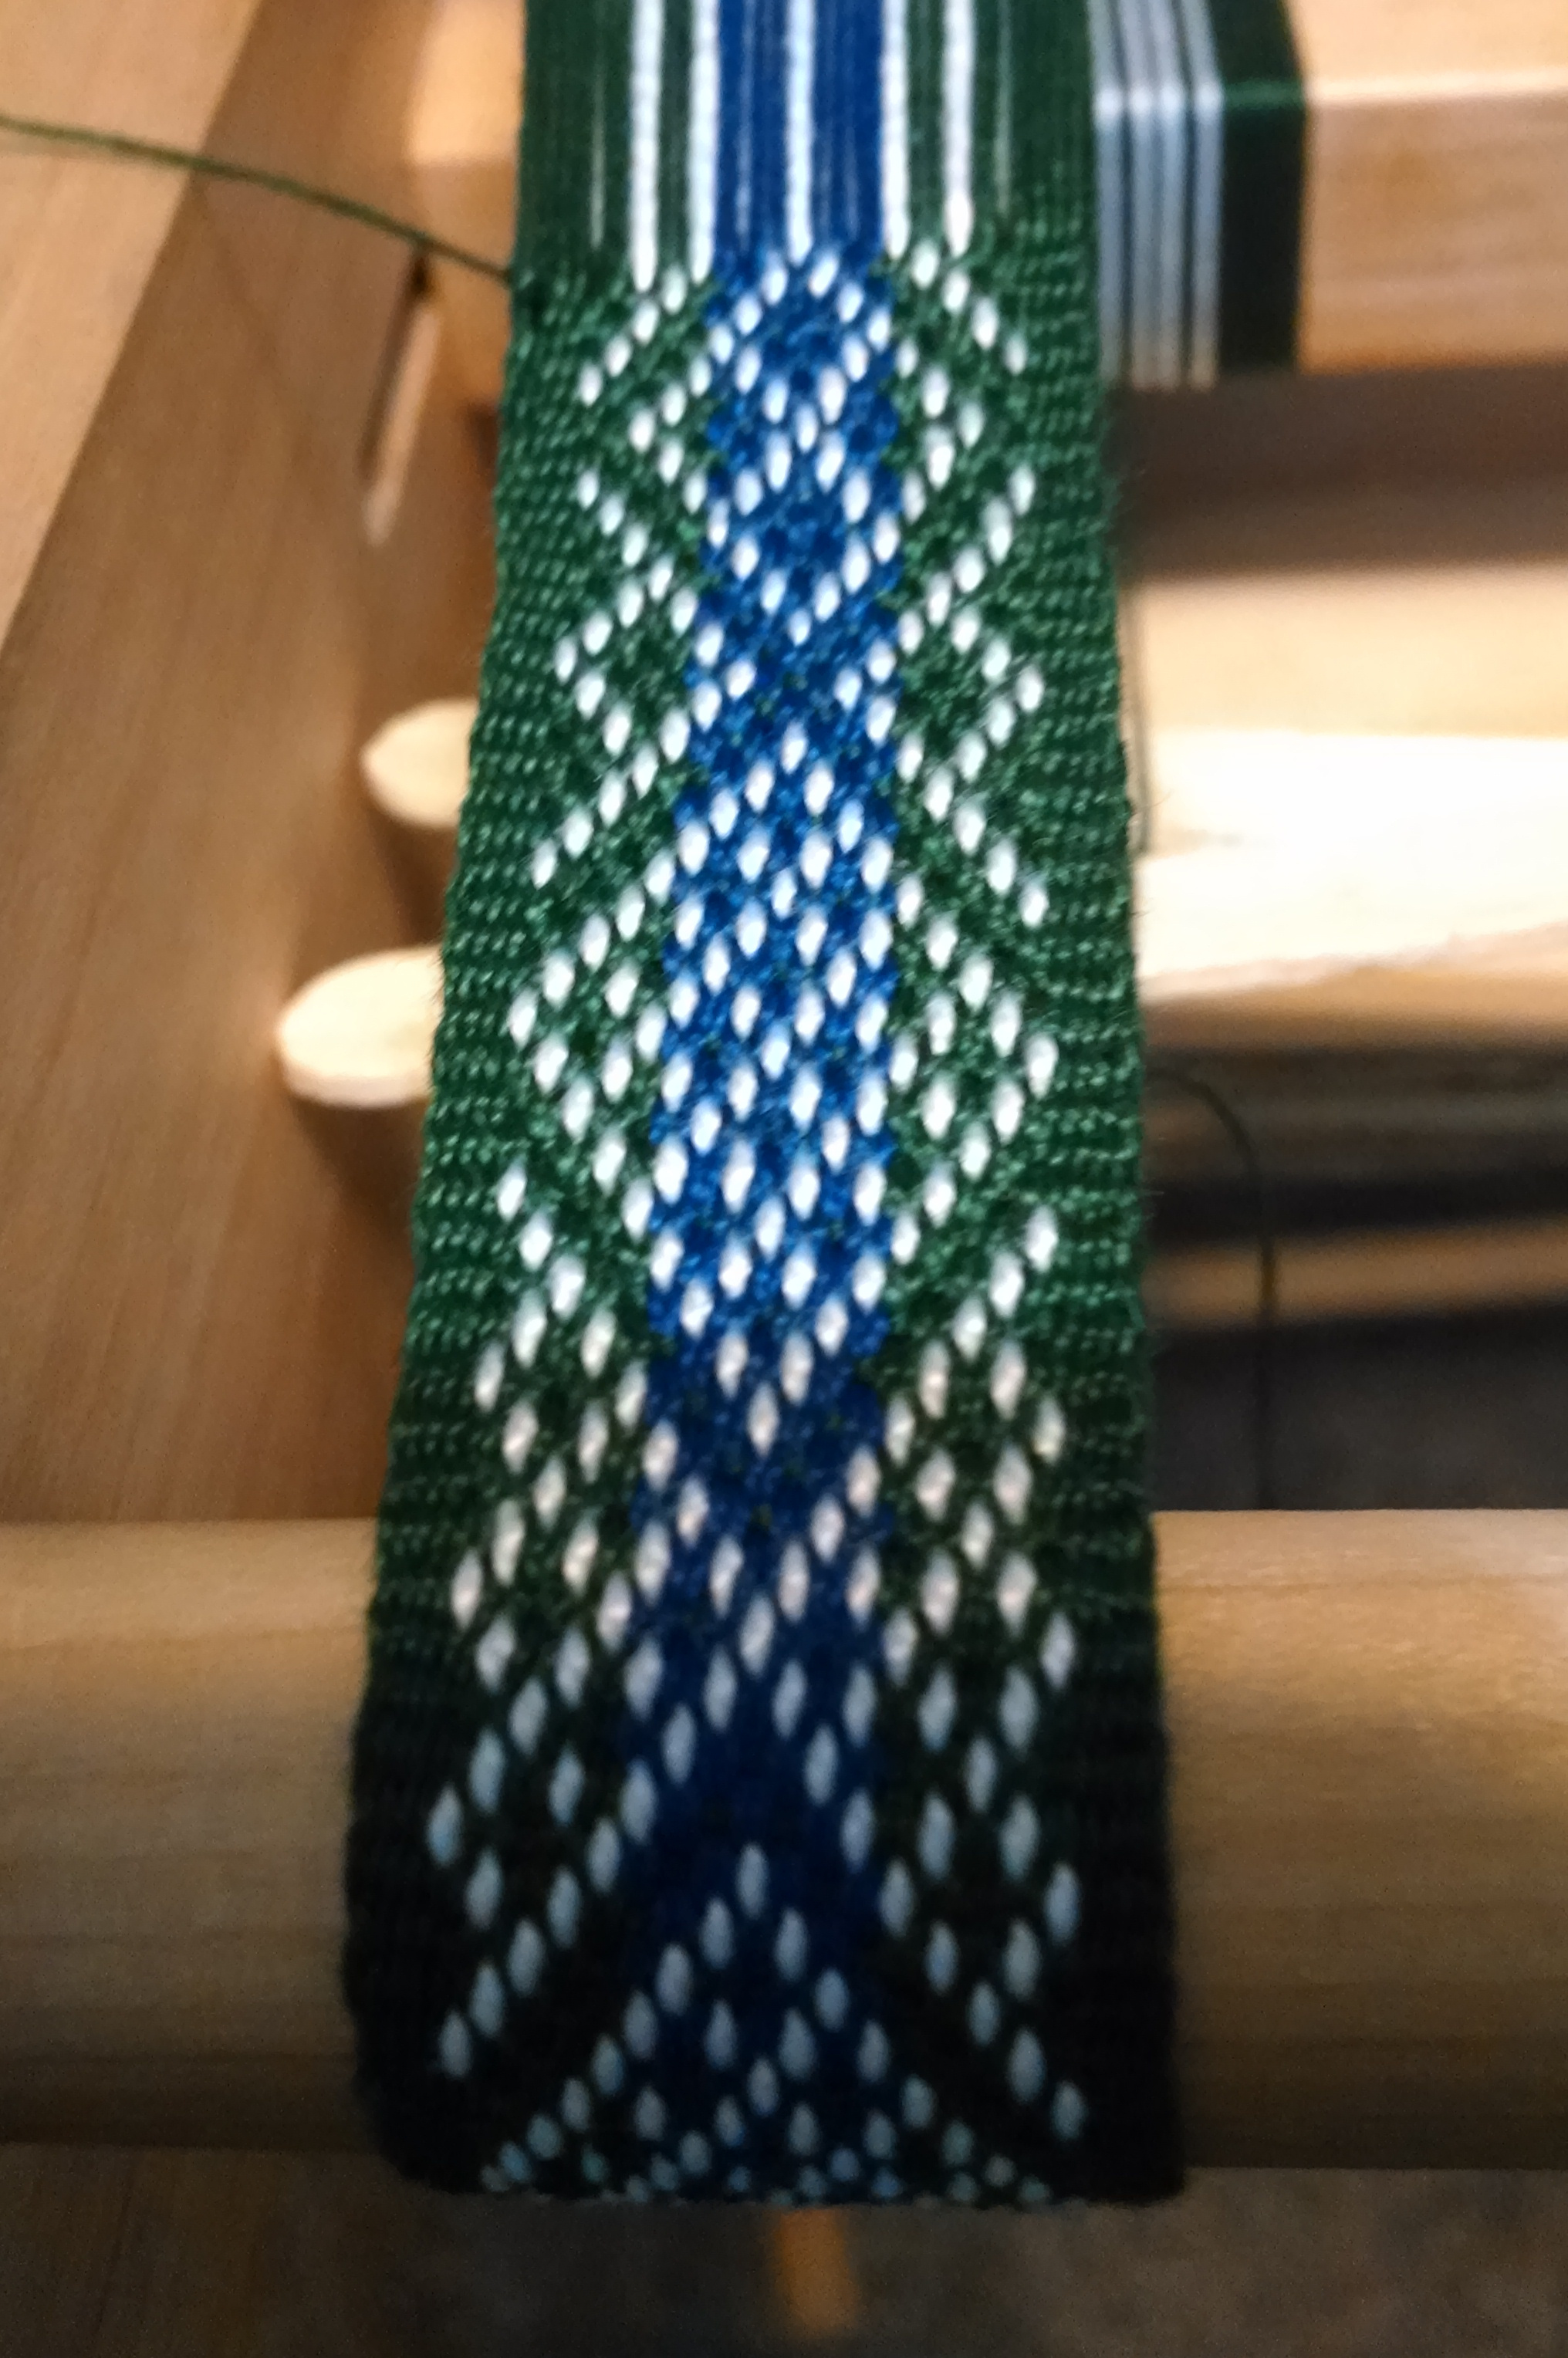
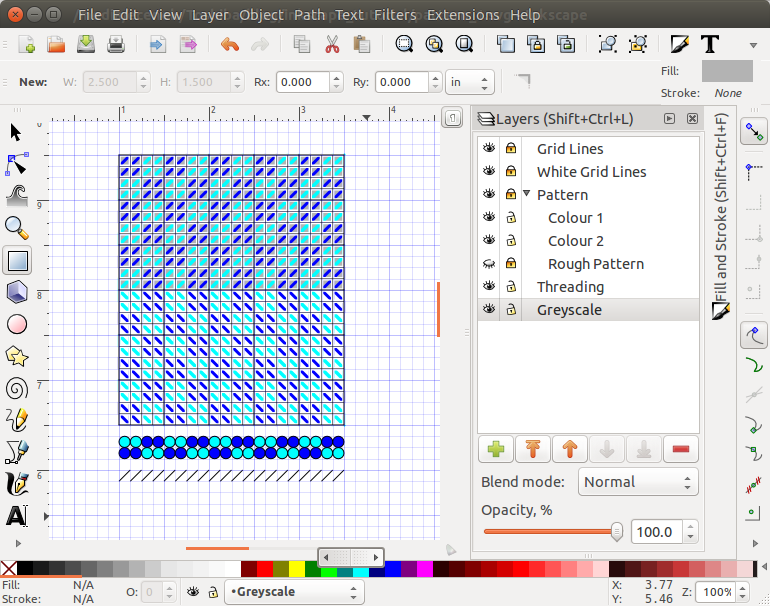
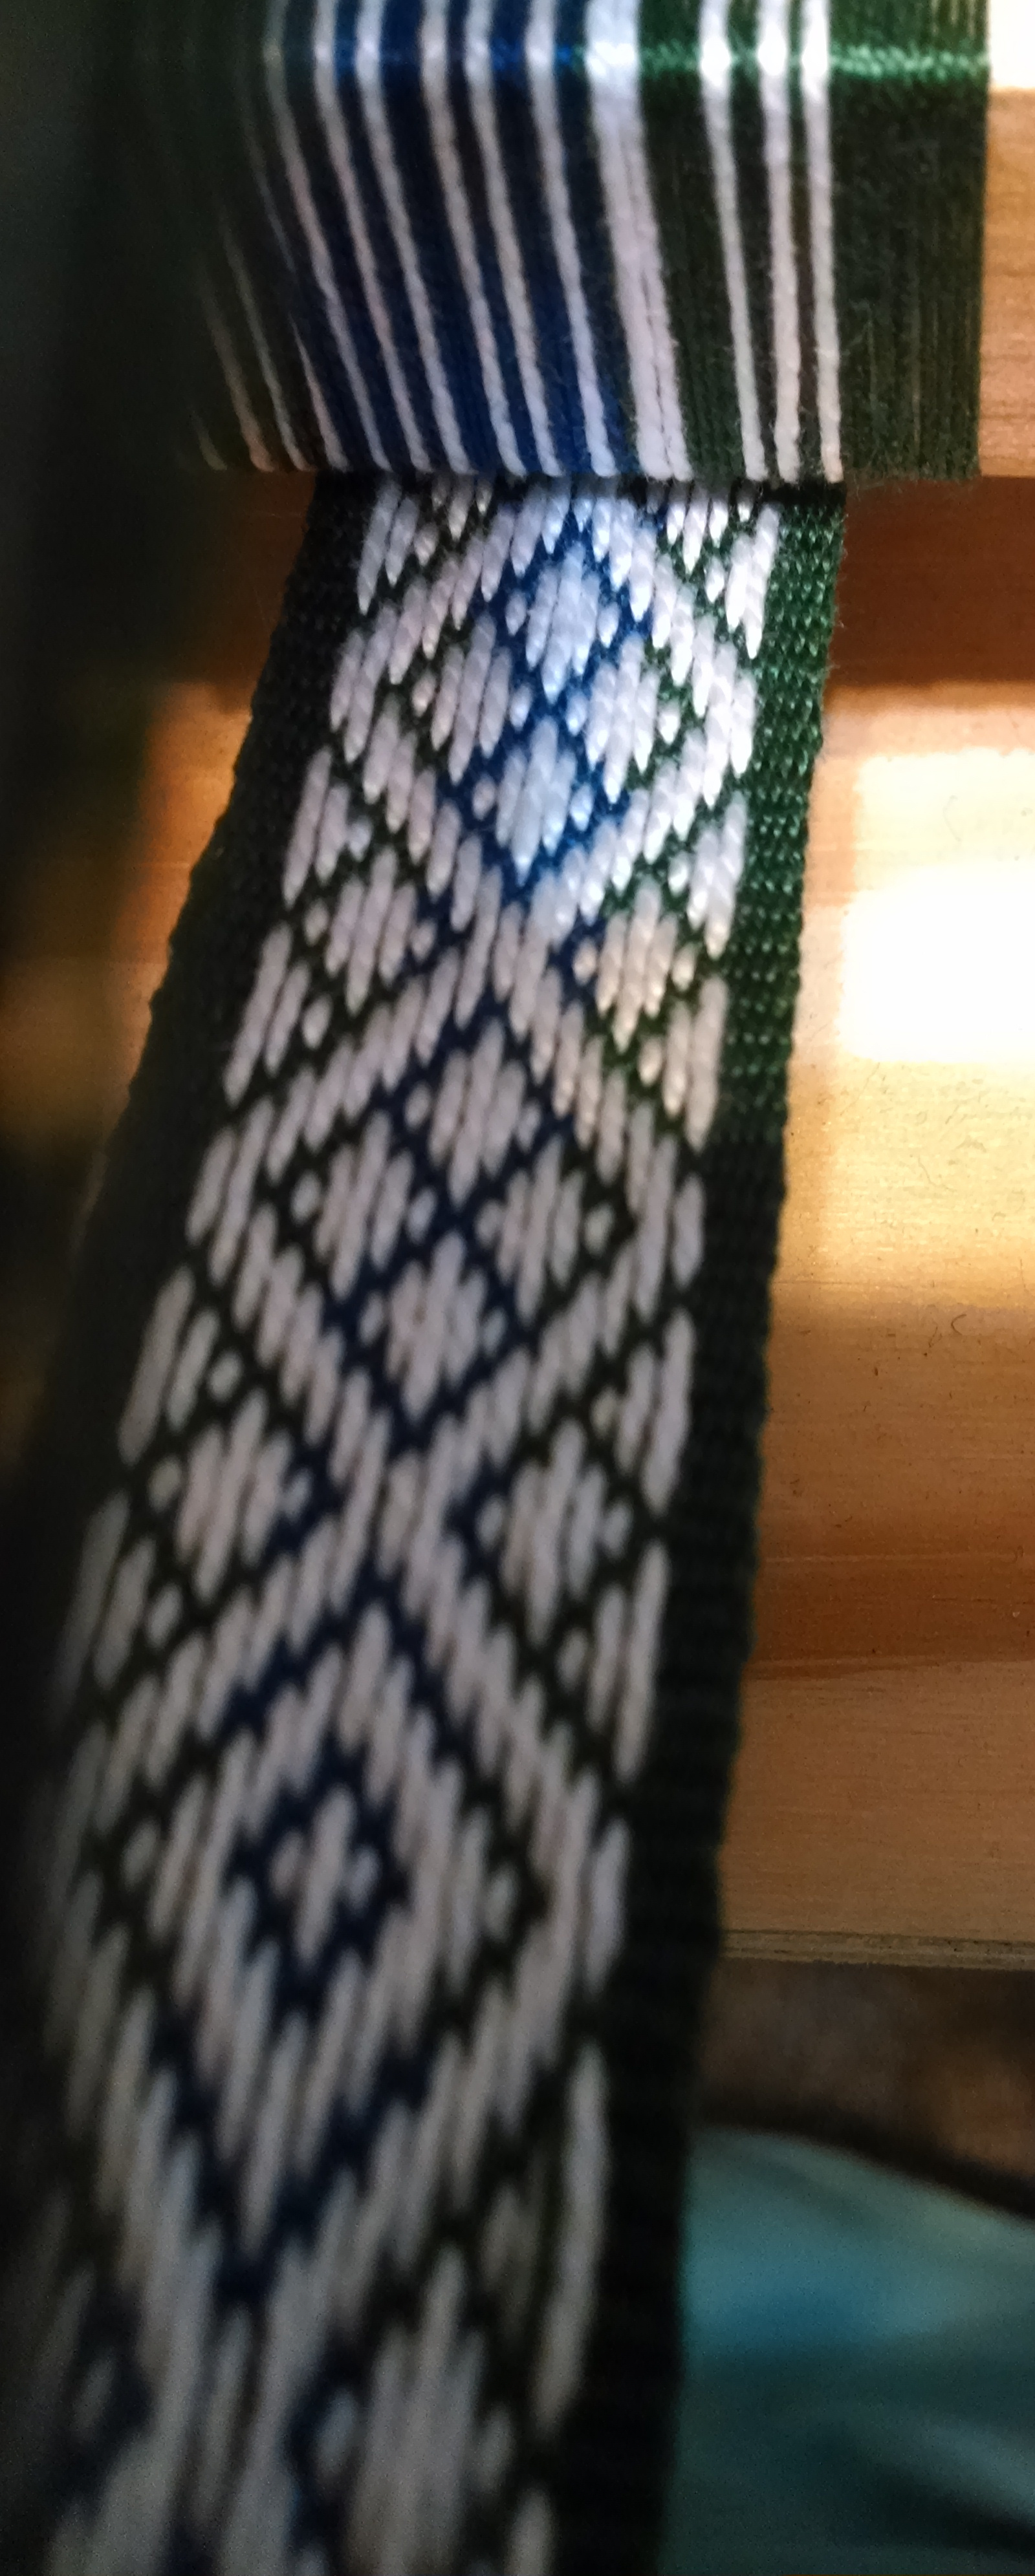
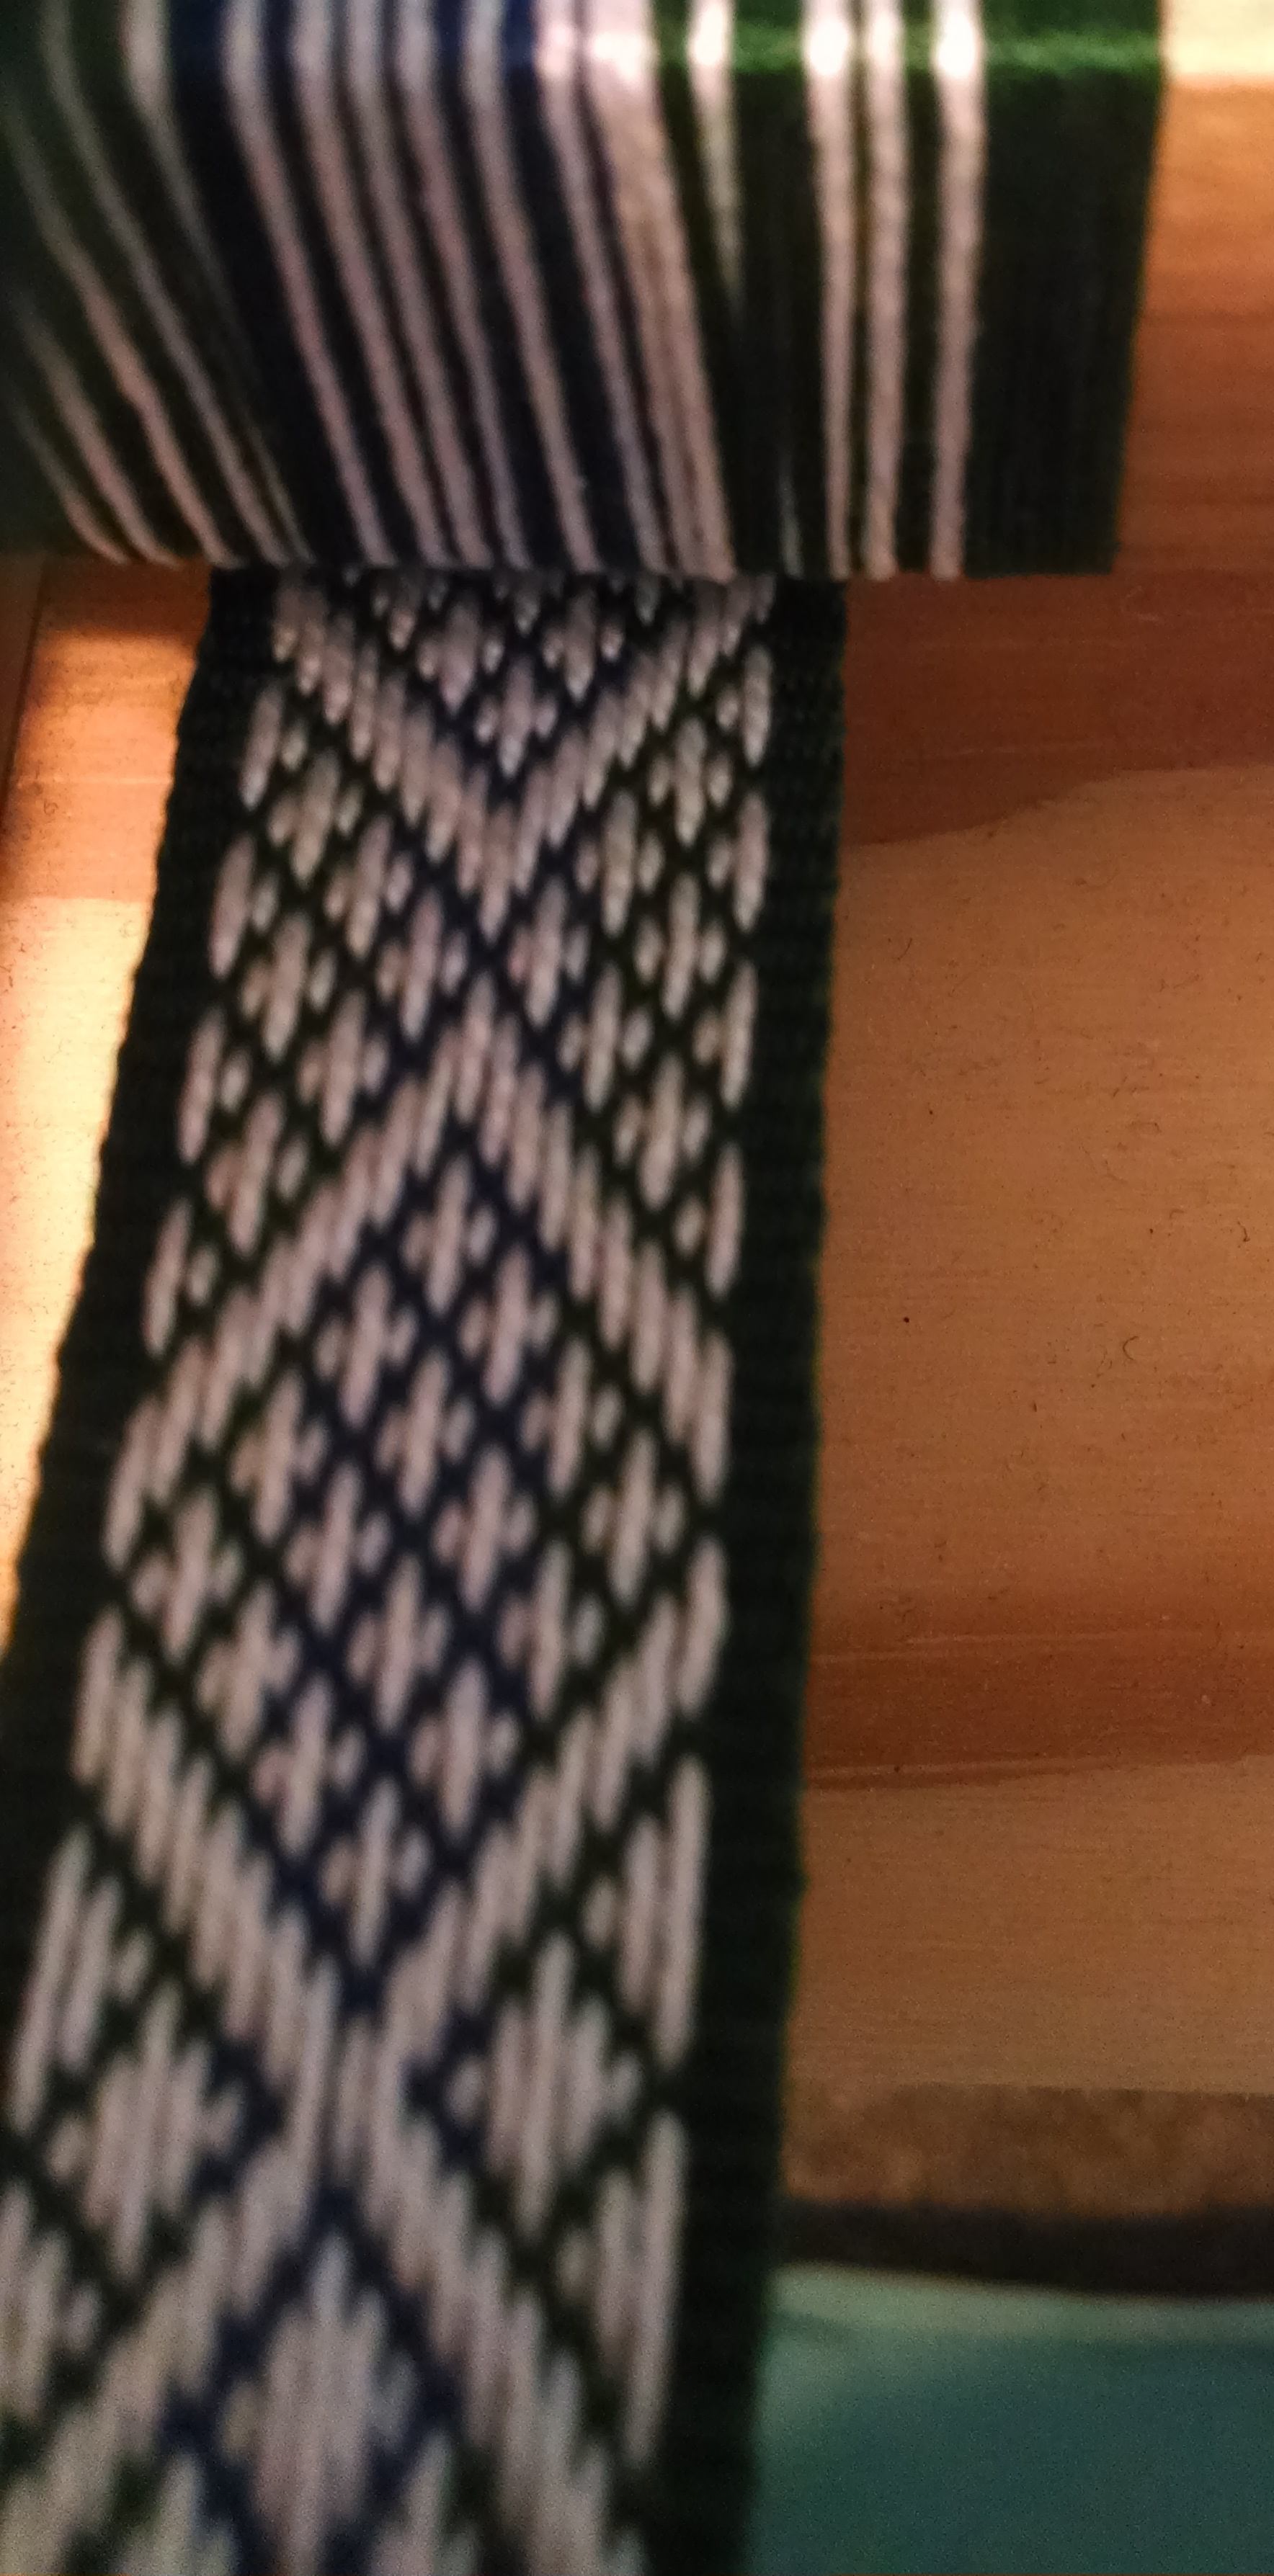
This is what the pattern with the small diamonds looks like; the predominantly green/blue side is what you see while weaving, the white side is the underside which is much harder to photograph while on the loom.


Large Diamonds (back side)Large Diamonds (front side)
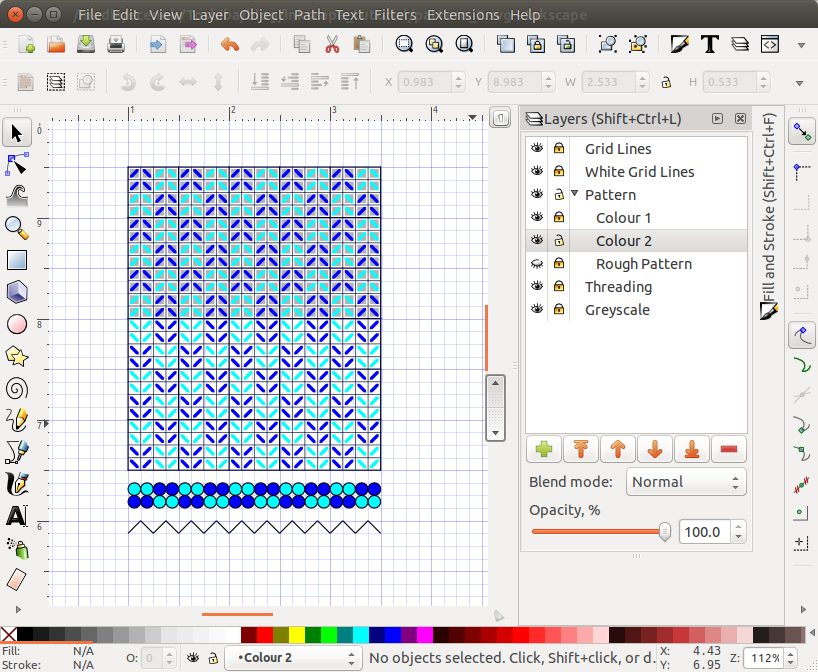
Here I was working with larger diamonds, and experimenting a little with alternate patterns like the diamond in a diamond and the inner cross.  Making the outside diamond a little smaller results in a 2×2 grid of the smaller diamonds, or a 3×3 grid of the larger, and then it’s just a matter of dropping a few extra threads here and there.


Using inkscape to draft tabletweaving patterns

I draft a lot of patterns for tabletweaving, and the way I like to display the pattern includes both the turning directions and a guideline as to what the pattern should look like.

When I first started drafting patterns, I would work in pencil on gridded paper where each square represented one card in one row; first I would outline the main shapes, and then use a highlighter to add the turning directions for each card — highlighted for backwards, not highlighted for forwards. The biggest downside was that even at 5 squares per inch, a sheet of standard letter paper didn’t really hold room for a lot of cards. And heck, the squares could be smaller in any case.

I use computers a great deal, so casting around for solutions I experimented (briefly) with spreadsheets and discovered that this was too fiddly for me. Then I discovered Adobe Illustrator, which is a vector based graphics editor that has all the bells and whistles one could desire. Sadly, it also had a price tag to match, and I was at the time a graduate student, and student discounts are nice, but not *that* nice.

Which brought me to inkscape which is free, opensource, and available for Windows, Mac OS, and most importantly linux, aka my operating system of choice.  Inkscape is a very powerful program, but I take advantage of a limited number of features.

blank_patternI use layers extensively, as each part of the pattern is in its own layer, including the grid. In fact, I usually use the following layers from top to bottom:

  • Grid lines – black grid lines 0.5 px wide
  • White grid lines – white grid lines 3.5 px thick
  • Pattern – one layer per colour to make colours easy to manipulate
    • Colour 1 – line 3 px wide
    • Colour 2 – line 3 px wide
    • Rough Pattern
  • Threading – the colour in the dots indicates the colour of thread in the two top holes.
  • Greyscale – used to indicate the turning directions forward and back.  Grey squares are turned towards the weaver, and white squares means the cards are turned away from the weaver.

Setting the layers up in this way allows me to take advantage of the order in which they’re drawn (bottom up) so that the diagonal lines I draw in the pattern colours become small individual diagonals.

rough_patternOnce I have the layers set up and the grid built I usually save the file as a blank.svg file, so that I don’t have to keep rebuilding the grid.

In this case, I’m planning a very simple pattern where the cards turn continuously in one direction until twist builds up, and then they reverse direction. I’ve roughed it in and now it’s just a matter of adding the colours.

finished_patternThe basic design has all cards threaded the same way with two dark and two light colours, and we will be turning the cards forwards 12 times, and then backwards 12 times.

pattern_2In this simple variation, we have turned every second card around its vertical axis, so that half the cards are threaded from left to right, and the other half are threaded from right to left.

A little bit of this, a little bit of that …

First off, I’ve been finding interesting articles all week, and collecting them, so without further adieu, a few links:

Secondly, I’ve been (unsuccessfully) trying to design knotwork in the Snartemo 4 colour technique, but in the process ended up digging out a lot of my old 3/1 broken twill notes. So here a very brief explanation of how I weave 3/1 broken twill.

In 3/1 broken twill, patterns will have a light and a dark colour. Each of the pattern tablets is threaded with two light and two dark colours, just as one does for doubleface.  But then, using Collingwood’s 2 pack method, the cards are divided into two groups: the odd numbered cards form one group, and the even numbered cards form the other. Each group turns as a whole; colour changes are created by flipping a card around its vertical axis – which reverse the threading – rather than by changing turning direction.


Setting up the two groups:

  • In each group flip the cards as needed so that they alternate S and Z threading.
  • In the odd group, turn the cards so that the background colour goes through the two holes closes to the weaver.  This is the “vertical” position, because the two holes threaded with the background colour are one above the other (aka vertical if the warp is held horizontal).
  • In the even group, turn the cards so that the background colour goes through the two top holes.  This is the “horizontal” position, because the two holes threaded with the background colour are beside each other (aka horizontal if the warp is held horizontal)

Turning Directions:

The cards are turned in a few turn repeat.  Each of the two groups moves 2F/2B, but there is an offset because of the differing starting positions.  Repeating this turning should yield a solid-coloured band with a structural diagonal.

Turn Odd Group Even Group
1 Forward Forward
2 Forward Back
3 Back Back
4 Back Forward

Patterns:

250152_198275326971392_2012513524_nI draw my patterns on a rectangular grid with a brick like pattern; Tree with Birds Pattern is a  pattern that uses 32 cards, but because of the symmetry the setup is modified slightly so that the second set of 16 cards completely mirrors the setup of the first 16 cards

In the pattern, each column represents one card over all the many turns; each rectangle represents that card for two turns.  Note how the odd and even rectangles are offset, because of the offset turning directions.  In the right side of the pattern you can see the changes needed for the colour changes; if the next rectangle switches from white to grey or vice versa, flip the card.
But that would give you some ugly edges, so sometimes we also need to flip the card when the colour is horizontal rather than vertical.  Those flips are represented in the left half of the pattern by the blue < in a rectangle.

How to design patterns

I tend to spend a lot of time fiddling out new patterns, most often for tablet weaving, but also for brickstitch and occasionally blackwork.  In fact, I’ve got blackwork on the brain at the moment after Kim Salazar posted Blackwork Inspiration, an article in which she talks about places to find inspiration.

I realized as I was reading her article that I like designing patterns in tightly constrained spaces.  In tabletweaving, especially when designing patterns designed to be warped up quickly using speed warping, the design is primarily affected by how the tablets turn.  You have essentially three options here; a tablet can turn forwards, backwards, or it can stay idle.  I haven’t really started experimenting with tablet idling yet, so that reduces it to two turns, which can easily be plenty.

Daggers_14_01Consider for instance an early pattern I called Daggers.  Back when I was graphing this I was using shorthand; each square represents two tablets and two quarter turns.  The colour of the thread is actually indicated by whether the line is solid (colour 1) or dashed (colour 2), and the background colour (colour 3) isn’t shown at all; forward turns are blue and backwards turns are red.

The tablets are warped so that each tablet has, in clockwise direction, colours 1 – 3 – 2 – 3 (although often when I wove it, the background colour and the second colour where the same colour, making the warping 1 – 2 – 2 – 2).  This allows for quick speed warping using the continuous warp method Linda Hendrickson describes in her description of a Continuous Warp (Linda Hendrickson).  After the tablets are all warped, they are set up so that all the cards are threaded in the same direction, and then turned so that colour 1 is – moving from left to right – in the top front hole, top back, bottom back, bottom front, and repeat.  Turning all the cards forward should result in straight diagonals moving to the left.  If the diagonals are jagged, either flip all the cards vertically and reset, or turn every second card two quarter turns.  This is all very similar to setting up for Egyptian Diagonals, except that the tablets are not all threaded two dark, two light.

Dagger on a pink beltIn this version, which is a slightly different pattern where the handle is longer and the guards are much bigger and the background is made with solid coloured diamonds, I was weaving a pink belt; hence the background colour is pink, colour 1 is purple, and colour 2 is white.  And I just noticed I’d left out the dashed lines inside the daggers, so will leave those as an exercise for the reader.

Patterns like this are easy to develop on grid paper; the basic rule for me is to draw out colour 1 first with the following constraints: if the diagonal changes direction, there can be no gap and for the two cards we must go from one diagonal straight to the other.  If the diagonal does not change direction, then there must be a (temporarily) blank square between them.  I can test the design by adding the dotted lines using the same rule.  If there are two parallel diagonal lines there must be a dotted line between them.  And the backgrounds I usually use either the dotted diamonds, or solid diamonds that are properly offset from the main pattern (so that there is room for the dashed lines in between).

Over time I’ve started developing diagrams that use the background (white or gray) to indicate the direction of the turn, and show every thread rather than just the dominant colours, but I find that when I’m just doodling patterns this method suits me just fine.