Weaving Directions in Doubleface and 3/1 Broken Twill using the 2 pack method

While trying to teach a friend to weave 3/1 broken twill, I stumbled on another way of looking at the cards to determine what the next turn should be.  To illustrate that method, I’m going to discuss doubleface first, since more of my readers are familiar with doubleface weaving.  All cards will be threaded two light and two dark, and we describe the positions of the cards as follows.  (Here the light is green, and the dark is blue.  We will also assume that the green will be the background.)

Horizontal and Vertical Position

We consider the position of the cards relative to the warp threads.  In these diagrams the warp extends to the right while the already woven portion extends to the left.  Horizontal and vertical are used to describe the position of the threads relative to the warp.
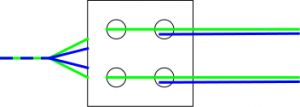
Card is shown with woven ribbon on left, warp extending on right, and the light coloured threads are in the two front holes closest to the woven ribbon

In the vertical position, the two green threads go through the holes closest to the woven ribbon.  Those holes are one above the other, so I call this position vertical.  If I turn this card forwards, the two green threads will lie above the warp and I will weave a green row.  Turn backwards, and the blue threads will be uppermost, and I will weave a blue row.
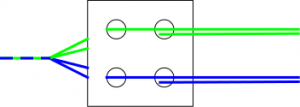
 

Card is shown with woven ribbon on left, warp extending on right, and the light coloured threads are in the two top holes above the warp. In the horizontal position, the top two threads are both green.  In this position, I will weave another green row regardless of whether I turn forwards or backwards.

Weaving Doubleface

Weaving doubleface with the 2 pack method, the cards are separated into two packs.  We can call these two groups “Background”  and “Pattern”.  When we start all the cards are in the background pack, and we start with the cards in vertical position.  If we consider “Front vertical” as the case where the background threads are all in the holes closest to the woven ribbon, and “Back Vertical” as the case where the background threads are closest to the unwoven warp threads, then the turning directions for each row in the pattern are as follows:

  1. Make sure any foreground/pattern cards are in the foreground pack and all other cards are in the background pack.
  2. If the background pack is in front vertical position, turn the background pack forwards and the pattern pack backwards, and put the shuttle through.  (Do this twice so that all cards are once more in vertical position.)
  3. If the background pack is in back vertical position, turn the background pack backwards and the pattern pack forewards, and put the shuttle through.  (Again, do this twice.)

For each row in the pattern you will complete either step 2 or step 3, but not both.  Notice how the pattern and background pack always move in opposite directions, and all the cards should all be in exactly the same vertical position every time you return to step 1.

Weaving 3/1 Broken Twill

The setup of the cards in 3/1 broken twill is slightly more complicated, and is a multi-step process:

  1. Divide the cards into two packs as follows.
    1. Card 1 goes into the Odd pack
    2. Card 2 goes into the Even pack
    3. Card 3 goes into the Odd pack
    4. Card 4 goes into the Even pack
  2. Flip the cards as needed so that the threading alternates between S and Z in each pack
  3. Turn the cards in each pack so that they are all in vertical front position.
  4. Turn the Even pack only once forward so that it is in horizontal top position.

Now the key point of weaving 3/1 broken twill is that the cards never shift between the packs.  Colour changes are made by flipping a card on its vertical axis, but only when that card is in vertical position.  (This reverses the threading for the card, and also switches between front and back vertical position.)

The turning direction now also never changes.  Each row will be one of four possible scenarios, and you can see which scenario comes into play by looking at the vertical or horizontal position of the two packs.  Be careful to key off cards which have not been flipped to produce pattern; but look at background cards.  Then the turning directions are:

Position of Odd Pack Position of Even Pack Turning directions Odd – Even
 Front vertical  Horizontal  Turn both packs forwards
 Horizontal  Back vertical  Turn odd pack forward, even pack backwards
 Back vertical  Horizontal  Turn both packs backwards
 Horizontal  Front vertical  Turn odd pack backwards, even pack forwards

At first try weaving only the background, without flipping any cards.  Notice how before every turn exactly one pack is in vertical position, and the other is in horizontal position.  Which also means that I can only effect colour changes in one pack, or the other, but not both at the same time.

Then eventually when it comes time to weave patterns, I like to use brick graph paper like 3/1 twill graph paper where each rectangle represents one card and two turns, emphasizing that the ability to change colours alternates between the odd and even packs.

Edited to add: At some point I will be adding a second article which focuses solely on weaving 3/1 twill patterns.  The purpose of this article is to get you weaving the basic 3/1 twill structure.
In Honor of all the Ladies who inspire

John Downland’s “Shall I sue” was published in his “Second Booke of Songs” in 1600.  There is a complete score available at http://imslp.org/wiki/Shall_I_Sue,_Shall_I_Seeke_for_Grace_(Dowland,_John).


Testing the Armor
To the Tune of John Dowland’s “Shall I sue”
Words by Eowyn de Wever

Shall I bow, shall I smite my shield,
Is my challenge heard,
As I wait to enter the lists
At the herald’s word.
There is none so fair as the one
For whom I fight,
Whose fair face and gentle smile
Gives such delight.

Bow we now, to the crown, to our love,
And to the crowd,
Let the marshal’s cry “Lay on!”
Ring out loud.
There’s no flinch, no cry
As she gazes upon the fight,
Though my wounds run red she smiles
At my wild delight.

Swords we cross, shields we raise in joy
Of a mighty bout,
As the knight’s fierce blows teach me
That my armor is stout.
Stoutly built, stoutly made
By my lady’s fair hands and mind,
Kept me safe this day – mildly bruised –
As I step back in line.

Weaving Broken Twill on a 4 harness loom

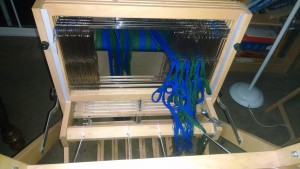
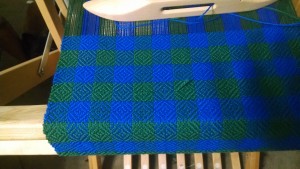
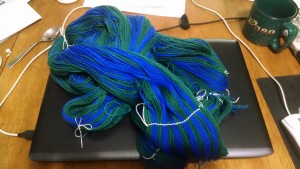
These are notes for a project currently on my 4 harness loom.  The wool I’m using is 8/2 Jaggerspun wool, from the Maine line, in royal blue and dark green.  I wanted to make fabric that was stripey and that displayed the broken twill diamonds encountered in Viking weaving.  The final fabric will be used to make a bag with Hedeby handles, as described in https://nattmal.wordpress.com/2015/05/14/haithabu-bag/. Unlike her bag, however, I will be using a tabletwoven rather than a leather strap.

The measured warp: 208 eights, in 13 groups of 16, to produce a striped fabric.

Step 1 was to measure out the warp.   As a computer programmer, binary in all its glories is very attractive, so I decided the diamonds would be 16 threads wide, and 16 picks high.  Sizes can vary of course.  So I measured out 13 strips of 16 ends each, on the horizontal warping mill; to make counting easier, the white thread groups the warp in bundles of 8 threads each.  This allows me to easily stretch the threads across the width of the backbeam using the raddle.  Since the epi for this wool is listed as 15-18 for twill, I decided to start with 16 epi, so the diamonds should be about an inch square.


Step 2 was to wind the warp on to the backbeam; to do this I used what some call “Angel Wings”: a pair of dowels which are put through the warp on both sides of the cross, and kept together with hairbands.  I use loops of string to hold the dowels in place.  This allows me to wind the warp on to the backbeam while maintaining the cross.  It usually maintains a nice even tension too, although here the wool was being very sticky and obstreperous.

Threading the heddles in groups of 8

Step 3: threading the heddles.  We left the dowel sticks in place and heddles from right to left.  The pattern repeats: first 8 heddles 1-2-3-4-1-2-3-4 and then 8 heddles 2-1-4-3-2-1-4-3.  Keeping track of count was easy since everything was being done in bundles of 8.  The outermost thread on each side was not heddled, and will form the floating selvage.

The reed I have for this loom is 10 ends per inch, so it took me a while to puzzle out how to thread it to get 16 ends to the inch.  Finally I decided that solving 8 ends to the half inch (and 5 slots) was easier, and threaded in a 2 – 1 – 2 – 1 – 2 pattern through the slots.


Broken twill, alternating between two shuttles every 16 picks.

Step 4: We weave!  Took a bit of monochrome weaving to get the edges right, and I realized that perhaps I could have set the threads closer together on the outside on both sides, but I got it to square up eventually.  And that’s when I added the second colour.  There are two shuttles loaded with blue and green respectively, and the one not in use is perched on the desk next to me.  The shuttle in use treats the thread from the other colour as a second floating selvage, so there’s a little bit of oddness on the right hand side of the fabric.

For now, though, my concern is still on getting the edges even, and trying to keep the squares … we.. square, which means managing the interplay between the tension of the warp threads, and the force with which I beat.  (And when a bobbin runs out, as you can see in the green, you just double up for an inch or so and keep going.)

The last picture, btw, was taken with flash so that you can really see the structure.  In natural light the patterning – especially in the monochrome areas – is much more subtle.

Filking about the Fiber Arts

I was recently reminded I tend to filk about fiber arts topics .. So here I present two filks sung to the tunes of The Irish Rover and the Three Ravens, respectively.


The Wild Seamstress
by Eowyn de Wever, and inspired by Mistress Isolde’s five year and running tapestry project
(Tune: The Irish Rover)

I’ve been a wild seamstress for many’s the year
And I traded my stitches for whiskey and beer.
But now I’m returning, my stitches are done
And the tapestry’s finished, about to be hung.

Chorus:
And it’s no, nay, never,
No, nay, never, no more,
Will I be a wild seamstress,
No never, no more.

I came to a yarn house I used to frequent,
And I told the shopkeeper my money was spent.
I asked her for credit, she answered me nay,
For such stitches as mine she could see every day!

I pulled from my pockets a charter so bright
That the shopkeeper’s eyes opened wide with delight.
She said “I have linen and yarn of the best
And the words that I spoke then were only in jest.”

I stretched out the linen, drew on the cartoon,
And I set to, the deadline was looming in June.
My stitches were even, my colour choice fine,
Yet I fear I must surely be out of my mind.

And it’s no, nay, never,
No nay, never, no more,
For I’m now a tame seamstress,
And get paid before.


Three Weavers
Words by Eowyn de Wever (written at Kingdom A&S 2011)
Tune: Three Ravens

There were three weavers sat at a loom,
Down a down hey down a down,
They traced out life and traced out doom,
With a down.
The first, she spun the living thread,
That held his life, his blood so red,
With a down, derry derry derry down down.

The second wove the gift of life.
Down a down hey down a down,
She wove him love and loss and strife
With a down.
She wove in gold, she wove in ache,
She wove him down to the earthen lake,
With a down, derry derry derry down down.

The third, she cut the final length,
Down a down hey down a down,
And as thread snapp’d so did his strength,
With a down.
Fates and Furies mote these be,
Spinner, Weaver, Cutter three,
With a down, derry derry derry down down.