Playing with Colours

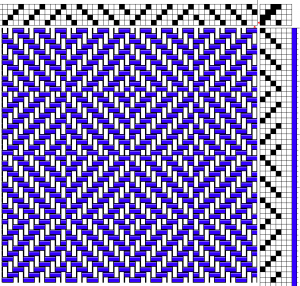
Consider the following two patterns: they look very, very different.  The first one is basically a broken diamond twill with 12×12 squares, and I’ve been weaving various sizes of those for a while now.

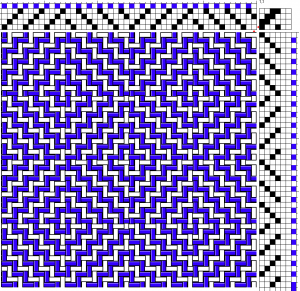
But the second looks drastically different.  There’s a spiral effect, and this is highly reminiscent of greek key patterns.  Again graphed with 2 pattern repeats.

But what absolutely fascinates me is how similar the two patterns are, structurally.  If you look carefully at the warping and treadling setups, you may notice that the two patterns differ in only one way.  In the first pattern, all the warp is white and all the weft is blue.  In the second pattern both the weft and the warp alternate blue and white.

I foresee some experimentation coming up.

Noodling with an MMM WWW Threading

An M-W threading is named for the threading through the heddles, which looks like repeating Ms and Ws on the form. The pattern I was playing with is a modified M W, where each M and W has three high (or low) points.  I’ve warped up umpty yards (he warp was measured for a sampler, so … I forget?), and enough ends for 8 repeats, warped alternating 2 olive repeats and 1 tan repeat.  The goal is to vary the weft in multiple projects.  Unfortunately I forgot to photograph the first two stretches, where the weft was respectively burgundy, and white, so that will have to wait until it comes off the loom.

Once the threading through the headings was decided, and going with a simple twill tie up, the next step is to decide the treadling. (I.e. in which order do the four harnesses get raises, or in what order are the treadles pressed?)  This first version looks more complicated than it actually is, mostly because I didn’t pick the best starting point.

In a simple twill weave, the treadling is 1-2-3-4 and repeat.  A twill diamond pattern, on the other hand, will treadle 1-2-3-4 followed by 3-2-1-4 for a 8 line pattern.  In my way of thinking, that would be a 4 row diamond.  In the pattern above, we have a 6-row diamond twill: 4-1-2-3-4-1 followed by 4-3-2-1-4-3.  This looks confusing at first, but by thinking of it as a six row diamond, I can reuse the muscle memory from previous projects.

On the other hand, the pattern looked very horizontal; it’s hard to make striped with just diamonds, but by golly I managed.  Also; I had woven two 19 or so inch lengths, and was bored.

Time to start playing with alternating treadlings.  This is where I once again thank my husband for the gift of a lovely piece of software (Fiberworks Bronze) which allows me to both typeset and change patterns up quickly and easily.  I’m still far from adept at pattern design, but the software lets me experiment with different treadlings really, really quickly.

My first idea was to treadly the same way as the heddles were threaded in extended Ms and Ws.  As it turned out, that gave a slightly unbalanced pattern and I experimented a little more, resulting in this pattern.

Oddly enough, I didn’t realize that this is still an extended MW treadling, except that if the extended M’s are treadled just as they’re threaded, the extended W’s are shifted one over, resulting in a 3-2-1-4-1-2-3 effect.  There’s exactly 1 extra treadling (using 4) between the M’s and W’s which makes this pattern again really easy to memorize.  Plus there’s lots of visual cues in the weaving, of course.

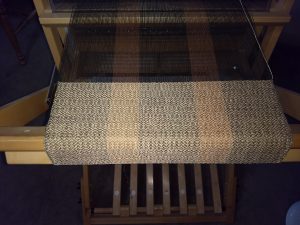
So what does the fabric look like? The weft is a lighter brown than the tan warp, keeping the pattern visible (albeit more subtle) on the tan stripes. As well, the edges are the best I’ve had on this yardage yet; there’sa floating selvage on both sides, but here I’m always treadling an even treadle when entering from the right, where in the previous bitsy bobs I always entered from the right on an odd treadle.  Funny the different that can make.

Weaving Broken Twill on a 4 harness loom

These are notes for a project currently on my 4 harness loom.  The wool I’m using is 8/2 Jaggerspun wool, from the Maine line, in royal blue and dark green.  I wanted to make fabric that was stripey and that displayed the broken twill diamonds encountered in Viking weaving.  The final fabric will be used to make a bag with Hedeby handles, as described in https://nattmal.wordpress.com/2015/05/14/haithabu-bag/. Unlike her bag, however, I will be using a tabletwoven rather than a leather strap.

The measured warp: 208 eights, in 13 groups of 16, to produce a striped fabric.

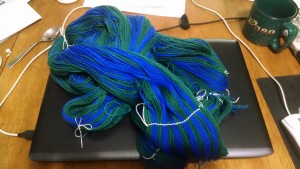
Step 1 was to measure out the warp.   As a computer programmer, binary in all its glories is very attractive, so I decided the diamonds would be 16 threads wide, and 16 picks high.  Sizes can vary of course.  So I measured out 13 strips of 16 ends each, on the horizontal warping mill; to make counting easier, the white thread groups the warp in bundles of 8 threads each.  This allows me to easily stretch the threads across the width of the backbeam using the raddle.  Since the epi for this wool is listed as 15-18 for twill, I decided to start with 16 epi, so the diamonds should be about an inch square.


Step 2 was to wind the warp on to the backbeam; to do this I used what some call “Angel Wings”: a pair of dowels which are put through the warp on both sides of the cross, and kept together with hairbands.  I use loops of string to hold the dowels in place.  This allows me to wind the warp on to the backbeam while maintaining the cross.  It usually maintains a nice even tension too, although here the wool was being very sticky and obstreperous.

Threading the heddles in groups of 8

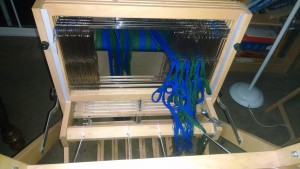
Step 3: threading the heddles.  We left the dowel sticks in place and heddles from right to left.  The pattern repeats: first 8 heddles 1-2-3-4-1-2-3-4 and then 8 heddles 2-1-4-3-2-1-4-3.  Keeping track of count was easy since everything was being done in bundles of 8.  The outermost thread on each side was not heddled, and will form the floating selvage.

The reed I have for this loom is 10 ends per inch, so it took me a while to puzzle out how to thread it to get 16 ends to the inch.  Finally I decided that solving 8 ends to the half inch (and 5 slots) was easier, and threaded in a 2 – 1 – 2 – 1 – 2 pattern through the slots.


Broken twill, alternating between two shuttles every 16 picks.

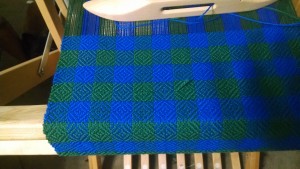
Step 4: We weave!  Took a bit of monochrome weaving to get the edges right, and I realized that perhaps I could have set the threads closer together on the outside on both sides, but I got it to square up eventually.  And that’s when I added the second colour.  There are two shuttles loaded with blue and green respectively, and the one not in use is perched on the desk next to me.  The shuttle in use treats the thread from the other colour as a second floating selvage, so there’s a little bit of oddness on the right hand side of the fabric.

For now, though, my concern is still on getting the edges even, and trying to keep the squares … we.. square, which means managing the interplay between the tension of the warp threads, and the force with which I beat.  (And when a bobbin runs out, as you can see in the green, you just double up for an inch or so and keep going.)

The last picture, btw, was taken with flash so that you can really see the structure.  In natural light the patterning – especially in the monochrome areas – is much more subtle.

Reading 4 harness weaving drafts

(Right after I started planning out 10 days of posts, I got hit by the crud, so these posts will be a bit delayed.  Sigh.

At Gulfwars this year, I picked up a lovely little 4 harness loom – a Wolf Pup LT. It’s got an 18 inch weaving width, which is perfect for sampling and trying to work out how patterns work. That, along with a copy of Anne Dixon’s The Handweaver’s Pattern Directory, meant that I could start experimenting with patterns.  First weaving some of the many many patterns in her book, and eventually moving on to my own.  (Not there yet.)

So today I’m going to talk a little about patterns.  Now the way they’re drafted in her book, you have the threading along the top, the treadling (which treadles are pressed for each row) along the right hand side, and the tie-ups (which harnesses are lifted when a treadle is pressed) in the top right hand corner.

Consider for instance Warped threadsthis set up.  Here the tie-ups and treadling aren’t listed yet, and all we’re concerned with is the warp threads.  The warp threads grid is structured as follows: each row represents one of the harnesses, and each column represents one thread.  For now, each thread will be controlled by only one harness.
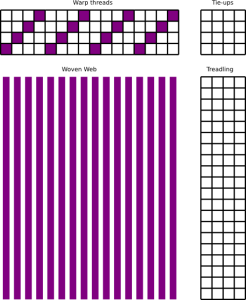
Later when I’m trying out more complicated patterns I may switch to a different type of heddle.  The loom currently uses eye heddles which means that the thread high is controlled by the harness; if the harness goes up, so does the thread, and if the harness stays down … the thread can’t rise.  If I use an open heddle, lifting the harness will raise the thread, but lowering the harness won’t force the thread down.

In any case, in this set up the threads are set up so that from left to right you have one thread each through harness 1, 2, 3, and 4, and then you repeat.
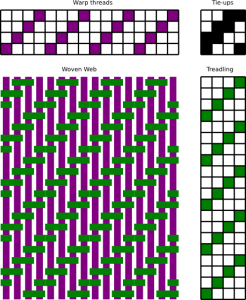
Simple 2/2 TwillNow we add the tie-ups and the treadling.  This is a standard 2/2 twill tie up: the first treadle lifts harnesses 1 and 2, the second lifts harness 2 and 3, then the third lifts 3 and 4, and the last lifts 4 and 1.

The treadling is actually read from the bottom up, since when weaving on modern looms you usually weave away from you.  (On standing looms it would be quite plausible to read the pattern from the top down.  Unlike cardweaving there’s no twist to worry about, so either way would work.)

The nice thing about this setup is that as long as the twill goes in the same direction, you can just keep treading 1-2-3-4 over and over.  (Or for a twill in the other direction, 4-3-2-1 repeated ad nauseum.)
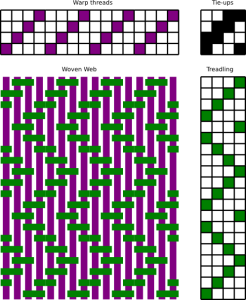
 

Simple 2/2 twill with reversalBut let’s say, for the sake of argument, you want diagonals that change direction after every fourth throw of the shuttle.  You can start with 1-2-3-4 for the first four rows, but following that up with 4-3-2-1 gives an odd effect (or rather, you end up unweaving what you just wove, unless you have a floating selvage), so that doesn’t really work.

Instead, when you reverse the direction of twill, you will weave 4 rows, but start with 3-2-1-4 , and by doing that you get a lovely zig zag.

But notice the long stretches of purple thread on the edges?  Those are – as I discovered on my first piece – going to be a problem because the weft won’t go out to the very edge.  The simplest solution is a “floating selvage”, which is an extra warp string on each side that isn’t passed through any heddles.  Then while weaving, you push the shuttle underneath the first free floating string, and over the second on the far side, so that the shuttle always ends up going around the selvage strings on each side.

For an even nicer edge, you could use multiple selvage strings, but I confess, I haven’t figured out how to tie them into the harnesses yet to get some sort of tabby weave.  Having two extra harnesses would really come in handy here.